Chapter Outline
Subacromial Subdeltoid Bursa Injection
Biceps Tendon Sheath Injection
Suprascapular Ganglion/Nerve Treatment
Sternoclavicular Joint Injection
Coracoacromial Ligament Division
Distal Radioulnar Joint Injection
Carpometacarpal and Scapho-Trapezio-Trapezoid Joint Infections
Extensor Compartment 1: De Quervain’s
Lateral Cutaneous Nerve of Thigh Block
Adductor Origin Pubic Symphysis
Aspiration of Paediatric Hip Effusions
Tensor Fasciae Latae/Iliotibial Band
Trochanteric and Gluteal Bursa Injection
Piriformis Syndrome and Ischiofemoral Impingement
Achilles and Peri-Achilles Intervention
Achilles Dry Needle Autologous Blood and Platelet-Rich Plasma Injection
Volume Injection/Tendon Stripping
Tibialis Posterior Tendon Sheath Injection
MID- AND FOREFOOT INTERVENTION
Shoulder Intervention
Subacromial Subdeltoid Bursa Injection
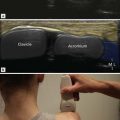
Patient and Probe Position
Ultrasound-guided injections provide more reliable and accurate needle placement which is particularly useful to assess the diagnostic response to local anaesthethic in patients with a poor response to a previous blind injection. Guidance is also useful to ensure accurate medication placement and in difficult cases such as obese and postoperative patients. A quick wipe with a sterile swab followed by the bursal injection allows the diagnostic examination to be combined with a guided injection with little prolongation of the overall examination time. The standard shoulder examination is with the patient seated and there is no need to change position prior to bursal injection.
Technique
Injection of the subacromial subdeltoid bursa is a commonly performed procedure. It is a large bursa and can be accessed by a variety of routes. For a blind approach, the most lateral and posterior margin of the acromion is palpated and the needle inserted 1 cm below this, directed upwards. There is a common misconception that if free lateral side-to-side movement of the needle tip is possible, it must be in the bursa. It can be readily demonstrated with ultrasound that side-to-side movement is possible whilst the needle is in subcutaneous fat.
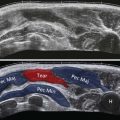
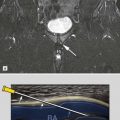
Ultrasound-guided injections are generally from a superolateral or anterior approach. A simple method is to place the probe in the same position as used to generate a coronal image of the cuff. From this position, the needle can approach either from above the probe or from below. For a right-handed operator, a left shoulder injection can be carried out by holding the needle in the right hand and the probe in the left hand, whilst the operator stands behind the seated patient. The reverse is true for the right shoulder. A needle approach from above has the advantage of not having the probe cable interfere with the needle ( Fig. 30.1 ). An alternative is to place the probe axially in an anterior position until clear visualization of the supraspinatus tendon and subacromial subdeltoid bursa is obtained. The skin is punctured lateral to the probe and the needle directed towards the bursa ( Fig. 30.2 ).


As long as the needle is kept in the same plane as the probe it can be followed accurately until it reaches the superficial surface of the supraspinatus tendon. It is important to be aware of the position of the bevel. Keeping the bevel upwards allows easy passage of the needle into the bursa. Once transgressed, rotating the needle through 180° places the needle fully within the space. A preliminary injection should demonstrate rapid flow of injected material away from the needle tip. Focal accumulation of injected fluid indicates incorrect positioning with the needle tip most commonly still lying on the deltoid side of the bursa. Gentle advancement of the needle with a slight hooking action, to direct the needle under the reflective bursal surface, is usually adequate to ensure placement within the bursa and the injection can be completed.
It is important to ensure that, when a bursa is injected, it can be seen to distend cleanly and that the injectate flows away easily from the needle tip.
The subacromial subdeltoid bursa is a large structure and can accommodate quite considerable volumes of fluid, although a total injection dose of more than 10 mL is usually not necessary. It is also useful to reexamine the bursal surface of the tendon following injection as the fluid introduced to the bursa may now demonstrate a bursal surface partial tear not previously appreciated.
Acromioclavicular Joint
Most shoulders are examined with the patient seated and there is no need to change position prior to injection. The needle is targeted on the rounded, poorly reflective joint space.
The acromioclavicular joint (ACJ) is easily identified in the coronal plane. It is useful to make an initial assessment to determine whether there is any subluxation present, as there is commonly a slight offset between the end of the clavicle and the acromion. The commonest situation is superior displacement of the end of the clavicle.
| If ACJ subluxation is present, the lateral aspect of the joint is open to an approach from the lateral side. If there is any joint effusion projected above the joint, this too can be accessed by a coronal approach from the lateral side. |

If there is no malalignment or effusion, the joint is best injected in the sagittal plane. This view is obtained by placing the probe, initially, medial to the joint and identifying the bony reflective margin of the clavicle. The probe is then moved laterally until the bony reflection disappears, indicating that the probe is now positioned directly over the joint ( Fig. 30.4 ). Further lateral movement brings the bony acromion into view. The probe is returned to overlie the joint either anteriorly or posteriorly and the needle is inserted at 90° to it in the sagittal plane. In this position it is easily seen entering into the joint. Reversing needle and transducer is equally effective. The ACJ is a rather small joint and is unlikely to accept more than 1–1.5 mL. It is therefore recommended that a low-volume syringe is used.

Glenohumeral Joint
Glenohumeral joint injection is indicated for patients undergoing MR arthrography, for local anaesthetic injection to diagnose indeterminate shoulder pain, to guide treatment of glenohumeral arthropathy and to distend the shoulder in patients with adhesive capsulitis. As most shoulder dislocations are anterior and the structures of interest also lie anteriorly, a posterior approach for MR arthrography is a good choice for reducing any extravasation or artifact, which may subsequently impede interpretation of the study.
A seated position with the operator standing behind the patient is straightforward. It is helpful for the patient to have some support, particularly during longer procedures such as distension arthography. The patient can sit against a raised examination couch and rest their head forward on some pillows. The arm of the side being injected can rest on the patient’s knee. Alternatively the patient may be placed in a semiprone position with the affected shoulder uppermost. It is useful to rest the ipsilateral arm over a bolster or pillow to maintain the semiprone position and optimize patient comfort.
The needle is most frequently introduced lateral to the ultrasound transducer and directed obliquely along a path to where the humeral head slopes towards the posterior labrum ( Fig. 30.5 ). Once the skin is punctured, the needle should be directed in the same long axis as the probe to ensure it stays in-view and reaches the correct part of the joint. Alternatively, a medial puncture can be used and directed to a point lateral to the labrum, but generally there is less room to manoeuvre with this approach, unless there is an effusion. Care should be taken not to aim for the glenoid margin itself as a large labrum may displace the needle posteriorly and prevent accurate placement into the joint. The intraarticular position of the needle can be confirmed by injecting a small amount of local anaesthetic. If the needle is correctly positioned, the injected local anaesthetic will disappear into the joint and no resistance will be felt. The arthrographic material or an antiinflammatory cocktail may then be injected. In the early stages of the injection, distension of the posterior glenohumeral joint recess is not evident. Towards the end of the glenohumeral joint injection, if a sufficiently large volume of fluid has been instilled, the posterior recess of the glenohumeral joint begins to distend and the posterior capsule is seen displacing away from the humeral head. Colour-flow Doppler can also show the injectate flowing way from the needle tip.

Distension Arthrogram
In patients undergoing distension arthrography some modifications to the above technique are necessary. The procedure is carried out for patients with adhesive capsulitis or frozen shoulder. It should be reserved for the later pain-free but stiff phase of the condition as distension during the acute, painful, inflammatory phase is less likely to be beneficial. The principle of the procedure is that restriction of motion is due to generalized joint contracture that can be improved by stretching the capsule. Stretching is achieved by injecting as high a volume as the patient can tolerate, up to 40–50 mL.
A mixture of local anaesthetic (20 mL), normal saline and corticosteroid is prepared and a second syringe containing 20 mL of normal saline is made ready. Once the joint is cannulated, a short flexible tube and a three-way connector tap are attached to the needle. If the patient tolerates the first 20 mL, the three-way tap is closed and a further filled syringe is attached. The use of the three-way tap prevents decompression of the joint as the syringes are being exchanged. The aim is to inject a volume beyond joint capacity in an effort to increase the volume within the joint and thus improve the patient’s range of motion. Either the patient’s tolerance will be reached or the capsule will rupture. Any sudden reduction in resistance should be noted as further injection will not be helpful and may even cause periarticular neural compression in the quadrilateral or spinoglenoid spaces.
Although much of the synovial and capsular thickening in adhesive capsulitis is in the anterior interval and the axillary recess, it is unlikely that either of these two areas are the ones that will rupture during the injection. More likely that capsular rupture occurs posteriorly in the areas of greatest weakness.
Calcium Barbotage
Calcific tendinopathy is a relatively common and painful disorder of the shoulder, which is due to the deposition of calcium hydroxyapatite crystals. Calcific tendinopathy is not always symptomatic and barbotage is usually reserved for patients who suffer acute pain as a result of crystal shedding into the subacromial subdeltoid bursa and/or for patients who are experiencing impingement related to the calcified mass that has not responded to bursal steroid injection.
Because barbotage may be painful, the examination is best carried out with the patient supine and positioned with the affected shoulder as near as possible to the edge of the examination couch ( Fig. 30.6 ). This allows the arm to be lowered below the level of the couch, thus inducing a degree of extension and internal rotation. The operator sits at a comfortable height at the level of the patient’s shoulder and preliminary examination identifies the easiest approach to the calcium. The general principles of barbotage have been described previously on page 343 . Aspiration/washout is continued until the aspirated material is clear or nearly clear and only the eggshell margin of the conglomerate remains. This is then fenestrated and the bursa injected with local anaesthetic and steroid.

Biceps Tendon Sheath Injection
Patients with anterior shoulder pain and tenderness overlying the proximal portion of the biceps tendon may benefit from guided injection into the biceps tendon sheath. It could be argued that the easiest way to inject the biceps tendon sheath is to carry out an injection into the glenohumeral joint itself. The direct route into the biceps tendon sheath is preferred as not only does it place the injection where it is most likely to help, but also because of the possibility that communication between the glenohumeral joint and biceps tendon sheath may be obstructed by synovial thickening in the anterior interval.
Patient positioning is the same as for the examination of the biceps tendon with the hand placed palm upwards on the patient’s knee. The sheath can be approached along either its short or its long axis. If fluid distension is present, a short access approach from the lateral side is easiest ( Fig. 30.7 ). For a long axis injection, a sagittal image of the tendon in the groove is obtained ( Fig. 30.8 ). A mark is placed at the upper end of the probe identifying the puncture point. The needle can be followed in-view as it runs parallel to the probe and into the sheath.


Tenodesis can be carried out under ultrasound guidance in patients who have anterior shoulder pain that is unresponsive to conservative measures where pain is felt to be due to a grossly attenuated biceps tendon. Ultrasound-guided biceps tenodesis is only recommended when all other conservative measures have failed and surgical division of the tendon is being considered in any case.
Suprascapular Ganglion/Nerve Treatment
A treatable cause of infraspinatus muscle atrophy is compression of the suprascapular nerve within the spinoglenoid notch by a ganglion cyst. This is most commonly associated with posterosuperior impingement syndrome. A tear is present in the posterosuperior labrum leading to the formation of a ganglion. This passes in a posterior and medial direction until it reaches the notch, where it can expand and compress the suprascapular nerve.
The technique for ganglion aspiration has been described on page 344 . An axial approach is employed for the spinoglenoid notch. The probe is held in the axial plane over the ganglion. A medial sided puncture is best as this gives the best opportunity for passing the needle along the neck once the main ganglion has been satisfactorily aspirated ( Fig. 30.9 ). Neural injection can also be carried out for chronic pain. Using Doppler is occasionally helpful as it may help visualize the adjacent suprascapular artery. The vessel is small, however, and in many cases its pulsation per se renders it easier to see than any Doppler signal it generates. If anaesthetic injection is positive, radioablation may provide longer-term relief.

Sternoclavicular Joint Injection
The principles for injecting the sternoclavicular joint are similar to those for the ACJ. The medial clavicle usually stands slightly proud of the underlying sternum, creating an access to the joint from the medial side. Once again, the presence of joint effusion or synovial thickening facilitates this further. The probe is held in the axial plane overlying the joint ( Fig. 30.10 ). It is moved laterally until the joint lies at the medial margin of the image. The skin is marked at the medial end of the probe representing the puncture point. As usual, a small-volume syringe is used for small joints.

Coracoacromial Ligament Division
Division of the coracoacromial ligament (CAL) is often carried out as part of a surgical subacromial decompression procedure, although recently the need to do this has been questioned. There have been some reports on dividing this ligament under ultrasound guidance. A simple green needle can be used to create multiple punctures at the same point in the ligament leading to its failure. This is a similar technique to biceps tenodesis.
Long Thoracic Nerve Block
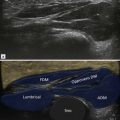
The long thoracic nerve can be located approximately 5 cm anterior to the lateral margin of the scapula in the midaxillary line. It is quite superficial, overlying the serratus anterior muscle in the midaxillary line ( Fig. 30.11 ). It is often accompanied by a small artery that can help to locate it. There is another nerve that runs parallel to the long thoracic nerve, but more posteriorly. This is the thoracodorsal nerve.

Elbow Intervention
Tennis Elbow
The usual indication for injecting the common extensor origin is recalcitrant tennis elbow. Several interventional techniques have been described; the use of corticosteroid injection has now largely given way to dry needle therapy, which may or may not be combined with autologous blood injection or platelet-rich plasma (PRP).
Two positions can be used, one with the patient seated opposite ( Fig. 30.12 ), the other with the patient recumbent with the affected forearm flexed across their abdomen ( Fig. 30.13 ). It is generally recommended that dry needling procedure is carried out as close to the long axis of the tendon fibres as possible. The target is the most tendinopathic area, particularly those showing areas of mucoid necrosis and hypervascularity. The probe is held in the coronal plane overlying the area to be treated. A puncture point is marked on the patient’s skin distal to the probe. If a small footprint probe is not available, care should be taken to ensure that the probe is moved a little more proximally, so that the proximal puncture point will be in the correct location and not too distal to the target area. Local anaesthetic is infiltrated along the outer epimyseum/paratenon of the common origin. Once anaesthetized, the needle is directed into the tendon and towards the bony origin. The general principles of dry needle therapy have already been described.


There is a risk of tendon rupture following dry needling therapy that needs to be actively managed. It is important that there is a planned rehabilitation programme under the care of an appropriate specialist. This should be individually tailored to the needs of the patient and the degree of tendon damage.
Common Flexor Origin
The rationale for ultrasound-guided therapy of the common flexor origin is similar to its extensor counterpart. As has been previously noted, the common flexor origin is more fleshy than the extensor origin. A recumbent position is used and is especially good for nervous patients. The arm is abducted exposing the common flexor origin ( Fig. 30.14 ). The approach is otherwise similar to the common extensor origin technique described earlier ( Fig. 30.15 ).


Elbow Joint
The elbow joint can be injected diagnostically as part of an MR arthrogram. Saline arthrosonography can also be used to detect radiographically occult osseous and cartilaginous loose bodies within the joint. Another common indication is to treat elbow arthropathy.
The patient may be seated with the palm on the couch, with the elbow flexed at 90° and internally rotated. The forearm is perpendicular to the examination table in the so-called ‘crab position’ ( Fig. 30.16 ). Alternatively the patient can be recumbent with their forearm positioned across their chest, either supine or decubitus ( Fig. 30.17 ). All of these positions expose the posterior joint to easy injection. In children with a suspected diagnosis of septic arthritis, the child sits facing the mother on her lap with their arms wrapped around the mother’s side. A nurse or assistant can stand behind the mother and hold the child’s hands to prevent excessive movement. This position allows access to the posterior aspect of the elbow joint for examination and aspiration.


The posterior joint space can be punctured in either the long or the short axis. The short axis is the easiest, particularly if there is an effusion ( Fig. 30.17 ). A posterolateral approach into the posterior joint space is used. The ulnar nerve posteromedially and the triceps tendon centrally should be identified and avoided. If a posterolateral approach is not possible, a posteromedial approach can be used if the ulnar nerve is safely identified. Once cannulation has been achieved it is often helpful to move the probe to visualize the olecranon fossa prior to injecting the joint. This allows easy confirmation of joint filling and allows the movement of suspected loose bodies, seen as mobile echogenic foci, to be observed.
An alternative approach in adults is through the radiocapitellar joint, which is palpated as a soft spot on the lateral aspect of the flexed elbow. Another approach in adults is just lateral to the olecranon process where a small groove can be palpated between the olecranon and the humerus.
Interosseous Nerve Block
The anterior interosseous nerve (AIN) is a branch of the median nerve, arising close to where the nerve passes through the two heads of pronator teres. The posterior interosseous nerve (PIN) is a branch of the radial nerve and reaches the posterior compartment of the forearm by passing between the two heads of the supinator muscle. Injection of the radial tunnel per se is not a common procedure but may be indicated in patients with symptoms suggesting isolated PIN compression. Compression may be due to a fibrous band at the proximal margin of the supinator muscle or any mass. The rationale for injection therapy in the absence of an identifiable cause is unclear, but it has been argued that corticosteroid injection dampens any inflammatory response and breaks down adhesions that may be present between the nerve and surrounding structures. The approach to the radial tunnel is from the lateral side through the brachioradialis muscle.
If injection around both interosseous nerves is required, a more distal puncture point on the extensor aspect of the forearm is chosen ( Fig. 30.18 ). Within the forearm, the nerves can be found on either side of the interosseous membrane. The AIN lies on the membrane itself but the PIN is separated from it by the deep extensor muscle group. Locating both nerves in a single image is possible in the majority of patients and injection can be carried out with the probe held in the axial plane. An imaginary line is drawn between the two nerves and back projected to the extensor skin surface. This is the puncture point that allows both AIN and PIN to be injected via a single puncture.

Wrist Intervention
Distal Radioulnar Joint Injection
Indications include distal radioulnar joint (DRUJ) arthropathy or as a component of a wrist arthrography. A dorsal approach is used. The patient can either be seated opposite the operator with the palm of the hand placed on the examination table or can be positioned prone with the arm above the head, again with the palm of the hand on the table. The latter is helpful in avoiding syncopal episodes, particularly in younger patients.
The probe is positioned in the axial plane over the DRUJ that is identified by the characteristic rounded appearance of the distal ulna ( Fig. 30.19 ). The easiest approach is ulnar to extensor compartments five. The needle is followed in-view until its tip encounters the dorsal aspect of the ulnar head. Unless there is communication with the radiocarpal joint (RCJ), 2–3 mL is sufficient to fill this small joint.

Radiocarpal Joint
A dorsal approach, radial to extensor compartment four, allows easy access to the joint ( Fig. 30.20 ). The seated patient is positioned opposite the operator with their forearm resting on the examination table in a pronated position. A rolled-up towel or pad may be positioned beneath the wrist to allow slight wrist flexion. The RCJ generally accepts 5 mL.

Carpometacarpal and Scapho-Trapezio-Trapezoid Joint Infections
The patient is positioned with the ulnar border of the hand on the examination couch. If both sides are to be injected, a praying position can be employed ( Fig. 30.21 ). A short footprint probe is placed along the radial aspect at the base of the thumb and the scapho-trapezio-trapezoid (STT) and first carpometacarpal joint (CMCJ) identified. The position of the radial artery should be noted. An out-of-view approach is used with the puncture point at the midpoint of the probe opposite the side of the radial nerve and extensor compartment one tendons. The two joints lie close together, separated by a thin septum. If necessary, either joint can be injected depending on involvement. An alternative method to inject the first CMCJ is through the thenar eminence with the probe held over the joint in the sagittal plane. For this approach an in-view method is used ( Fig. 30.22 ).