(1)
Institute of Cellular Biology and Pathology, 1st Faculty of Medicine, Charles University in Prague, Prague, Czech Republic
(2)
Institute of Molecular and Translational Medicine, Faculty of Medicine, Palacký University, Olomouc, Czech Republic
Abstract
In this chapter, the basic principles and protocols of the electron microscopical detections of specific DNA and RNA sequences are described. We focused primarily on a comparison of various methods of electron microscopy in situ hybridization (EM-ISH) with respect to their sensitivity and the structural preservation of the sample with the aim of helping the readers select the appropriate hybridization protocol. As the post-embedding EM-ISH most frequently represents the optimal choice, the protocol for the post-embedding EM-ISH approach is described in detail. Concurrently, the alternative methods based on the enzymatic synthesis of the labeled nucleic acids chains that can be used for the detection of DNA or RNA molecules in situ are mentioned. In this respect, the technique enabling the enzymatic detection of the polyadenylated RNA sequences is described in detail.
Key words
Electron microscopyDouble- and single-stranded DNA and RNAIn situ hybridizationPost-embeddingPre-embeddingCryo-sectionsHigh-pressure freezingFreeze substitutionDušan Cmarko and Anna Ligasová contributed equally to this work
1 Introduction
The localization of DNA and RNA molecules is a frequent subject of interest of many light (LM) and electron microscopy (EM) studies. The aim of such localizations is usually the detection of the overall cellular DNA or RNA or the detection of selected sequences of nucleic acids. The special kind of detections of nucleic acids represents the methods of the detection of newly replicated DNA or newly transcribed, nascent RNA. The methods enumerated became the essential for the analysis of the basic cellular processes. They are also widely used as diagnostic tools for the detection of changes in the chromosomal arrangement or the detection of viral infections in host cells.
Although EM detections of DNA and RNA molecules are usually more technically demanding and time-consuming than their LM variants, in many cases they provide original findings unattainable by LM approaches as the application of EM offers typically a resolving power about two orders of magnitude superior to LM.
The most frequently used method for the detection of specific nucleic acid sequences in the cellular environment is in situ hybridization (ISH). ISH takes advantage of the specific pairing of complementary nucleic acid molecules through hydrogen bonds formed between bases attached to the sugar–phosphate backbone. The first LM detection of nucleic acid sequences by complementary radioactive probes was performed by Pardue and Gall [1] and John et al. [2]. Later on, radioactive ISH was adopted for electron microscopy [3, 4]. However, only a relatively low spatial resolution could be achieved, and a long exposure time of autoradiograms was necessary. Moreover, the use of radioactive probes required the implication of safety hazard regulations. All these obstacles were overcome by the introduction of non-isotopic labels and their application in electron microscopy-ISH (EM-ISH). The use of non-isotopic probes also enables simultaneous detections of more than one nucleic acid sequence or the simultaneous detection of nucleic acid and protein targets. As a consequence, ISH, including its electron microscopy variant, has become an essential method in a number of fields of biomedical research (recently reviewed in [5–7]).
Another, however, much less used variant for the detection of specific DNA or RNA sequences are approaches based on the enzymatic labeling in situ [8–10]. As primers are used for the synthesis of the complementary labeled DNA strand, it is sometimes referred to as PRINS (primed in situ hybridization). In this chapter, we have described the protocol of the detection of polyadenylated RNA sequences by means of reverse transcription [8]. The described protocol is a very fast variant that does not need any special hybridization step and at the same time manifests a high signal/noise ratio (see Note 1).
In the case of EM-ISH, it is necessary to assess the effect of various steps used during sample preparation such as the use of proteases, nucleases, alkali solutions, or formamide that have various destructive effects on the cellular structure, and it is necessary to select the most suitable approach for the concrete study. The first issue that must be resolved is if the pre-embedding or post-embedding approach is expedient (see Fig. 1). During the pre-embedding when the LM procedure of the cell processing is mimicked, cultured cells or vibratome sections are fixed and permeabilized, and detection is performed; the samples are postfixed, embedded in resin, and thin-sectioned [11–18]. A major drawback of pre-embedding techniques is the need for permeabilization treatment before hybridization. When weak permeabilization results in the low penetration of probes and antibodies into cells, especially into vibratome sections, stronger permeabilization results in a more extensive extraction of cellular components and in the loss of ultrastructural details. In contrast to the lower preservation of the cell ultrastructure, the pre-embedding approach could benefit from the fact that no embedding material is used before detection so that the probe can penetrate into the cell structures. Consequently, the labeling is, in principle, found in the entire volume of the section, and therefore, a more intense signal is usually observed. In this respect, the pre-embedding may eventually allow the detection of unique genes. This approach can be therefore recommended only in the case when the detection of nucleic acids does not require too many steps leading to the destruction of the cellular structure and when the primary aim is to obtain a high signal. To summarize, however, the pre-embedding approaches were never as widely used as detection on the sections (the post-embedding method or techniques based on frozen sections).
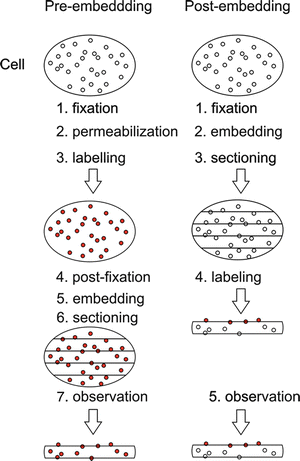

Fig. 1
Schematic view of pre-embedding and post-embedding labeling. Red dots represent labeled molecules. Empty circles represent searched molecules
Using the post-embedding approach (see also Note 2), the tissue or cells are fixed, embedded into resin, and sectioned, and detection is performed on the surface of the prepared ultrathin sections [19–42]. The use of resin sections for ISH reactions, even though giving rise to a relatively low hybridization efficiency restricted by the limited number of target sites when compared to ISH reactions performed in the whole volume of permeabilized biological material, has several advantages. Besides the higher preservation of the cell structure thanks to the degree of resin polymerization, it is also the fact that, during the sectioning of the sample or its preparation, the otherwise masked parts of the DNA strands are revealed. It allows non-denaturing (in the case of RNA–RNA hybridization) or strongly reduced denaturing conditions (when it is RNA–DNA or DNA–DNA hybridization) and avoids harsh treatment leading to deterioration on the cellular fine structure. The post-embedding detection on ultrathin resin sections dominates the current high-resolution EM-ISH methods. This is especially true in the case of locally abundant nucleic acids, when good ultrastructural preservation is required; post-embedding on ultrathin acrylic sections represents the common choice. Moreover, this approach includes also the variant that allows the quick immobilization of the molecules of the fixed sample by means of a freeze fixation followed by the cryosubstitution of the water by solvents that can contain a small concentration of chemical fixatives, followed by embedding.
Besides post-embedding and pre-embedding labeling, the relatively widely used EM approach for the detection of nucleic acids is a technique based on the freezing of a fixed and cryoprotected sample that is afterwards sectioned, and detection is performed on the thawed sections [5, 42–48]. The sections are then usually “embedded” in a thin layer of special water-soluble material (e.g., methylcellulose) that preserves the section structure during drying and observation. The accessibility of cell structures is usually better than in the case of sections embedded in hydrophilic resins. Some results even support the possibility that probes penetrate into a volume of cryo-sections [49]. However, the conditions used during ISH could result in a much higher damage of ultrastructure than in resin sections. This is also a reason why ultrathin cryo-sections are not suitable for the detection of DNA sequences that requires a harsh denaturation step.
Each of the mentioned techniques has its advantages and disadvantages. Generally, the development of a protocol represents a search for a compromise between cell ultrastructural preservation and detection sensitivity. In this respect, the final choice of methods depends on the specific aim of the study to be performed (see Note 3).
Here, we will focus on probably the most frequently used approach: the post-embedding detection of sequences of nucleic acids in acrylic resin sections. We also provide a protocol for cryofixation and freeze substitution that provides good results for the detection of nucleic acids. Post-embedding detection has been successfully used to localize ribosomal RNA and DNA, viral RNA and DNA, as well as high copy cellular messenger (m)RNAs or polyadenylated RNA. This most widely used technique provides, in our opinion, a very good compromise between resolution, ultrastructure preservation, and intensity of the signal.
2 Materials
2.1 Fixatives
1.
1 M piperazine-N,N′-bis(2-ethanesulfonic acid) (PIPES): Mix the PIPES with distilled water (three-fourths of the final volume), adjust the pH by adding concentrated 5 N sodium hydroxide to achieve a pH of 6.95–7.3, and fill with distilled water to the final volume.
2.
4 % formaldehyde and 0.25 % glutaraldehyde in a 100 mM PIPES buffer, pH 7.3 (working solution): Mix the paraformaldehyde with the distilled water (one-half of the final fixative volume) in an Erlenmeyer flask. Heat to 60 °C on a stir plate. When moisture forms on the sides of the flask, add sodium hydroxide (drops of 1 N solution), and stir until the solution clears. Cool the solution under the faucet. Filter, and then add glutaraldehyde (research grade) and the PIPES buffer (1 M, pH 7.3). Adjust the pH if necessary and fill with distilled water to the final volume. Caution: Formaldehyde and glutaraldehyde are toxic. Use gloves, and prepare and use fixatives under a fume hood.
3.
4 % formaldehyde and 0.25 % glutaraldehyde in 100 mM of the PIPES buffer with heptane, pH 7.3 (working solution): Combine the formaldehyde–glutaraldehyde fixative (prepared as described above) with an equal volume of n-heptane, shake for 1 min, and then leave to stand until the phases are separated. The heptane (the upper) phase is carefully decanted and immediately used for fixation. Caution: Formaldehyde and glutaraldehyde are toxic. Use gloves, and prepare and use fixatives under a fume hood.
4.
8 % formaldehyde in 100 mM PIPES, pH 6.95 (working solution): Mix the paraformaldehyde with distilled water (three-fourths of the final volume) in an Erlenmeyer flask. Heat to 60 °C on a stir plate. When moisture forms on the sides of the flask, add sodium hydroxide (drops of 1 N solution), and stir until the solution clears. Cool the solution under the faucet. Filter, and then add the PIPES buffer (1 M, pH 6.95). Adjust the pH if necessary and fill with distilled water to the final volume. Caution: Formaldehyde is toxic. Use gloves, and prepare and use fixatives under a fume hood.
2.2 Processing of Cell Samples: Embedding
1.
10× phosphate buffered saline (PBS; stock solution): Prepare 1,370 mM NaCl, 30 mM KCl, 160 mM Na2HPO4, and 20 mM KH2PO4. Adjust pH to 7.4 with sodium hydroxide (10 N). Sterilize in an autoclave. Store at room temperature (RT); after opening store the bottle in a refrigerator.
2.
2 % agarose: Dissolve the low-melting agarose in 1× PBS at 37 °C. Alternatively, 10 % gelatin can be used: dissolve the gelatin in 1× PBS at 40 °C. Store at −20 °C.
3.
Dehydrating solutions: Ethanol or methanol is usually used for dehydration. For detailed information, see the protocol of the manufacturer of the embedding medium. Caution: Methanol is toxic. Use gloves. If methanol is used, perform the dehydration step under a fume hood.
4.
Embedding medium (e.g., LR White or Lowicryl): Embedding media are toxic. Use gloves. Embed the samples under a fume hood.
5.
Gelatin capsules.
2.3 High-Pressure Freezing and Freeze Substitution
1.
Cibacron Blue.
2.
High-pressure freezer (e.g., Leica EM PACT).
3.
Machine for freeze substitution (e.g., Leica ASF machine).
4.
Dehydrated acetone.
5.
20 % uranyl acetate in methanol (stock solution). Store at −20 °C.
6.
Acetone + 0.25 % glutaraldehyde + 0.1 % uranyl acetate (working solution, freshly prepared).
7.
Lowicryl HM20.
8.
Special plastic capsules (Leica reagent bath and Leica flow-through rings).
9.
Gelatin capsules.
2.4 Sectioning
1.
Ultramicrotome.
2.
Diamond or glass knife.
3.
Coverslips coated with poly-d-lysine.
4.
Gold or nickel EM grids covered with plastic foil. Any standard procedure for their preparation can be used. If nickel grids are used, antimagnetic tweezers are recommended.
2.5 ISH Probes and Primer for PRINS
Four types of probes labeled with biotin or digoxigenin are used:
1.
Double-stranded DNA probes.
2.
Single-stranded DNA probes.
3.
Oligonucleotide probes.
4.
Single-stranded RNA probes.
5.
Primer: oligo dT15 (0.5 μg/μL, stock solution).
2.6 Hybridization
1.
20× saline–sodium citrate buffer (SSC; stock solution): Prepare 3 M sodium chloride plus 0.3 M sodium citrate. Adjust the pH to 7 with sodium hydroxide (10 N). Sterilize in an autoclave. Store at RT; store the bottle in a refrigerator after opening.
2.
10 mg/mL RNA stock solution: Dissolve yeast tRNA in diethylpyrocarbonate-treated water. Store at −20 °C.
3.
10 mg/mL DNA stock solution: Dissolve herring sperm, salmon sperm, or Escherichia coli DNA in sterile water. Store at −20 °C.
4.
10 mg/mL RNase A stock solution: Dissolve in sterile water. Store at −20 °C. Dilute in 10 mM Tris–HCl, pH 7.4 before use.
5.
10 mg/mL proteinase K, stock solution: Dissolve in sterile water. Store at −20 °C. Dilute in 20 mM Tris–HCl, 2 mM CaCl2 buffer, pH 7.6 before use.
6.
1 mg/mL DNase I stock solution: Dissolve in sterile RNase-free water. Store at −20 °C. RNase-free DNase should be used. Dilute in 1× DNase I buffer (see item 9).
7.
100–400 U/μL S1 nuclease stock solution: Dilute in 1× S1 nuclease buffer (see item 10).
8.
Deionized formamide: Add 5 g of ion exchange resin AG501-X8 (Bio-Rad) to 100 mL of formamide. Shake for 30 min. Filter it. Store at −20 °C in the dark. Caution: Formamide is very toxic. Use gloves during manipulation and work under a fume hood.
9.
10× DNase I buffer, stock solution: 100 mM Tris–HCl, 25 mM MgCl2, 5 mM CaCl2, pH 7.6. Store at −20 °C.
10.
10× S1 nuclease buffer, stock solution: 330 mM sodium citrate, 500 mM sodium chloride, and 300 mM zinc sulfate, pH 7.5.
11.
50 % dextran sulfate, stock solution: Dissolve dextran sulfate in distilled water. Store at −20 °C.
2.7 PRINS
1.
5× AMV reverse transcriptase buffer (stock solution): 250 mM Tris–HCl, 250 mM KCl, 50 mM MgCl2, 2.5 mM spermidine, 50 mM dithiothreitol (DTT).
2.
AMV reverse transcriptase (10 U/μL, stock solution).
3.
RNasin (40 U/μL, stock solution).
4.
Mixture of deoxynucleotides (10 mM, stock solution): 2′-deoxyadenosine 5′-triphosphate (dATP), 2′-deoxycytidine 5′-triphosphate (dCTP), and 2′-deoxyguanosine 5′-triphosphate (dGTP).
5.
5-bromo-2′-deoxyuridine 5′-triphosphate (BrdUTP; 1 mM, stock solution).
6.
Oligonucleotide: oligo dT15 (0.5 μg/μL, stock solution).
2.8 Labeling
1.
1× PBS:BSA (1 %, working solution): Dissolve BSA in 1× PBS. Sterilize by filtering using a 0.22 μm filter. Store at −20 °C.
2.
Anti-biotin, anti-digoxigenin, and anti-BrdU antibodies.
3.
Colloidal gold antibody complexes. The secondary antibodies are raised against anti-biotin or anti-digoxigenin or anti-BrdU antibodies and coupled to colloidal gold particles.
3 Methods
3.1 From Fixation to Ultrathin Sections
3.1.1 Conventional Fixation and Embedding
Primary fixation is the first and a very important step of any EM-ISH procedure (see Note 4). A freshly prepared fixation solution should be used.
1.
Prepare a fixation solution containing 4 % formaldehyde and 0.25 % glutaraldehyde.
2.
Fix small pieces of tissue or cultured cells at 4 °C.
Tissue: Sink the pieces of tissue to the bottom of the fixation solution. If this method does not work, use the vacuum to remove the air bubbles. They can prevent the penetration of the fixative into the tissue. Fix for 4 h.
Cells in suspension: Centrifuge at 500 × g in a Falcon tube for 5 min and remove the medium. Overlay with a fixative and resuspend the cells. 2 h is usually sufficient for cell fixation.
Cells cultured in monolayer: Remove the medium before fixation. Fix immediately in a fixative. 2 h usually is sufficient for cell fixation.
If fixative penetration is a major problem, e.g., in plant tissue or animal embryos owing to the presence of cell walls and hydrophobic waxy cuticles, you can use the phase-partition fixation method [26, 50]. It accelerates fixative penetration. Immerse the material in the heptane phase. Fix at RT for 10 min. Remove the material from the heptane and place it in a formaldehyde/glutaraldehyde fixative for a further 4 h at RT.
3.
Wash three times in 1× PBS.
4.
Prepare small pieces of the material.
Tissue: Dissect tissue into small cubes (less than 1 mm3).
Cells in suspension: Transfer cell suspension in an Eppendorf tube. Centrifuge at 500 × g for 5 min. Remove 1× PBS, leave around 200 μL of 1× PBS, and resuspend the cells. Heat the agarose (2 %) or gelatin (10 %) and keep it warm (37 °C). Overlay the pellet of cells in an Eppendorf tube with 200 μL of agarose or gelatin, and mix the content of the tube by gentle pipetting on and off. Cut the end of the pipet tip to reduce the shearing forces before mixing. The cells should be evenly distributed throughout the agarose or gelatin. Centrifuge the cell suspension at 500 × g for 5 min. Carefully remove the excess agarose or gelatin and chill the cell pellet at 4 °C. If gelatin is used, fix the cell pellet with 4 % formaldehyde and 0.25 % glutaraldehyde for 20 min at 4 °C. Afterwards, wash the cells with 1× PBS several times and cut the tip of the tube. Remove the embedded cells from the tip and cut them in small pieces (less than 1 mm3).
Cells cultured in monolayer: Remove almost all 1× PBS, leave around 2 mL of 1× PBS, and scrape the cells off using a cell scraper. Transfer the cell suspension in the Falcon tube and centrifuge at 500 × g for 5 min. Remove 1× PBS, leave around 200 μL of 1× PBS, and resuspend the cells. Then use the same protocol as for cells in suspension.
3.1.2 High-Pressure Freezing and Freeze Substitution
As an alternative to chemical fixation, high-pressure freezing and freeze substitution can be used. Perform the following steps.
1.
Freeze the samples using a high-pressure freezer.
Cells in monolayer: Remove the culture medium from cells cultured in a Petri dish. Replace it by a CO2-independent medium supplemented with 20 % bovine serum albumin. Remove the CO2-independent medium, leave around 200–300 μL of the medium in the Petri dish, and scrape the cells off. Transfer the cell suspension to an Eppendorf tube and add 1 μL of Cibacron Blue. Mix. Transfer 1 μL of the cell suspension prepared in this way to the membrane carrier, and freeze the cells in the high-pressure freezer. The time interval between the removal of the cells from the incubator and freezing should be kept at a minimum (always less than 10 min).
Cells in suspension: Centrifuge the cells at 500 × g, 37 °C for 5 min. Remove the culture medium and add the CO2-independent medium supplemented with 20 % bovine serum albumin. Centrifuge the cells again and remove the excess CO2-independent medium, leave around 200–300 μL of the medium. Resuspend the cells by gentle pipetting on and off, add 1 μL of Cibacron Blue, and mix. Transfer 1 μL of the cell suspension prepared in such way to the membrane carrier, and freeze the cells in the high-pressure freezer. The time interval between the removal of the cells from the incubator and freezing should be kept at a minimum (always less than 10 min).
Tissue: Use the microbiopsy transfer system to take a small sample of the tissue and freeze it according to the manufacturer’s instructions.
2.
Prepare a substitution solution containing dehydrated acetone, 0.25 % glutaraldehyde, and 0.1 % uranyl acetate (see Note 9). Precool the freeze substitution machine and the substitution solution to −90 °C.
3.


Transfer the frozen samples in carriers under liquid nitrogen to the freeze substitution machine. The following protocol is an example of a substitution protocol for cells:
Transfer the samples to the substitution solution. The time for freeze substitution is 48 h at −90 °C. Raise the temperature at a rate of 10 °C/h to −40 °C. After 12 h, transfer the cells into special plastic capsules filled with cold acetone. Infiltrate the samples at −40 °C with the cold mixtures of acetone and Lowicryl HM20 and pure Lowicryl HM20. Use the following mixtures: acetone and Lowicryl HM20: 2:1 for 30 min; 1:1 for 1 h; 1:2 for 2 h, pure Lowicryl HM20 for 2 h. Exchange Lowicryl HM20 three times to remove the residue of acetone. Replace Lowicryl HM20 by the freshly prepared one. Polymerase the samples by UV at −40 °C for 24 h, raise the temperature at a rate of 10 °C/h to 20 °C, and polymerase the samples by UV at 20 °C for 48 h (see also ref. 8).
Stay updated, free articles. Join our Telegram channel

Full access? Get Clinical Tree


