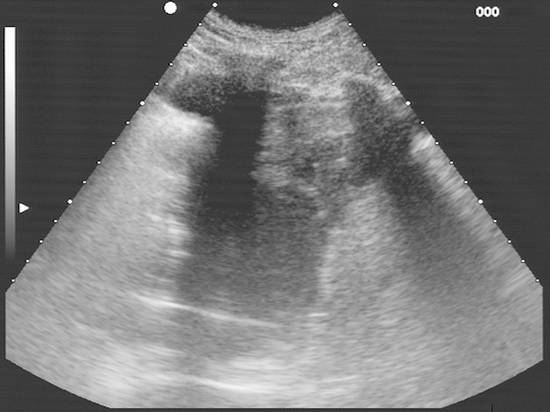
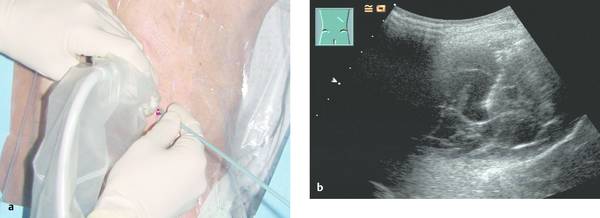
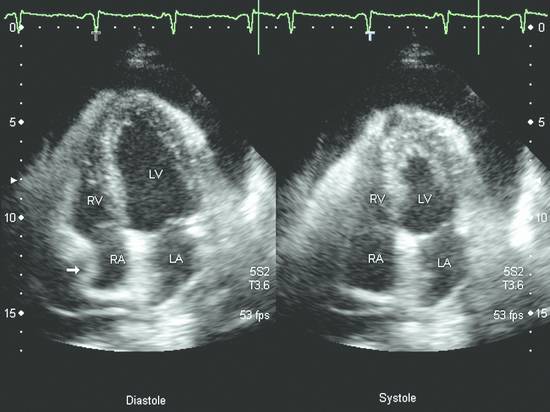
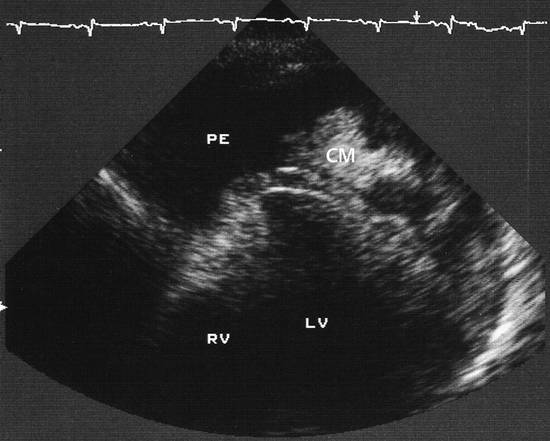
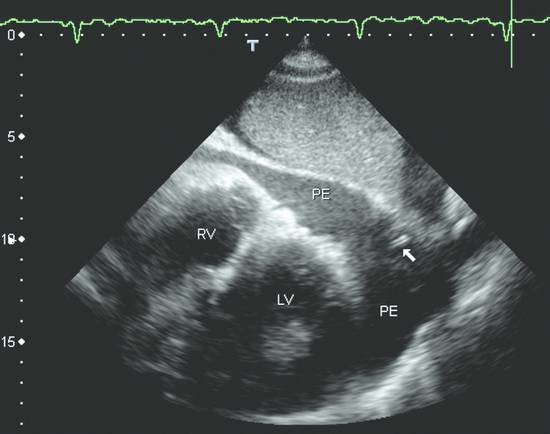
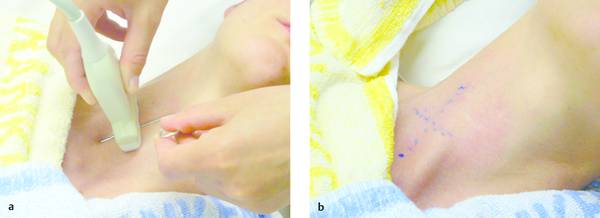
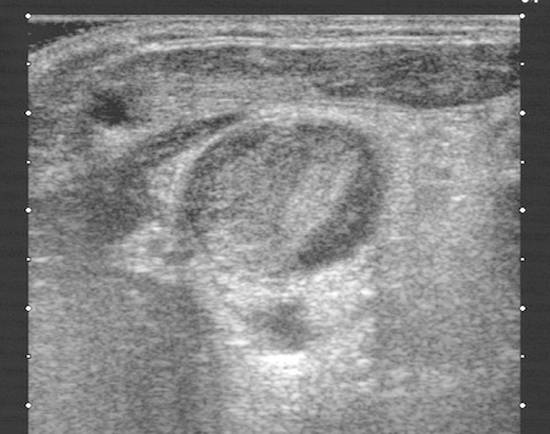
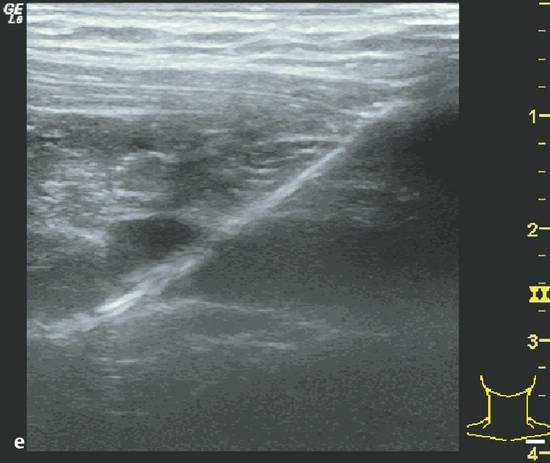
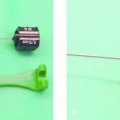
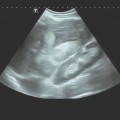
Emergency Interventions Ultrasonography has assumed an increasingly important role in emergency and critical care medicine in recent years. After the history and physical examination, ultrasound is the method of choice for the investigation of a medical acute abdomen.1 In surgical emergencies it is used in the FAST protocol (focused assessment with sonography for trauma) within the framework of ATLS (advanced trauma life support) and is practiced under a number of other acronyms (FASTER, p-FAST, EFAST, etc.). Ultrasound is used in emergency settings for the rapid detection of free fluid in the abdomen, pleural space, or pericardium. Abdominal ultrasound provides a specificity >90% with a variable sensitivity ranging from 31 to 83%.2–6 FAST has not yet demonstrated a survival benefit in trauma patients,7 although its primary use in an algorithm with secondary CT is advocated in equivocal cases.8 Ultrasound provides a technology that “comes to the patient” in critical care situations. Diagnostic uses are paramount, with one study finding that ultrasound-guided interventions accounted for just 0.25% of all indications.9 Ultrasound had immediate diagnostic or therapeutic implications in 5.5% of cases and short-term implications in another 20%. Ultrasound is fast, mobile, economical, and highly sensitive for the detection of free fluids. Consequently, percutaneous interventions should be integrated into the examination: Diagnostic interventions, followed if necessary by immediate therapeutic interventions, in patients with suspected hemorrhage (hemothorax, hemoperitoneum), empyemas, or abscesses Drainage procedures in life-threatening situations (pericardial tamponade, tension pneumothorax) Establishing access to central and peripheral veins and arteries Several international ultrasound societies have proposed or instituted multilevel training programs for emergency sonography. All of these programs include ultrasound-guided interventions in the initial training phase.10–13 A number of urgent indications for interventional procedures are recognized in emergency and critical care medicine. They are summarized in ▶ Table 30.1. Almost all ultrasound-guided interventions in emergency medicine are also practiced in “routine” situations. In this chapter, accordingly, we shall focus our attention on specific issues relating to emergency settings and will otherwise refer the reader to chapters dealing with specific body regions. Ultrasound can also be used for control purposes before or after critical care interventions: Studies indicate that imaging the neck before a percutaneous dilatational tracheostomy warrants a change of puncture site in 24 to 36% of cases. The rate of major complications can be reduced from 4% to 0%, while the rate of minor complications remains approximately the same (0.7% versus 1%) and the rate of cuff perforations falls from 10% to 0.9%. Ultrasound guidance can also prevent placing the tracheostomy tube too high.14–16 The correct placement of a conventionally placed endotracheal tube can be reliably confirmed by the “sliding lung sign,” or relative sliding of the visceral and parietal pleura seen at ultrasound. This sign is absent over a nonventilated lung.17,18 Ultrasound can reliably detect the presence of a feeding tube for enteral nutrition in the small intestine. This method appears to be particularly useful in children as a means of avoiding radiation exposure.19,20 Possible alternatives (CT-guided intervention, surgical intervention) should also be considered in emergencies. No comparative studies have yet been done on the different options that are available in emergency settings. Fewer contraindications exist in emergencies, and it is important to make an individual risk assessment in a patient with impaired coagulation, for example. Physicians still have the obligation to disclose necessary information, except in the case of an acutely life-threatening, unstable situation or an unconscious patient. The timing and scope of the disclosure depend on the severity and urgency of the intervention. Two basic contraindications remain: Refusal of informed consent Lack of practical implications “Bedside ultrasound” and “point-of-care ultrasound” are terms that describe the capability to examine patients almost anywhere using portable devices. The advantage of portable scanners is that they can be delivered quickly to the patient and can even be taken to accident sites by rescue personnel.21 Many authors stress the time gained by use of mobile devices in the hospital—which usually means that ultrasound machines are absent at strategically important sites like the emergency room and intensive care unit. In principle, ultrasound equipment should be available that can image and document relevant structures with optimum quality in every situation. Portable machines are inferior to high-end systems in terms of image quality.22,23 No comparative prospective studies have yet been done on interventions with portable ultrasound scanners. One small series (n = 12) reported good results with hand-carried ultrasound-guided pericardiocentesis and thoracentesis.24 In our experience, the success of an ultrasound-guided intervention depends to a substantial degree on the familiarity of the operator with the machine, regardless of its portability. Superficial interventions in arteries and veins are guided with a 7.5- to 10-MHz linear transducer, while a standard curved-array “abdominal” transducer is used for paracentesis. We also use a high-frequency linear transducer for the aspiration of small pleural effusions. A limited array of interventional materials and supplies are used in emergency settings (▶ Table 30.2). Procedures are simplified by using as few different materials as possible to solve a maximum number of problems. Practice Ultrasound machines and interventional equipment belong at the emergency treatment site. Physicians on duty must be familiar with the materials and equipment. The principles of antisepsis are reviewed in Chapter ▶ 8. The patient’s skin is shaved if necessary and prepared with an alcohol solution. The transducer must be thoroughly cleaned and disinfected before use (e.g., with alcohol- and aldehyde-free wipes). Since the operator will not touch the needle or the patient’s skin in a diagnostic intervention, it is unnecessary to wear sterile gloves. Disposable gloves are worn, however, to prevent contamination with the patient’s blood.25 Following use, the transducer is cleaned with a (nonsterile) towel and again disinfected with antiseptic wipes. Vascular interventions and the drainage of abscesses and effusions must be performed under sterile conditions. Sterile drapes, gloves, gown, mask, cap, and sterile device covers (for transducer and keyboard) are essential, just as in an operating room. Emergency ultrasonography takes several minutes of calm, steady concentration and should always employ sterile technique. Problems arise when the operator is unfamiliar with the ultrasound machine, space is confined, vision is poor, or multiple concurrent actions are being carried out on the patient (see ▶ Table 30.3). The complications that may arise in emergency interventions are of the same nature as those in elective settings. To date there have been no systematic studies comparing the complication rates of interventions in emergency settings versus normal conditions. Time pressure, unstable patients, a hectic environment, confined space, and hygienic issues suggest that complication rates are likely to be higher. The complication rates of thoracentesis in ICU patients range from 1.3% to 18% and are comparable to the rates reported in routine settings.26,27 A differential diagnosis must be made quickly, and its scope depends on the patient’s history. If the pattern of injury is unclear in a patient with blunt abdominal trauma, or if no organic injuries can be found but emergency ultrasound detects the presence of free fluid, a diagnosis of hemoperitoneum should be confirmed. The sensitivity of ultrasound for detecting intra-abdominal free fluid in the FAST evaluation of trauma patients varies greatly in published studies—as does the proficiency of the examiners. If fluid can be detected, an immediate ultrasound-guided fine needle aspiration should be performed to investigate the cause (hemoperitoneum, ascites, urine). This intervention takes only a few minutes and may be crucial in directing further actions. In patients with an acute abdomen and/or sepsis and intra-abdominal free fluid, the diagnostic aspiration of ascites can provide a rapid diagnosis and may facilitate the decision for emergency laparotomy by detecting bowel contents, pancreatogenic ascites, purulent fluid, or blood. Bacterial peritonitis (spontaneous or secondary) should be urgently excluded in patients with hepatic cirrhosis, ascites, and sudden clinical deterioration. Again, immediate needle aspiration may be rewarding as a granulocyte count >240/μL establishes a diagnosis of spontaneous bacterial peritonitis.28 There is no emergency indication for the immediate catheter drainage of intra-abdominal free fluid. Even for spontaneous bacterial peritonitis, there have been no studies comparing patients treated by catheter drainage versus antibiotics only. The steps in the procedure are as follows: Locate the ideal puncture site (easily accessible, no interposed vessels, significant fluid volume). Introduce the 20-gauge needle under long- or short-axis ultrasound guidance without prior local anesthesia. The detection of blood or bloody ascites may warrant (exploratory) laparotomy. Ascites should be investigated by chemical and microbiological analysis. Caution Free fluid in the abdomen of emergency room patients requires immediate diagnostic aspiration. Abscesses and empyemas (e.g., acute cholecystitis, infected pancreatic pseudocyst) are an urgent but rarely emergent indication for percutaneous drainage. They should always be treated on the same day. This allows enough time to perform these procedures “semielectively” in a calm atmosphere. The puncture and drainage techniques are described in Chapter ▶ 15. A hemothorax may require immediate surgical intervention (e.g., for an aortic dissection), depending on the pattern of injury. Primary chest tube placement is a reasonable option in cases where acute bleeding may have stopped but the patient still has significant respiratory compromise. With a long-standing hemothorax, significant adhesions may develop between the pleural layers. Large (more than 1/2 hemithorax), loculated effusions and empyemas with a pH <7.2 or positive microbial stain or culture also require immediate chest tube drainage (▶ Fig. 30.1).29,30 Fig. 30.1 Right posterior infrascapular ultrasound scan of a hemothorax following multiple rib fractures (motorcycle accident). An inhomogeneous, hypoechoic fluid collection is visible in the pleural space. Traditionally, hemothorax and empyema are treated with a large-bore thoracostomy tube that requires prior blunt surgical dissection of the drainage tract. Pigtail catheters (8–14F) can be placed faster and more easily. They have success rates of 42 to 80% for the drainage of empyema and up to 100% for traumatic hemothorax.26,31 We therefore primarily use 10F to 12F drains. An early diagnosis and early initiation of treatment are important because the later formation of septa and adhesions will prevent percutaneous therapy. If treatment is unsuccessful (no significant improvement in 3 days, clogged drain, poor output), the tube should be promptly exchanged for a large-bore catheter or replaced by thoracoscopic therapy.30 Empyemas can also be treated by instilling fibrinolytic agents (streptokinase, urokinase) into the pleural cavity. This treatment achieves higher cure rates than saline irrigation. The role of drainage compared with primary thoracoscopic therapy cannot be definitively assessed at present.29,32 The steps in the procedure are as follows: Place the patient in a sitting position if possible. Locate the ideal puncture site (easily accessible, superior rib border, significant fluid volume). Introduce the 20-gauge needle (diagnostic) under long- or short-axis ultrasound guidance without prior local anesthesia. Then administer local anesthesia if required. Make a stab incision. Introduce a pigtail catheter along the superior rib border using trocar technique. With large effusions, the skin site can be marked under sonographic guidance and the needle inserted without continuous imaging (▶ Fig. 30.1, ▶ Fig. 30.2). Connect a three-way stopcock and reservoir with water seal; suction may be applied if needed (15 cm H2O). Analyze the aspirate according to etiology: infectious → microbiology, Ziehl-Neelsen stain, pH, WBC, clinical chemistry; traumatic → Hb; malignant: → cytology. Fig. 30.2 Drainage of an empyema in a severely dyspneic patient under sonographic guidance using the trocar technique. a Transducer placement and drain insertion using sterile technique. b Corresponding ultrasound image. The drain appears as a linear echo entering the image from the right side. Multiple septa have already formed within the empyema, appearing as echogenic lines. Ultrasound is more sensitive than standard chest radiographs in the diagnosis of pneumothorax33,34 and therefore is an effective guidance modality for treatment. While ultrasound cannot display the position of the drain in the pneumothorax, it can determine whether pneumothorax is actually present at the proposed puncture site. Adequate drainage can usually be obtained with 7F to 9F pigtail catheters, which have an 84 to 97% success rate for drainage periods of 2 to 4 days. Single or repeated needle aspiration is an alternative for idiopathic pneumothorax.35,36 If a drainage tube is placed, an oblique intra- and subcutaneous tunnel should be developed to prevent recurrence after drain removal (see also Chapter ▶ 24). Elevate the upper body 30 to 45°. Localize free air by ultrasound and administer local anesthesia at the typical Monaldi site (second or third intercostal space in the midclavicular line) or at an atypical site if the pneumothorax is incomplete or accompanied by adhesions. Make a stab incision. Introduce an 8F to10F pigtail catheter along the superior rib border using trocar technique. Connect a three-way stopcock and water-seal suction at 15 cm H2O. Pericardial tamponade is a life-threatening condition that may have a malignant, infectious, postoperative, or occasionally a traumatic etiology. Echocardiography typically shows “swinging heart” motion within the pericardium (▶ Fig. 30.3). The right atrium and possibly the left atrium show diastolic collapse, and the right ventricle may collapse at end diastole. Even small effusions may be life threatening: the clinical parameters of hypotension, tachycardia with a paradoxical pulse (i.e., pulse diminished on inspiration), and distended neck veins are considered indications for pericardiocentesis. An aortic dissection should first be excluded as the cause, as it would necessitate primary surgical treatment.37 Ultrasound has a sensitivity of 100% and specificity of 96.9% in the detection of traumatic pericardial effusion.38 Fig. 30.3 Hemodynamically significant pericardial effusion with a “swinging heart” pattern in a breast cancer patient. The swinging heart in the pericardial sac shows diastolic collapse of the right atrium (arrow at left) and end-diastolic collapse of the right ventricle. (Source: image courtesy of Dr. M. H. Hust, Reutlingen, Germany.) Caution With fluid in the pericardium: rule out aortic dissection! Ultrasound-guided drainage has been described as safe and effective in several clinical series, with success rates of 97 to 99.1%. Major complications (1.3%) are ventricular injury, hemopneumothorax, and sustained ventricular tachycardia (3%) while minor complications have a reported incidence of 3.5% in the largest published series.39,40 The ideal puncture site is not necessarily subxiphoid, which was once considered standard. With ultrasound guidance, the needle can be introduced at the site where the effusion volume is greatest and the distance from the skin surface is short with no critical intervening structures. The injection of NaCl or HES (hydroxyethyl starch), for example, will produce a “white cloud” that accurately marks the position of the puncture needle and drain (▶ Fig. 30.4, ▶ Fig. 30.5).41 Fig. 30.4 HES is injected to check the position of the puncture needle. The solution acts like contrast medium (CM) to produce a visible “white cloud.” LV, left ventricle; PE, pericardial effusion; RV, right ventricle. (Source: image courtesy of Dr. M. H. Hust, Reutlingen, Germany.) Fig. 30.5 Pericardiocentesis in situ. The drainage catheter appears as a tram-track echo at the tip of the arrow. LV, left ventricle; PE, pleural effusion; RV, right ventricle. (Source: image courtesy of Dr. M. H. Hust, Reutlingen, Germany.) We use a single-lumen 14-gauge central venous catheter for pericardial drainage, since all physicians are familiar with its use. Pericardiocentesis sets usually include approximately 8F drains and dilators (e.g., from Cook Medical). It is not necessary to have an ECG lead attached to the needle hub when ultrasound guidance and skin surface leads are used. Elevate the upper body 30 to 45°. Start ECG monitoring. Administer local anesthesia under sonographic guidance. Make a stab incision. The needle is usually introduced under sonographic guidance. On entering the pericardial sac, inject agitated NaCl or HES to check the needle position. Change to Seldinger wire and insert a drain primarily or after dilating the tract. Recheck placement by injecting NaCl or HES. The aspiration of bright red blood may indicate puncture of a coronary artery, the right ventricle, or the left ventricle if an apical approach was used. Analyze the aspirate according to etiology: infectious → microbiology, Ziehl-Neelsen stain; traumatic (or bloody aspirate) → Hb; malignant → cytology. Central venous catheterization was traditionally done “blindly” on the basis of designated anatomical landmarks. Ultrasound improved this technique by allowing the operator to image the target vessel in two planes and then mark its course on the skin, followed again by a “blind” needle insertion (▶ Fig. 30.6a, b). In any case, the target vessel must be imaged sonographically before the intervention in order to detect any positional anomalies and avoid puncturing a thrombosed vein (▶ Fig. 30.7). Fig. 30.6 a, b Ultrasound-assisted landmark technique. The right internal jugular vein is imaged in two planes, and its course and the puncture site are marked on the skin with a waterproof marker. The paperclip beneath the transducer is oriented along the course of the vein. Fig. 30.7 Short-axis view (cross-section) of the left internal jugular vein. The vessel is noncompressible and filled with echogenic material: thrombosis in a breast cancer patient. The catheter was inserted on the opposite side. On the basis of the results of two meta-analyses, central venous catheter placement under continuous ultrasound guidance results in fewer placement attempts and fewer malplacements in the internal jugular vein, subclavian vein, and femoral vein of adults and the internal jugular vein of children, reducing overall complication rates from 10.2% to 4.6%. The differences in time to catheter placement and costs (including device acquisition) were not clinically relevant compared with the landmark technique.42–44 Another study showed that real-time ultrasound guidance also reduced complications relative to the landmark technique under emergency conditions using a portable scanner.45 Central venous catheterization under ultrasound guidance has been incorporated into the British guidelines of the National Institute for Health and Care Excellence.46 The needle can be visualized in a long-axis view with the vessel imaged in longitudinal section, or a short-axis orientation can be used. In the short-axis view the needle cross-section appears as a punctate echo. The needle tip can be identified only by gently oscillating the transducer. The long-axis view displays the full length of the needle, making it easier to avoid penetration of the posterior vessel wall (▶ Fig. 30.8, ▶ Fig. 30.9). Fig. 30.8 Central venous catheter placement. a Sterile conditions for catheterization of the right internal jugular vein. The operator in sterile attire sits behind the patient’s head and has a clear view of both the monitor and puncture site. Sterile covers have been placed on the keyboard and transducer. b Puncture of the right internal jugular vein: the needle is clearly visualized in the long-axis view, which avoids perforating the posterior vessel wall. c The advancing guidewire is clearly visualized. d The double-wall echoes from the CVC (here a single-lumen dialysis catheter) are clearly visible in the vessel lumen. Fig. 30.9 Long-axis view of the catheter advancing in the subclavian vein. (Source: image courtesy of Dr. C. Rex, Reutlingen, Germany.) The internal jugular vein is the vessel most often catheterized and is excellent for learning the ultrasound guidance technique. Even physicians unfamiliar with general diagnostic ultrasound can quickly master the long-axis imaging technique with a little practice. It takes some practice to work synchronously with both hands, i.e., holding the transducer in one hand while inserting the needle with the other. There are very few occasions where a central venous catheter must be placed within a few minutes without benefit of an ultrasound machine. Given the smaller number of placement attempts and needle redirections, placement of a central venous catheter (CVC) under continuous ultrasound imaging guidance should be standard practice. It can significantly reduce the incidence of complications. Practice Continuous ultrasound guidance reduces errors in CVC placement and should be standard practice. Help from an assistant in sterile attire is ideal. Place the transducer in a sterile probe cover. The operator should wear sterile operating room attire. The patient is positioned supine. A head-down tilt may be added to improve venous filling. For puncture of the internal jugular vein, the operator stands behind the patient’s head with the ultrasound machine next to the patient. For puncture of the subclavian vein, the operator stands on the ipsilateral side next to the patient (▶ Fig. 30.8a). First image the vessel in a long-axis (longitudinal) view and short-axis (cross-sectional) view. Inspect the vessel and its surroundings (atypical location? thrombi? venous valves?). Image the vessel in a long-axis view proximal to the puncture site. Administer local anesthesia under sonographic guidance. Introduce the needle using Seldinger technique in a long-axis view that shows the full needle path. Insertion of the puncture needle and wire is monitored on the screen. After that, any tract dilation and exchange for the CVC can be done with or without real-time ultrasound guidance (▶ Fig. 30.8b–d, ▶ Fig. 30.9). Even deep or nonpalpable peripheral veins can be reliably catheterized in (obese) adults and children with difficult intravenous access when ultrasound guidance is used.47,48 With a tourniquet on the upper arm, the vein is imaged in a long-axis view proximal to the puncture site. The operator holds the transducer in one hand while introducing the needle with the other (▶ Fig. 30.10). Skin antisepsis and transducer disinfection are sufficient for the placement of a simple indwelling venous cannula, taking care not to touch the transducer with the cannula. Fig. 30.10 Puncture of a peripheral vein at the elbow. No veins are palpable in an obese arm. a Ultrasound clearly shows a (nonpalpable) cephalic vein at the elbow. The vein is surprisingly superficial. b The indwelling venous cannula appears fragmentary in the long-axis view, but the tip (left arrow) can be positively identified. c Short-axis view. d Long-axis view after stabilizing the metal cannula and advancing the plastic cannula. The walls of the plastic cannula are clearly visualized, and its intraluminal advance can be monitored. Practice If multiple attempts or needle redirections are necessary in peripheral venous catheterizations: use ultrasound. Ultrasound can also be used successfully for arterial cannulation (blood gas analysis, invasive blood pressure measurement). For this application we usually introduce the needle in a short-axis view (▶ Fig. 30.11). Before the puncture, the patency of both forearm arteries (radial and ulnar arteries) is assessed by color Doppler ultrasound to avoid inducing critical ischemia in the hand.
30.1.1 Indications
Indication
Goals
Method
Fluid in the pleural space
Determine etiology
Aspirate with 20-gauge needle under ultrasound guidance
Hemothorax
Establish drainage, improve dyspnea, prevent organized hematoma formation
Place 12–14F drain under ultrasound guidance
Thoracic empyema
Establish drainage, improve dyspnea, prevent sepsis
Place 12–14F drain under ultrasound guidance
Pneumothorax
Tension pneumothorax
Expand the lung, improve dyspnea
Place 8F drain under ultrasound guidance
Intra-abdominal free fluid
Determine etiology
Aspirate with 20-gauge needle under ultrasound guidance
Spontaneous bacterial peritonitis
Establish drainage, improve dyspnea, prevent sepsis
Place 10–12F drain under ultrasound guidance
Fluid in the pericardium
Differential diagnosis
Aspirate with 20-gauge needle under ultrasound guidance
Pericardial tamponade
Establish drainage, prevent pump failure
Place 14-gauge catheter under ultrasound guidance
Abscess, empyema
Confirm suspected diagnosis
Aspirate with 20-gauge needle under ultrasound guidance
Therapeutic drainage
Place 8–12F drain under ultrasound guidance
Venous access
Rapid, uncomplicated placement of a secure central venous line
Ultrasound guidance in long- or short-axis view
Arterial cannula
Arterial pressure measurement, BGA
Ultrasound guidance in long- or short-axis view
Pseudoaneurysm
Obliterate the pseudoaneurysm
Ultrasound-guided thrombin injection
30.1.2 Contraindications
30.1.3 Materials and Equipment
Ultrasound Technology
Interventional Materials
Goal
Materials
Diagnostic aspiration (effusion, abscess, empyema, hemorrhage)
20-gauge needles in 4- and 7-cm lengths
10-mL and 20-mL syringes
Drain insertion (chest, abdomen)
8–14F pigtail catheters
Scalpels
Initial puncture needles
Seldinger wires
Dilators
Three-way stopcocks
Luer lock bag
Reservoirs with water seal
(Or: ready-to-use sets)
Drain insertion (pericardium)
14-gauge single-lumen CVC sets
Three-way stopcocks
50-mL perfusor syringes
Luer lock bag
(Or: ready-to-use sets)
CVC placement
Standard CVC sets
Arterial cannula
Standard arterial indwelling cannulas
Aneurysm obliteration
20-gauge needles in 4- and 7-cm lengths
1-mL syringes with fine scale (insulin syringes)
Thrombin
Abbreviation: CVC, central venous catheter.
30.1.4 Antisepsis
30.1.5 Problems and Complications
Problem
Possible solutions
Difficulty operating a device
Train all ER and ICU staff members in the operation of the device.
Bring along a familiar, portable device.
Difficult ambient conditions
Darken the room.
Pause other actions.
Call for assistance.
Difficult patient conditions
Improve position if possible.
Move patient to a (semi)sitting position for thoracentesis.
Move patient to a supine position for abdominal puncture.
Use sedation if required.
Uncertain needle path
Look for a different approach.
Reposition the patient.
Summon experts.
Consider alternative procedures.
Difficult asepsis
Diagnostic intervention: employ aseptic skin preparation, ensure transducer disinfection.
Use sterile “operating room” technique for drains and vascular access.
30.1.6 Intra-abdominal Free Fluid
Procedure
Abscess, Empyema
30.1.7 Intrathoracic Free Fluid
Procedure
30.1.8 Pneumothorax
Procedure
30.1.9 Pericardial Fluid
Procedure
30.2 Percutaneous Vascular Interventions
30.2.1 Vascular Access

Procedure

Related posts:
 Informed Consent
 Percutaneous Sclerotherapy of Cysts
 Contraindications, Complications, and Complication Management
 Fine Needle Aspiration Biopsy and Core Needle Biopsy
 Indications for Diagnostic Interventions in the Abdomen and Thorax (Liver, Pancreas, Spleen, Kidneys, Lung, Other Sites)
 Neurologic Interventions, Ultrasound-Guided Regional Anesthesia
Stay updated, free articles. Join our Telegram channel

Full access? Get Clinical Tree


