Fig. 6.1
Femoral artery within the femoral sheath. The femoral artery courses under the inguinal ligament within the femoral sheath, bordered on its lateral aspect by the femoral nerve and on its medial aspect by the femoral vein
As detailed below, optimal femoral arterial access is in the common femoral artery (CFA) between the inferior epigastric artery superiorly and the bifurcation of the CFA inferiorly (the so-called safe zone) (Fig. 6.2).
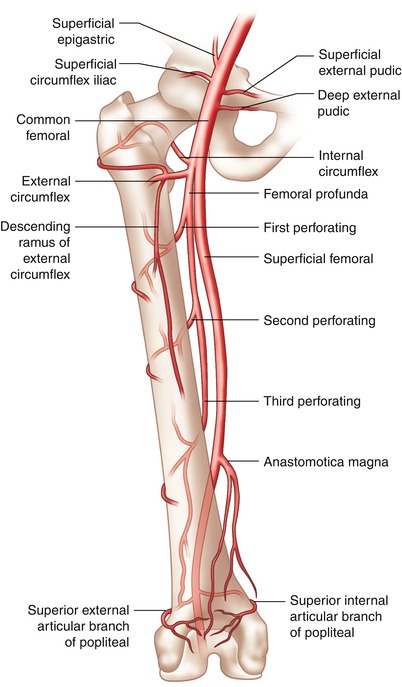
Fig. 6.2
Femoral arterial anatomy. The optimal entry point for femoral arteriotomy is the common femoral artery, superior to the bifurcation to the superficial and profunda branches, but inferior to the superficial epigastric branch
Brachial Anatomy
The brachial artery begins at the inferior border of the teres major muscle tendon as a continuation of the axillary artery. It continues its course down the medial aspect of the upper arm and lies in a superficial plane, covered only by the integument and superficial and deep fascia. It initially gives off the deep brachial artery (profunda) and then the superficial ulnar and deep ulnar collateral arteries. It terminates at the bifurcation to the radial and ulnar arteries just distal to the articulation of the elbow (Fig. 6.3).
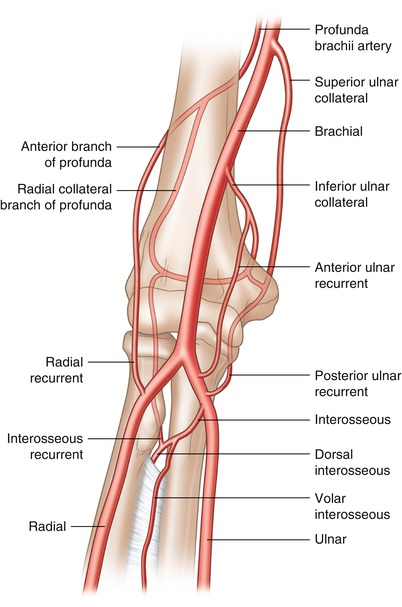
Fig. 6.3
Brachial artery anatomy. The brachial artery begins at the inferior border of the teres major muscle tendon and continues down the medical aspect of the arm terminating at the bifurcation to the radial and ulnar arteries just distal to the articulation of the elbow
Radial Anatomy
The radial artery begins as the continuation of the brachial artery just distal to the articulation of the elbow. The brachial artery bifurcates into the ulnar artery, which is larger but runs deeper within the tissue, and radial artery, which remains fairly superficial. For anatomic purposes the radial artery and its branches are separated into three distinct regions, the forearm, the wrist, and the hand. At the forearm the radial artery gives off three branches, proximally the radial recurrent artery, then the muscular artery, and at the distal forearm, the volar radial carpal artery and the superficial volar artery. At the wrist the radial artery provides the dorsal carpal branch and then the first dorsal metacarpal artery. The radial dorsal carpal branch forms an anastomosis with the ulnar dorsal carpal branch and the volar and dorsal interosseous arteries to form the dorsal carpal network. Finally in the hand the radial artery gives off five branches: the princeps pollicis, volaris indicis radialis, volar metacarpal, the perforating branches, and the recurrent branches (Fig. 6.4).
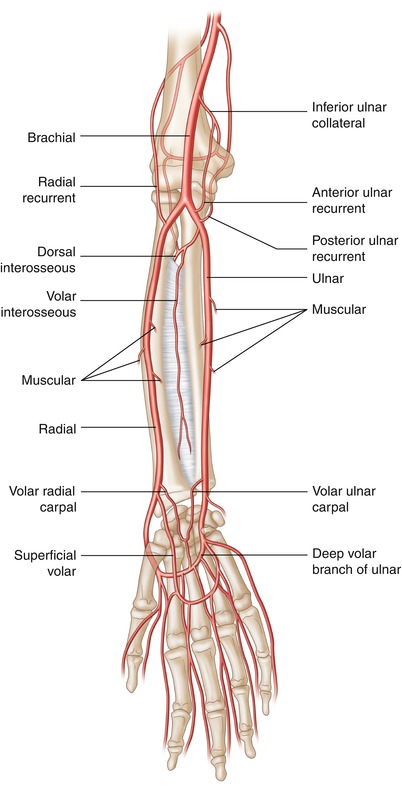
Fig. 6.4
Radial artery anatomy. The radial artery begins just distal to the articulation of the elbow bifurcating into the ulnar artery and radial artery which each contributes to the palmar arches and the anastomoses around the hand
Vascular Access
Femoral
The femoral artery remains the most commonly utilized access site in cardiac catheterization laboratories. As mentioned above, the optimal entry point for femoral arteriotomy is the CFA, superior to the bifurcation to the superficial and profunda branches, but inferior to the superficial epigastric branch. Operators often use the inguinal skin crease as a landmark for skin access, but it is important to note that this can be misleading because the inguinal crease rarely coincides with the location of the CFA. Instead, using either ultrasound or fluoroscopy guidance significantly increases the likelihood of puncture in the safe zone. Because the safe zone typically coincides with the inferior half of the femoral head, femoral head fluoroscopy prior to arterial puncture is a useful technique (see below). Another technique is to palpate the symphysis pubis and the anterior superior iliac spine to denote the location of the inguinal ligament. Femoral arteriotomy should be inferior to the inguinal ligament, but given the variation in patient anthropometric measurements, fluoroscopy or ultrasound is preferred. Puncture of the femoral artery in the safe zone allows for compression of the access site against the femoral head after arterial sheath removal, thus facilitating hemostasis.
The optimal skin entry site is approximately 3 cm below the inguinal ligament directly over the femoral arterial pulsation. A needle is positioned at this point and advanced through the skin at a 30–45° angle. Often the operator can feel the pulsation of the artery transmitted from the needle tip to the hub, and the needle can be placed through the front wall of the artery at which time pulsating arterial blood flow should come through the needle indicating proper position. A J-tipped guidewire can then be advanced, the needle withdrawn, and finally the arterial sheath inserted over the guidewire with a twisting motion to aid entry through the soft tissue into the artery. Improper placement of the vascular sheath can cause vascular complications during and after the case. Needle and sheath insertion above the inguinal ligament can often lead to retroperitoneal bleeding after the case, occasionally severe enough to require transfusion [2]. Insertion below the optimal point of the CFA may cause the formation of an arteriovenous fistula, can lead to vascular injury to the bifurcation site, insertion into the profunda, or cause the formation of a pseudoaneurysm [3, 4]. Thus, appropriate placement of the needle and vascular sheath into the CFA cannot be overemphasized.
Femoral Head Fluoroscopy
Several methods have been used to aid in proper cannulation of the CFA. Traditional anatomic landmarks such as the inguinal crease, maximal femoral pulse, and bony prominences help guide the operator, but can be misleading, especially in obese patients. There is a consistent radiographic relationship between the inferior and middle third of the femoral head and the CFA as shown by small radiologic studies [5, 6]. Indeed, in a descriptive femoral artery angiography study performed in ~150 patients, the bifurcation of the CFA was below the center of the femoral head in 99 % of patients. Observational analyses have suggested that fluoroscopic guidance, using the femoral head, can aid in proper placement of the vascular sheath in the safe zone [6–8].
There have been very few randomized controlled clinical trials to evaluate fluoroscopic guidance, and the results are mixed. A very small, single-center randomized trial of ~200 patients showed that palpation with fluoroscopic guidance compared with traditional palpation of anatomic landmarks alone resulted in a small but statistically nonsignificant increase in the successful cannulation of the CFA (90 % vs. 85 %, respectively, p = 0.49), while increasing the number of attempts and time to access [9]. This study was relatively small, and the authors suggested that a larger study may have found benefit to fluoroscopic guidance. A larger single-center randomized trial performed in 986 patients evaluated the use of fluoroscopic guidance vs. traditional landmarks in achieving CFA access for cardiac catheterization [10]. The authors found that fluoroscopy significantly decreased the incidence of low arteriotomies (defined as below the femoral head) without increasing the number of high arteriotomies (defined as above the femoral head), time to access, and number of needle passes or arterial punctures. A standard technique was used, locating the inferior border of the femoral head on an anterior-posterior fluoroscopic projection, and then utilizing this location as the skin entry site for the needle. While very little data are available for review, it seems femoral head fluoroscopy is a simple and effective way to decrease the number of low arteriotomies, which can reduce vascular bifurcation injuries and pseudoaneurysms, with the caveat that it may increase the time required for access.
Femoral Ultrasound
The utility of ultrasound (US) in gaining central venous access has been proven in multiple clinical trials to reduce time to access and complications, and thus its use has become widespread. Very little research has been performed to evaluate the utility of US in femoral arterial access, though it would seem there could be benefit, especially in obese patients and in those with difficult anatomy. The first randomized study in 2004 was a very small trial of 112 patients undergoing cardiac catheterization [11]. Patients were randomized to either traditional landmark/palpation-guided access vs. US-guided access of the femoral artery (Fig. 6.5). The authors found that US guidance was only beneficial in patients with weak arterial pulses and those with a leg circumference of 60 cm or greater, significantly decreasing the number of attempts needed as well as the time for successful arterial puncture. There was no benefit in patients with normal pulses, and there was no difference in vascular complications. A larger, multicenter, randomized controlled trial was performed in 1,004 patients to evaluate a US-guided technique vs. fluoroscopy-guided technique in obtaining CFA access [12]. There was no significant difference in successful CFA cannulation between US and fluoroscopy techniques (86 % vs. 83 % p = 0.17), though US did show benefit in the small subgroup of patients with the CFA bifurcation occurring above the inferior border of the femoral head. US guidance did, however, decrease the mean number of attempts (1.3 vs. 3.0 p < 0.000001), rate of venipuncture (2.4 % vs. 15.8 % p < 0.000001), and mean time to access (185 s vs. 213 s p = 0.016) as compared with fluoroscopic guidance. The US guidance technique also significantly decreased the number of access site hematomas (0.6 % vs. 2.2 % p = 0.03), but had no effect on rates of pseudoaneurysm, dissection, or bleeding requiring transfusion compared with fluoroscopic guidance. Based on the limited data, US guidance appears to be most useful in obese patients or those with weak arterial pulses and may decrease time to access, although its effect on reducing vascular complications is unclear.
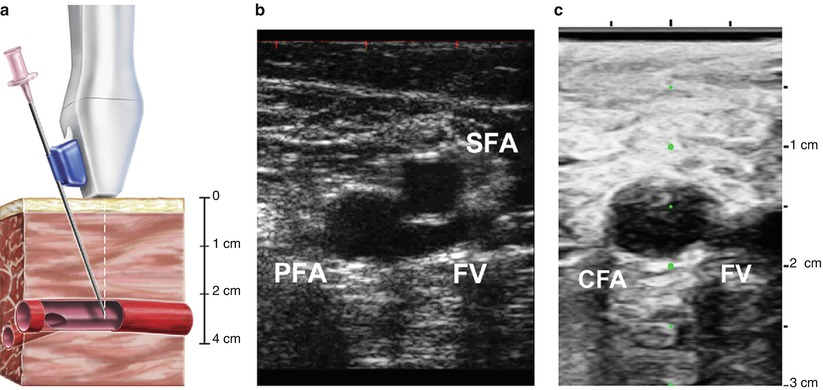
Fig. 6.5
Ultrasound guidance technique for femoral artery access. Femoral artery access with ultrasound guidance can be achieved with a needle attached to the ultrasound probe (a). The femoral artery bifurcation to the profunda femoris (PFA) and superficial femoral artery (SFA) is located (b), and then the probe is advanced towards the head until the common femoral artery is visualized (c). The femoral vein (FV) can be distinguished from the common femoral artery (CFA) by location, pulsation, and compression (From Seto et al. [12], with permission)
Brachial
The brachial artery is a potential access site for cardiac catheterization, but is often used in cases where neither the femoral nor the radial arteries are possible sites of access. In the early years of cardiac catheterization, brachial artery catheterization was performed through the cut-down (Sones) approach. However, if entry through the brachial artery is necessary, the percutaneous approach has been adopted and is similar to modern femoral artery cannulation. The brachial pulse is identified just medial to the biceps brachii tendon 1–2 cm above the articulation of the elbow. The site is prepared and anesthetized and can be accessed with either a micropuncture or standard femoral access needle inserted through the skin and soft tissue at a 30–45° angle. Because of the loose soft tissue in this area, palpation and stabilization of the artery with index and middle fingers distal and proximal to the needle entry site may aid in successful cannulation of the brachial artery. The needle is slowly advanced until pulsatile flow is seen, and then either a 0.018″ guidewire (used with a micropuncture needle) or a short 0.035″ guidewire (used with a standard femoral access needle) is introduced into the brachial artery. The needle is then removed, and the sheath is passed over the wire into the artery.
Radial
The transradial approach to cardiac catheterization is gaining in popularity based on evidence showing its association with a lower rate of vascular complications. Most operators verify that there is collateral flow in the hand by checking either the Allen’s or the Barbeau test [13] (Fig. 6.6), although it should be noted that there are no strong data showing an association between radial access and adverse vascular outcomes in patients with abnormal Allen’s or Barbeau tests.
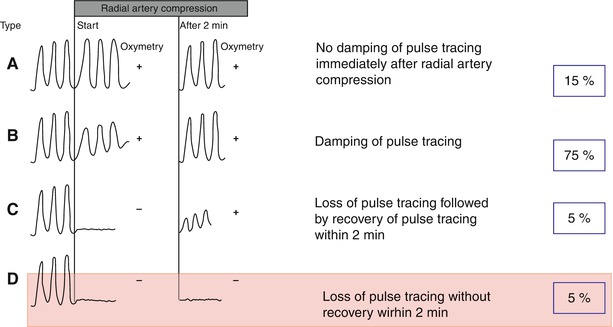
Fig. 6.6
The Barbeau test. The Barbeau test consists of a combination of plethysmography and pulse oximetry before and after manually occluding the radial artery. Transradial cardiac catheterization can be performed safely with patterns A, B, or C but should be avoided with pattern D (From Barbeau et al. [13], with permission.)
There are two generally accepted approaches to radial artery access. Both start with palpation of the radial pulse at the wrist and then identifying the bony prominence of the radial styloid process. Optimal radial artery entry site is just proximal to the radial styloid or approximately 2 cm proximal to the wrist. The anterior wall approach is, in essence, much like the traditional femoral artery front wall access. The access needle is inserted through the skin at the aforementioned site at a 30–45° angle and slowly advanced until blood pulsates out of the needle. Then a guidewire is introduced with a twirling motion ensuring it passes freely into the radial artery. The needle is then removed, and the sheath is passed over the wire into the artery. A micropuncture needle with compatible low-profile guidewire is commonly used. A small skin nick may be necessary to advance the sheath through the skin.
The counterpuncture (through and through) approach starts with the same skin and radial artery entry site. In this approach a 20-gauge Teflon cannula is inserted through the soft tissue and advanced through the radial artery. Often a blood flash is seen in the hollow chamber within the cannula, which marks initial entry to the artery. The cannula is advanced further through the posterior wall of the artery in a counterpuncture, or through and through, technique, and then the needle is removed. The hollow cannula is then slowly retracted until pulsatile flow is seen. A low-profile guidewire is then introduced with a twirling motion into the radial artery, and the cannula is removed. The sheath is then passed over the wire into the artery. Advantages of this technique include the presence of pulsatile arterial flow through the cannula (the caliber of micropuncture needles does not allow for pulsatile flow when the anterior wall puncture technique is used) and avoiding losing access to the artery with the micropuncture needle.
Vascular Closure
Femoral Closure Methods
Manual Compression
Manual compression remains the gold standard for achieving hemostasis after diagnostic cardiac catheterization and percutaneous coronary intervention through the femoral artery. For either procedure, the arterial sheath is removed once the activated clotting time is <170 s. Manual pressure is applied with three fingers, 2–3 cm proximal to the skin entry site, directly over the arterial entry site. Initially, heavy pressure is applied to control bleeding and nearly obliterate pedal pulses. Pressure is gradually lessened to allow arterial flow to the distal limb. Pressure is maintained in this area for 10–20 min or longer, depending on sheath size, until hemostasis is achieved. If anticoagulation and antiplatelet medications are used, mostly in the setting of interventional cases, then manual compression times will be longer. After hemostasis is achieved, a sterile, clear, waterproof dressing is applied to the site, and the site is observed for signs of hematoma or oozing. Pedal pulses are also monitored during recovery to ensure adequate distal limb perfusion. The patient is instructed to lay flat under strict bed rest for 2–6 h (depending on type of procedure, size of sheath, and adjunctive antithrombotic therapy) after hemostasis is achieved to promote proper healing of the arteriotomy site.
Assisted Compression (FemoStop, Safeguard, Boomerang Device)
Assisted compression devices mimic manual compression (to a degree) and are meant to decrease operator fatigue when a longer period of compression is necessary for hemostasis. Modern-assisted compression devices include the FemoStop (Radi Medical System/St. Jude Medical System, Reading, MA), Safeguard (Maquet Cardiovascular/Datascope Corporation, Fairfield, NJ), and the Cardiva Catalyst (Boomerang device, Cardiva Medical Inc., Sunnyvale, CA), which is a hybrid closure device.
The FemoStop II Plus device is a pneumatic bubble mounted on a plastic frame that is fastened to the patient by a belt/strap system around the hips (Fig. 6.7). The bubble is positioned 1–2 cm above the skin nick, directly at the arteriotomy site, and then initially inflated to 70 mmHg with the attached sphygmomanometer. The bubble is then inflated to a maximum of 20 mmHg above systolic blood pressure for 1–3 min, then deflated and maintained at just below systolic blood pressure for 15 min. The pressure is then decreased 20 mmHg every 2 min until the pneumatic pressure in the bulb is 30 mmHg. The device is kept in place for 1–2 h at this pressure and then carefully removed. Time may vary depending on anticoagulant status and sheath size. The success rate for application of the device has been reported to be nearly 100 %, and reported complication rates are very low [14, 15]. The FemoStop device, however, does not shorten time to hemostasis, ambulation, or discharge as compared to manual compression [14].
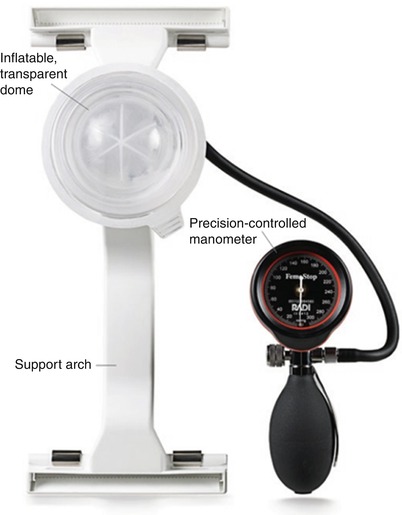
Fig. 6.7
The FemoStop device. The FemoStop device consists of a pneumatic bubble mounted to a support arch that is attached to the patient by a band around the hips. The bubble is then inflated by the precision control manometer to apply pressure to the arteriotomy site
The Safeguard device is a 24-cm adhesive bandage with a clear, plastic, pneumatic bubble in the center. It is applied directly to the skin and is designed to aid in manual compression of femoral arteriotomy sites. It can be used in a pre-hemostasis technique or a post-hemostasis technique strategy. For the pre-hemostasis technique, the Safeguard device is applied directly over the site of arteriotomy with the femoral sheath having been withdrawn ~3 cm so that the sheath hub does not interfere with appropriate device placement. The pneumatic bubble is then inflated with up to 40 cm3 of air from the Luer lock syringe port. Manual pressure is then applied to the bubble, and the femoral sheath is withdrawn. Manual compression is held until femoral vessel hemostasis is achieved. The device can then be deflated every 2 h to assess for oozing or hematoma formation, and re-inflated as necessary, or promptly removed. In the post-hemostasis technique, the Safeguard device is applied directly to the clean, dry skin site directly over the femoral arteriotomy, and the pneumatic bubble is inflated with up to 40 cm3 of air. The site is checked frequently for oozing or hematoma formation and again is deflated every 2 h to assess the site. It can then be removed at the clinician’s discretion. As with previous devices, the Safeguard is successfully applied near 100 % of the time with very low complication rates. In a subset of the RACE trial, application of the Safeguard device was associated with a decreased time of active compression to achieve hemostasis when compared with historical controls [16]. It did not, however, decrease the time to ambulation or discharge in this study.
The Boomerang device is a hybrid closure device that is placed immediately after diagnostic or interventional procedures and, upon removal, leaves no foreign material in the artery. The device is a flexible mesh 6.5 mm disc coated with protamine sulfate and is deployed through the existing arterial sheath (up to 7 French). It expands like an umbrella at the intraluminal arteriotomy site and is held in place by a tension clip (Fig. 6.8). It remains at the site for a short period of time (~20 min. for Diagnostic cases; 120 min for Interventional cases) and is then removed with the sheath. It does require an additional 5 min. of manual compression to achieve hemostasis after removal. In a small study of 96 patients undergoing diagnostic catheterization [17], the Boomerang device was successful in achieving hemostasis in 99 % of patients with a very low complication rate (minor bleeding in 5 % of patients). No major adverse events were observed. In this small study, the device was successfully utilized in 6 patients with significant vascular disease and even in 19 patients with arterial access at the bifurcation of the femoral artery or in the profunda femoris.
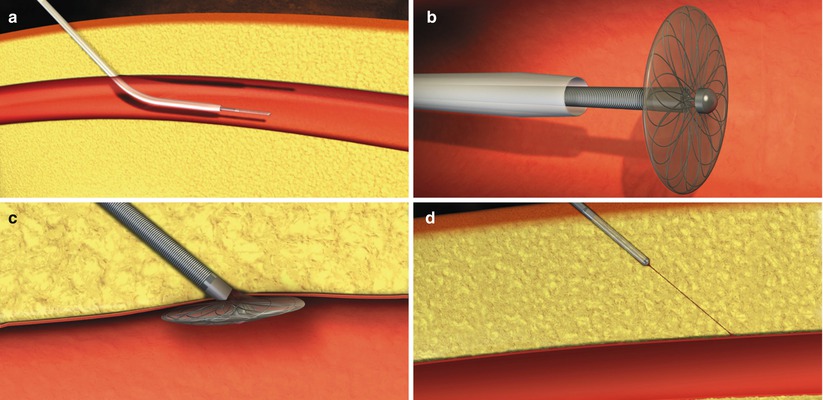
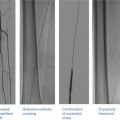
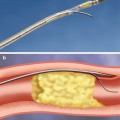
Fig. 6.8
Deployment of the Boomerang device. The Boomerang device is inserted in the artery (a) and expands once deployed from the sheath (b). It is secured to the anterior wall of the artery with traction (c) and then completely withdrawn (d) after a short “dwell time” (From Doyle et al. [17], with permission.)
Vascular Closure Devices (StarClose, Perclose/ProGlide, Angio-Seal)
Related posts:
 Adjunctive Pharmacology for Coronary Intervention
 Patient Selection for Coronary Intervention
 Percutaneous Management of Lower Extremity Arterial Disease: Patient Selection, Techniques, and Technologies
 The Retrograde Approach to Chronic Total Occlusion PCI
 Percutaneous Cell Therapy for Acute and Chronic Cardiac Disease
 Application of Advanced Technologies for the Treatment of Lower Extremity Arterial Disease
Stay updated, free articles. Join our Telegram channel

Full access? Get Clinical Tree


