Pleural disease
Undiagnosed exudative pleural effusion
Pleural space infection and empyema thoracis
Suspected pleural malignancy/mesothelioma
Pleural mass lesions
Identification of source of hemothorax or chylothorax
Pulmonary disease
Diffuse interstitial lung disease/pulmonary infiltrates
Lung cancer: staging and assessment of operability
Indeterminate pulmonary nodules (surgical indication)
Mediastinal disease
Mediastinal cystic and solid mass lesions
Mediastinal lymphadenopathy including lung cancer staging and assessment of response to chemo-/radiotherapy
Complications of chest trauma
Hemothorax
In this chapter, we will give an overview of the most common applications of VATS in the diagnosis of chest diseases in the hands of the interventional pneumologist.
Anesthesia and General Surgical Technique
VATS requires general anesthesia with selective one-lung ventilation for facilitation of the procedure. This is best achieved by ventilation with a double-lumen endobronchial tube. In young children for whom no suitably sized double-lumen tube is available, a single-lumen tube with either the tip placed into the contralateral mainstem bronchus or in combination with an endoscopically placed bronchial blocker can be used. The correct placement of the double-lumen tube or the bronchial blocker should be confirmed by fiber-optic bronchoscopy. On occasion, if the patient does not tolerate single-lung ventilation (or had undergone pneumonectomy on the contralateral side), short periods of apnea after hyperventilation with FiO2 1.0 will allow sufficient time to perform short diagnostic and therapeutic interventions. Monitoring during anesthesia is done following the standards for thoracic procedures.
For most of the procedures (described below), the patient is positioned in the full lateral decubitus position with the operative side up and the table flexed at the patient’s hip level with additional slight reverse Trendelenburg tilts (Fig. 62.1). The patient is either placed on a beanbag or secured by side positioning cushions and elevated arm support. Care should be taken that the patient’s shoulder marks the highest point with the arm positioned as low as possible to allow free angulation of instruments from either direction (Fig. 62.1). The position of the surgeon depends on the procedure performed and the site of the lesion. It is recommended to approach the lesion from the same general direction with instruments and camera. The surgeon best stands facing the lesion with the camera-holding assistant on the same side and direct view on the monitor on the opposite side.
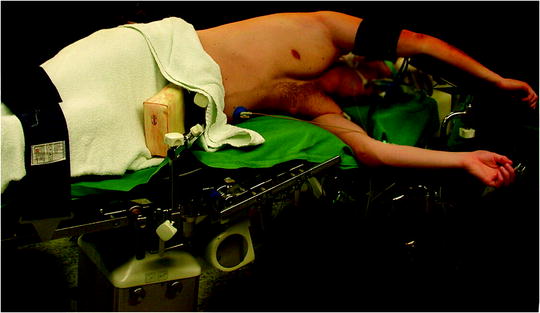
Fig. 62.1
Positioning of the patient for VATS procedures. The patient is positioned in the full lateral decubitus position with the operative side up and the table flexed at the patient’s hip level with additional slight reverse Trendelenburg tilts
The surgical site extends from the axillary region down to the distal costal arch and from the mammary line backward to the vertebral column (Fig. 62.2). A spacious sterile draping facilitates targeted access to the entire hemithorax. Single-lung ventilation is established with the first skin incision. For most of the procedures and general inspection of the pleural space, the camera port is placed anteriorly (anterior axillary line for right-sided lesions and posterior axillary line for left-sided lesions) and low in the hemithorax (eighth intercostal space). For localized pleural effusions, it is recommended to place the first port site at the center of the fluid collection as seen on X-ray or computed tomography scans. Aspiration of fluid with a small needle may aid in localizing a fluid collection. The first incision is always made bluntly with careful digital intrathoracic exploration. After skin incision (1.5 cm), carefully dissect over the top of the rib with scissors to enter the pleural space (Fig. 62.3). Insert a finger gently to corroborate entry into the pleural space. On occasion, adhesions will be present that can be cautiously disrupted with the finger to allow safe placement of the thoracoscope (Fig. 62.4) (adopted from: SAGES manual). Additional access sites are placed under video guidance and should be positioned at a farthermost distance either cranial in the third or fourth intercostal space, if the first incision was located below the fifth intercostal space, or into the diaphragmatic recesses if the initial approach was above the fifth intercostal space (Fig. 62.5). For a diagnostic approach, two to three incisions usually are adequate; if a pulmonary wedge resection is planned, a third incision may be appropriate. For three (or more) access sites, the ports should be placed within the same 180 ° arc to allow for the comfortable “triangulation” of the instruments enabling them to target the lesion site from either side and avoid mirror image (adopted from: Yim and Sihoe 2009; SAGES manual).
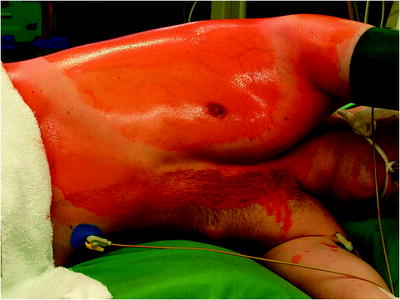


Fig. 62.2
The surgical site extends from the axillary region down to the distal costal arch and from the mammary line backward to the vertebral column
Fig. 62.5
Basic two-port VATS setting. The camera port is placed anteriorly (anterior axillary line for right-sided lesions and posterior axillary line for left-sided lesions) and low in the hemithorax (eighth intercostal space). One additional access is placed under video guidance and should be positioned in the third or fourth intercostal space
Fig. 62.3
The first incision is always made bluntly with careful digital intrathoracic exploration. After skin incision (1.5 cm), carefully dissect over the top of the rib with scissors to enter the pleural space
Fig. 62.4
Insert a finger gently to corroborate entry into the pleural space. On occasion, adhesions will be present that can be cautiously disrupted with the finger to allow safe placement of the thoracoscope
The author prefers the use of a combination of minimally invasive surgery instruments (5-mm diameter) and long standard conventional instruments. The basic preference card includes a long and a short ring clamp, conventional long Metzenbaum scissors, a sponge stick, 5-mm biopsy forceps, 5-mm Metzenbaum scissors, and an electrocautery blade (Fig. 62.6). In addition, an open thoracotomy tray should always be kept ready for use in the OR in an event of bleeding. An actual trocar is only used for the thoracoscope. The 10-mm 30 ° scope is preferred for most adult procedures (5-mm scope in children). A 30 ° scope will provide optimal viewing without undue pressure on the ribs and the intercostal nerves. As described by Yim and Sihoe (2009), prewarming the thoracoscope with a sterile hot water bath effectively prevents fogging of the lens which can result from temperature differences when it is first inserted into the chest. Most working ports can be 5 mm and converted to 10–15 mm if necessary, as for stapling devices. There is a clear trend toward the use of smaller instruments and scopes, and it can be predicted that in the future, 2-mm instruments and scopes will be used as a standard in simple procedures.
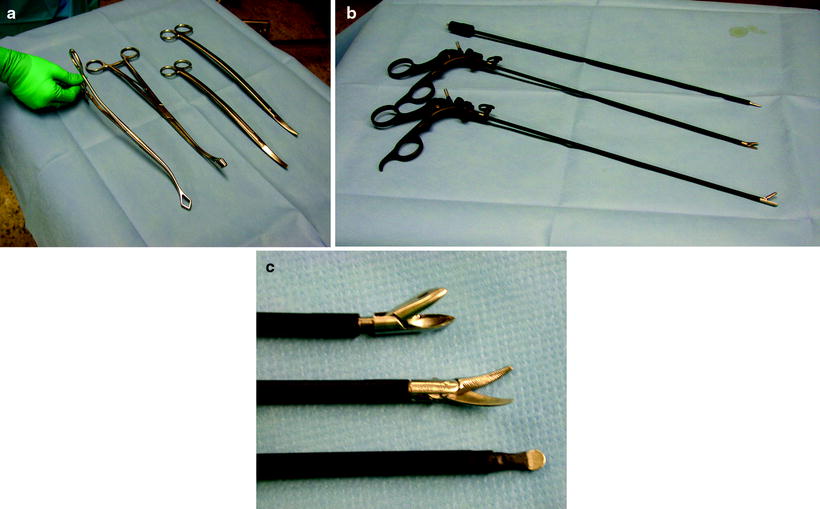
Fig. 62.6
(a, b, c) The basic preference card for diagnostic VATS procedures includes a long and a short ring clamp, conventional long Metzenbaum scissors, a sponge stick, 5-mm biopsy forceps, 5-mm Metzenbaum scissors, and an electrocautery blade
Avoiding, Recognizing, and Managing Technical Complications During the Procedure
Bleeding from Chest Wall
This problem usually manifests itself as a continuous stream of blood dripping from one of the trocar sites, and/or blood seen on the surface of the pleural surfaces. Less commonly delayed presentation as a hemothorax may occur. The source of bleeding is usually the intercostal artery or in cases of lesser bleeding smaller muscular vessels. Bleeding may be controlled with a variety of techniques, including application of direct pressure, electrocautery, or in rare instances suture ligation or clipping. In rare instances, enlarging the incision facilitates identification of the bleeding source.
Injury to the Visceral Pleura
Although careful observation of the technical steps enumerated will minimize the chance of visceral pleura and lung injury, it is not a rare complication. It may occur during trocar placement or mobilization of the lung. Management depends on the size and the location of the laceration and the amount of air leakage after reexpansion of the lung. Smaller tears at the periphery of the lung with direct contact to the chest wall may not require any repair. Larger tears may be repaired by application of sealants or by open suturing through a limited anterior thoracotomy.
Insufficiency of the Stapler Line
If the thickness of the stapled lung tissue is underrated during wedge resection with the use of standard stapling devices the length of the staples will not suffice for a closure of the central part of the resection line. Furthermore, the typical congested and fragile lungs of patients with diffuse interstitial lung disease can tear easily when standard endoscopic staplers are applied. In these instances, the lung should be repaired by open suturing (3-0 monofilament tie) through a limited anterior thoracotomy performed by enlargement of one of the trocar sites.
Major Vascular Injury
Major vascular injury can occur when biopsies are taken at the hilum or mediastinum. In particular, when pressure is applied while taking the biopsy, the tip of the forceps can injure the major vessel underneath. In the event of bleeding, use the sponge stick to tamponade the bleeding. If the bleeding is not controlled by application of direct pressure, it is advisable to emergency call for assistance by an experienced thoracic surgeon and prepare for a thoracotomy.
Pleural Disease
Undiagnosed Exudative Pleural Effusions
Pleural disease, specifically pleural effusions, is one of the more common clinical problems encountered by the interventional pneumologist. Estimates of the incidence of pleural effusions vary, with some estimating an annual incidence of up to one million in the United States. The more common causes of transudative effusions are congestive heart failure and hypoalbuminemic states (e.g., cirrhosis), and those of exudative effusions are malignancy, infection (e.g., pneumonia), pulmonary embolism, and tuberculosis (adopted from: Light: The undiagnosed pleural effusion).
At most institutions, over 50% of pleural exudates seen are malignant. Although most of these patients have advanced disease with a poor prognosis, some of them may have a relatively prolonged survival. Thus, specific treatments are often justified in an attempt to effectively palliate symptoms. However, only a minority of patients with malignant pleural effusions benefit from systemic chemotherapy. Pulmonologists, therefore, find themselves in a position to treat these chronic pleural effusions, as they recur rapidly and are disabling for patients. Most patients with malignant pleural effusions (MPE) are symptomatic, and their quality of life is affected. Complaints are usually dyspnea, cough, and chest pain, and treatment is focused on relieving these symptoms. Taking into account that the tumor does often not respond to chemotherapy, adequate drainage, with or without pleural symphysis, is mandatory for such patients, and several approaches are available to provide palliation (adopted from: Rodrigez-Panadero et al. 2006).
Invasive techniques for the diagnosis of pleural effusions have gained more popularity with the advent of video-assisted technology. Thoracoscopy offers the advantages of visual evaluation of the pleura, direct tissue sampling (including lung biopsy), and therapeutic intervention (e.g., dissecting loculations and pleurodesis). VATS is indicated for diagnosing pleural effusions that have remained undiagnosed despite previous, less invasive tests (e.g., thoracentesis).
For the diagnosis of pleural effusions of unknown origin, the use of two ports (one for the camera, one for a biopsy forceps) is recommended as the standard approach with the surgeon to stand on the patient’s front. If the patient has a chest tube already in situ, the drain site can be used as one of the access ports avoiding extra incisions.
If the patient presents with a large long-standing effusion or has undergone prior multiple thoracentesis attempts, we prefer to place a pigtail catheter 2–3 days before a scheduled VATS. This approach is recommended for three reasons: (1) dyspnea will be relieved immediately, (2) the risk of reexpansion pulmonary edema will be decreased, and (3) information is gained whether the lung is still fully expandable or partially or fully trapped. Full expansion of the lung is essential for effective pleurodesis after instillation of sclerosing agents. Among sclerosing agents available, talc (especially when applied thoracoscopically) is the most cost-effective sclerosant for the management of recurrent malignant pleural effusions. If, however, the lung is not fully expandable (Fig. 62.7), the implantation of an indwelling pleural catheter (PleurX Pleural Catheter; CareFusion, San Diego, Ca) provides a convenient, effective alternative, with good symptomatic relief following catheter placement and with few complications (Fig. 62.8). The indwelling pleural catheter can be placed under local anesthesia in the bronchoscopy suite by a single-use introduction set via J-tip guidewire and a peel-away introducer according to the manufacturer’s instructions. In the VATS setting, we prefer an open approach (Fig. 62.9). Indwelling pleural catheters offer an at-home management approach which is relevant for patients with terminal malignancies. Moreover, this procedure allows (at least partial) pleurodesis in up to 50 % of the cases with a less invasive approach than chest tube placement or thoracoscopic talc poudrage.
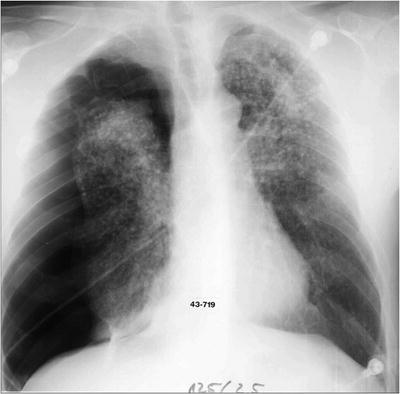
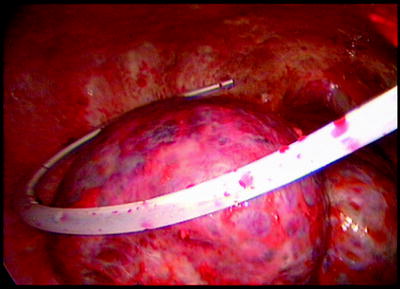
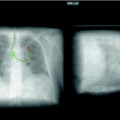
Fig. 62.7
Nonexpandable, entrapped right lung (with lymphangiosis carcinomatosa) after drainage of exudative fluid by means of an interventional (pigtail) catheter
Fig. 62.8


Related posts:

Stay updated, free articles. Join our Telegram channel
Full access? Get Clinical Tree
