1 Projection Radiography: General Information and Positioning Techniques
Radiographs of the hand are acquired according to standardized techniques in which positioning and centering must be carried out with great precision to avoid malalignment in the three spatial planes. To prevent pronosupination, the dorsopalmar and lateral views must be exposed in their respective neutral positions. With the elbow flexed, the forearm should be adducted for a lateral view, whereas for the dorsopalmar view the upper arm is placed in abduction at the shoulder level. Because of to the superpositioning of skeletal parts in projection radiography, several special positions and projections are used for the carpus. Injuries to the ligaments of the carpus and the thumb can be demonstrated indirectly in stress views.
General Techniques for Radiologic Diagnosis of Hand Abnormalities
Examining Instruments
Radiographs of the hand are acquired either on the universally usable Bucky table or on a special work surface for imaging of the hand (the Lysholm table). In the overtable technique, the x-ray cassette is placed on the surface of the table, and the patient’s hand is positioned on top of the cassette. The film—focus distance (FFD) is 105cm; the fine focus is individually set (focus size 0.6mm or less). A scattered radiation grid is not used.
Auxiliary Materials
For radiation protection, a lead coat and apron, as well as lead gloves for stress views.
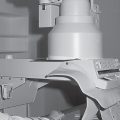
A positioning block made of light wood or plastic with the dimensions 25×35×50cm. For dorsopalmar projections, the patient’s hand and forearm are placed on this positioning block at shoulder level (Fig. 1.2a)
A positioning splint with vertical sides for strictly lateral views.
Wedged pads made of foam rubber (Bocollo) in various sizes and angles (30°, 45°, and 60°).
Small sacks filled with rice meal, Velcro bands, and adhesive tape for stable positioning and fixation of the patient’s hand.
Markers to indicate “R” and “L” on the x-ray film.
Lead strips to cover the nonexposed segments of the cassette.
Radiation Protection Measures
The patient wears a lead apron or a lead coat for radiation protection and sits beside the examining table; the patient’s legs are not under the table.
Recording Systems and Exposure Parameters
For projection radiography, cassettes sized 18×24cm and 24×30cm are used. Three different recording systems are available:
In film—screen radiography for diagnosis in adults, the cassettes have intensifying screens with a sensitivity value of 400 (dose required: 5 μGy). Depending on the size of the hand, a tube voltage between 45 and 55 kV and a current—time product between 3 and 6 mAs are selected for any exposure (without automatic exposure timer). According to the guidelines of the German Federal Medical Chamber, high-resolution film—screen systems can also be used for special clinical indications.
In digital luminescence radiography, storage screens based on phosphorus compounds serve as detectors. The exposure parameters are about the same as for film–screen radiography. A characteristic of the digital luminescence technique is the higher range on a linear gradiation curve, permitting corrections of the image brightness and contrast during postprocessing. For diagnostic imaging of the hand, so-called K2 systems with 2048×2048 pixels are recommended.
With flat-panel detectors, the x-ray pattern is recorded directly onto silicate- or selenium-based detectors so that an intermediate read-out procedure is no longer necessary (direct radiography). This procedure offers improved quantum efficiency with increased signal-to-noise ratio (SNR) at the same radiation dose: in practice this means that the same image quality can be achieved with a lower radiation dose. Direct radiography systems are now used with increasing frequency.
Peculiarities in Childhood
Aside from the use of high-gain intensifying screens with a sensitivity value of 400, the guidelines of the German Federal Medical Chamber require additional filtering with 1 mm aluminum and 0.1 mm copper for pediatric radiographic imaging.
According to radiation protection regulations in Germany, storage screens can be exposed at a lower radiation dose in children, although the result is poorer (decreased) SNR.
Special Examination Techniques
The following situations and techniques require modifications to the standard diagnostic procedure.
If the patient is immobile as a result of polytrauma or when postsurgical follow-up radiographs are being taken, auxiliary equipment is necessary for correct positioning and setup, such as placing the cassette laterally on the patient’s hand.
For imaging with mammography films, film–screen combinations with a sensitivity value of 25 are used (dose requirement: 40 μGy). The same film–focus distance of 105cm requires an 8-fold higher radiation dose than with standard diagnostic techniques. This technique therefore cannot be applied routinely but only when specially indicated, as in the diagnosis of the initial stages of arthritis.
In magnification and low-kilovoltage techniques, the film–focus distance is generally 65 cm. When conducted with a mammography unit using film–screen combinations, the exposures range from 35 to 41 kV, or 10 to 20 mAs (magnification technique) and between 28 and 35 kV or 25–40 mAs (low-kilovoltage). The digital alternative of magnification radiography using fine-focus tubes (direct radiographic magnification [DIMA] technique) is discussed in Chapter 2.
Diagnosis of congenital abnormalities of the hand and determination of the skeletal age are performed with the dorsopalmar projection only.
Special Imaging Techniques
Radiographs of the Entire Hand
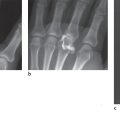
As survey views, these include the distal section of the forearm, the carpus, the metacarpus, and all fingers. In addition to the dorsopalmar view (Fig. 1.1a), an oblique view is exposed as a second plane, namely the 45° semipronated oblique view (zither-player projection, (Fig. 1.1b) and the 45° semisupinated oblique view (Nørgaard projection, (Fig. 1.1c). Indications for a survey view of the hand are acute injury distal of the carpus, diagnosis of inflammatory joint diseases (often with the Nørgaard projection as the second plane), and diagnosis of systemic bone diseases, using the hand as an indicator.
Radiographs of the Wrist
Indications for radiographic imaging of the wrist in two planes are pathologies of the distal forearm, the wrist, and the carpus. These include acute traumas, carpal instability, chronic degenerative and inflammatory diseases of the joints, and equivocal complaints at the wrist.

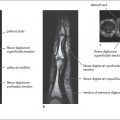
For radiologic diagnosis, an exact analysis of the radiograph of the distal section of the forearm and the carpus is only possible when the anatomical position is identical in both projection planes, i.e., without pronosupination between the two exposures. The so-called neutral position, which is the middle rotation of the forearm between the extreme positions of pronation and supination Fig. 1.2c-e, is best suited to this purpose. Standardized radiographs of the wrist in neutral position have the following prerequisites:
For the dorsopalmar view, the upper arm is abducted 90° in the shoulder and placed on a positioning block so that the forearm and the hand are at shoulder level with the elbow flexed Fig. 1.2a.
For the lateral view, the upper arm is adducted in the shoulder and the elbow is flexed 90° so that the forearm and the ulnar edge of the hand lie on the Bucky table Fig. 1.2b
A rotational movement of 90° must be avoided when acquiring the views in two planes.
The particular height between the abducted arm and the Bucky table is achieved for each patient individually by the use of a positioning block of appropriate height.
Whether the radiographs have been taken in neutral position without rotational movements in the proximal and distal radioulnar joints can be ascertained by the following radiological signs:
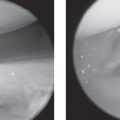
The ulnar styloid only appears in profile on the outer edge of the head of the ulna if the hand is in the neutral position (Fig. 1.2f). In all other positions, the styloid process appears in an “en-face” projection, namely in pronation at the level of the ulnar section and in supination in the middle of the head of the ulna.
Pronosupination changes the apparent length of the radius and ulna (translatory shift). In pronation, the ulna is in a more distal position in relation to the radius, whereas it is located more proximally in supination.

Related posts:
Stay updated, free articles. Join our Telegram channel

Full access? Get Clinical Tree


