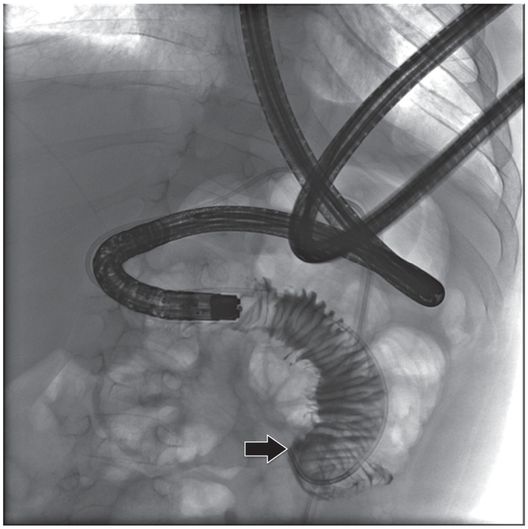
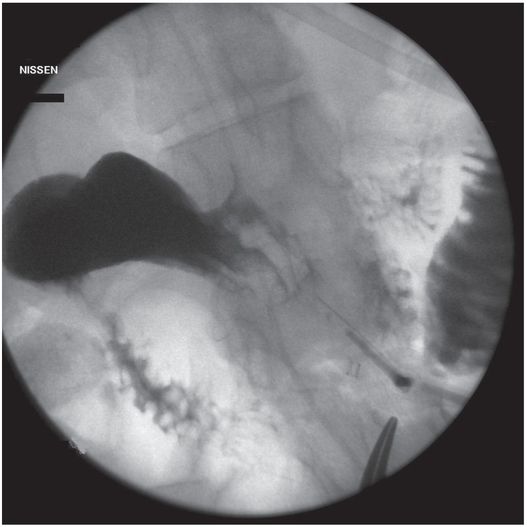
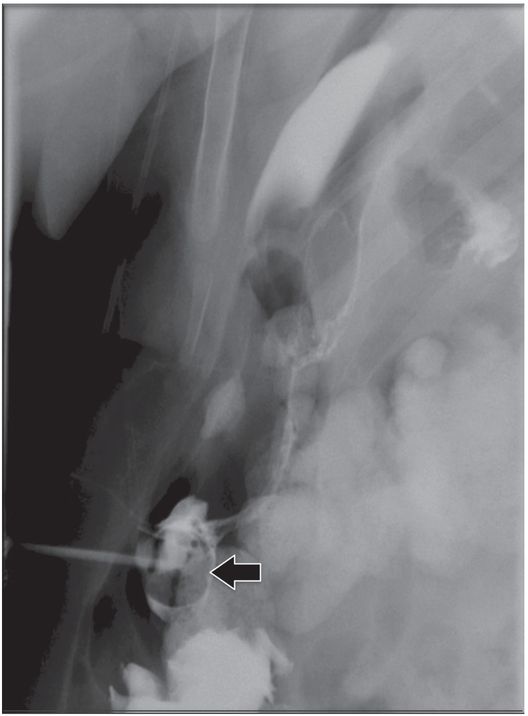
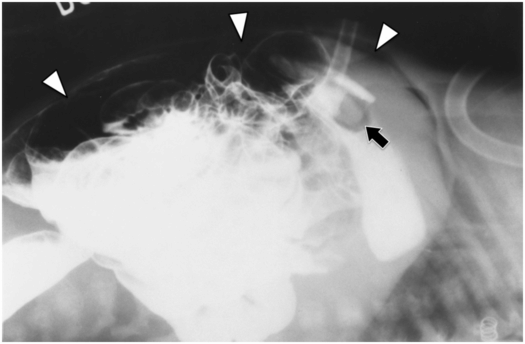
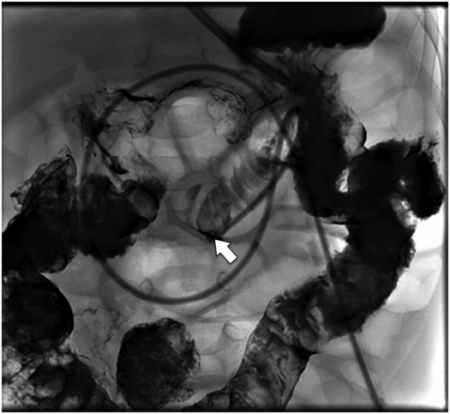
Due to the location of this surgically created gastrostomy in the proximal fundus, the transgastric jejunostomy tube became coiled in the gastric lumen. Because the stoma is directed toward the left side of the lesser curvature (arrow), it was not possible to advance the catheter through the pylorus without protracted effort and undue exposure to ionizing radiation. An endoscope was used to redirect the jejunostomy catheter into the duodenum but could not uncoil the Waltman’s loop in the stomach.
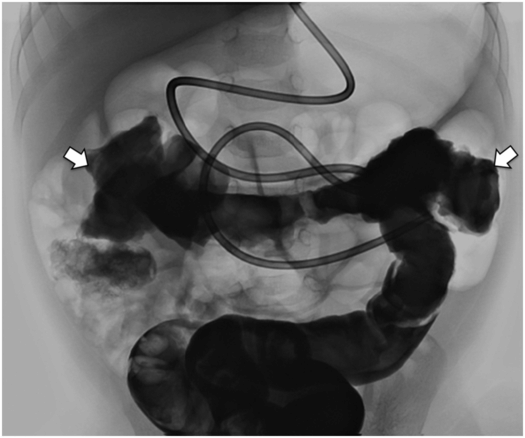
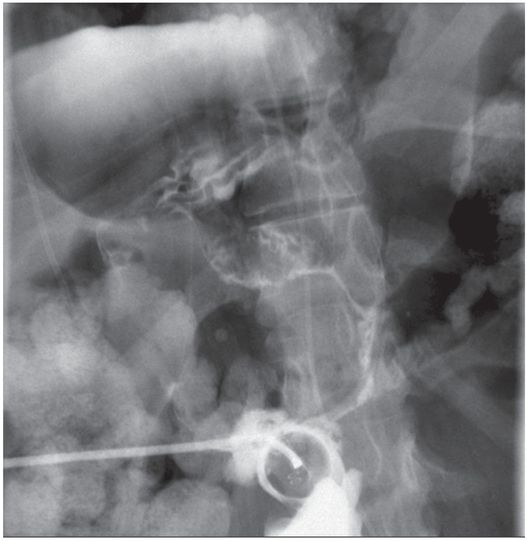
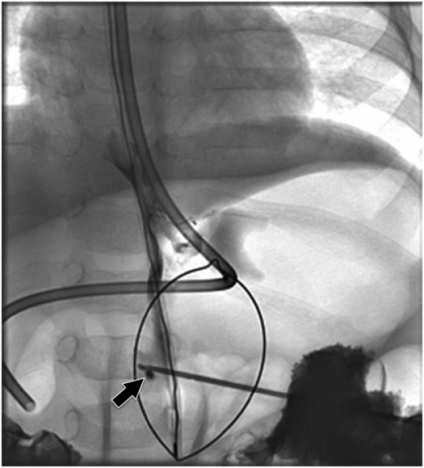
The jejunostomy catheter was removed, and a 5 French angled catheter was directed by a combination of endoscopic and fluoroscopic guidance. The endoscope traverses the esophagus, stomach and pylorus, with the tip in the third part of the duodenum. The catheter tip (arrow) was advanced to the proximal jejunum, and a small amount of contrast instilled through it to confirm position.
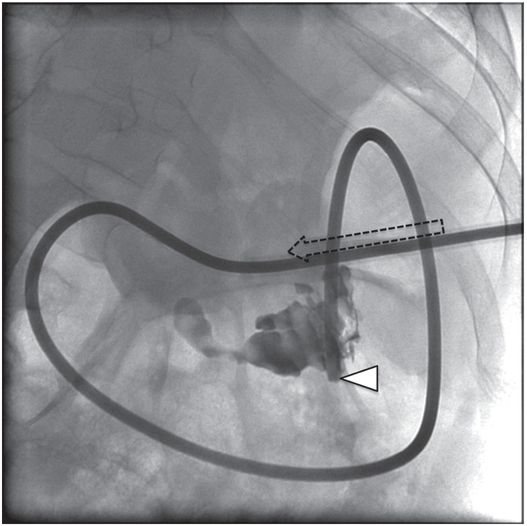
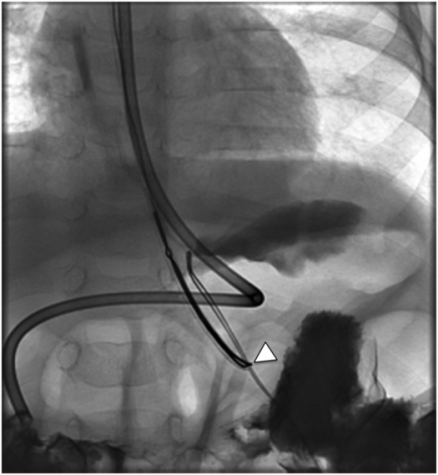
A stiff guide wire was advanced through the directional catheter, and the catheter was exchanged for a new transgastric gastrojejunostomy catheter, taking care to keep the catheter directed (arrow) toward the pylorus. The tip (arrowhead) was located in the proximal jejunum.
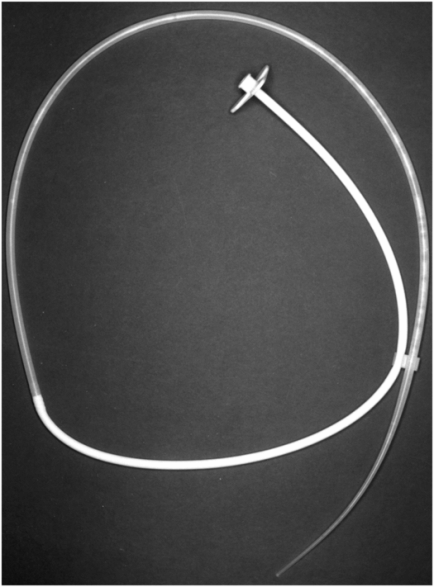
The gastrostomy button (GB), a simple, skin-level, non-refluxing gastrostomy device, was also introduced in the early 1980s as a substitute for conventional gastrostomy tubes. The intended use was for replacement of gastrostomy tubes in patients with established tracts that had been inserted surgically or endoscopically. Shortly after its introduction, other reports appeared supporting the use of the GB and stressing the positive features of the device and the high level of patient satisfaction. Since that time, the use of GBs for long-term nutritional support has grown tremendously and the GB is now the most commonly used feeding device for individuals who require prolonged assisted feeding.
As a result of the widespread acceptance of the GB, there has been increasing interest in using it as a primary device, thereby avoiding the initial step of gastrostomy tube insertion. The one-step insertion has been advocated as an efficient approach to feeding and avoiding the need for a second procedure and its attendant risks and costs. Several series have been presented demonstrating the safety and effectiveness of this method. Today, placement of a primary GB is most often performed using the laparoscopic approach.
When a primary gastrostomy or gastrojejunostomy has been performed, exchange for a low-profile device can be performed as a second procedure at a later date (usually six to twelve weeks later). In 1994, Towbin developed a button jejunostomy. Subsequently, a button gastrojejunostomy became available. Both devices are useful in patients with GER. It is likely that the area of percutaneous feeding will continue to evolve with minimally invasive techniques replacing open surgery whenever possible.
Enterostomy care
In some settings, such as home care and chronic care facilities, ostomy care may be episodic, with complications or tube dysfunction requiring trips to emergency departments or tertiary facilities with varying experience in the management of ostomy catheters and stomas. In some hospitals, ostomy care may be provided by an advanced practice nurse or ostomy nurse, while in others a pediatrician surgeon, gastroenterologist, or interventional radiologist may direct care of these patients. In facilities where primary insertion of gastrostomy catheters is performed, this care tends to be distributed under the auspices of multiple services, medical, surgical, and interventional, with varying degrees of coordination between services. For example, primary insertion may be performed by gastroenterologists or surgeons, but diagnosis and management of catheter-related complications falls to the radiologist, ostomy and skin care or ostomy nurses, and nutritional management to dieticians, with limited communication between providers.
Where experienced pediatric interventionalists are available, over time there is a tendency for ostomy care to centralize under the supervision of the interventional service, from primary insertion to continuing care. This may even take the form of a multidisciplinary enterostomy team, with highly coordinated care provided by those services already mentioned as well as admission and discharge planners, occupational therapists, educational nurses, and other providers. Such a team can offer a single point of contact for patient and parent education, referral, assessment, and prioritization of enterostomy patients, as well as for information management, quality assurance, and outcome analysis related to these patients. An organized approach to management of this large patient group remains an opportunity to improve patient care and decrease costs (Table 4.1).
| To improve outcome and quality assurance analysis, it may be helpful to record the following information for each abdominopelvic procedure: – Demographic information (patient name, unique identification number, date and time of procedure, age, sex, weight, date of birth, etc.) – Primary diagnosis (underlying disease), patient acuity, comorbid illness, ASA class, competence of patient or primary caregiver – Any contraindicating or complicating factors Coagulopathy Infection, immunodeficiency, nutritional status, cardiorespiratory compromise Skin or mucosal abnormality (e.g., cellulitis, epidermolysis bullosa) Limitation to access (e.g., micrognathia, microgastria, intervening vital structure or mass) – Reason (indication) for procedure; referring service and provider; inpatient or outpatient status – Anticipated endpoint – Primary provider responsible for procedure (interventionalist, gastroenterologist, surgeon, etc.) – Collaborating provider(s) – Procedure location (interventional suite, operating room, ICU, bedside, etc.) – Provider(s) responsible for anesthesia/sedation (interventionalist, intensivist, anesthesiologist, nurse, etc.) – Preprocedural evaluation (e.g., coagulation profile, creatinine, amylase, etc.) – Preprocedural interventions (e.g., antibiotics, blood products, imaging, endoscopy) – Initial access Guidance (anatomic landmarks, US, fluoroscopy, CT, MRI, PET fusion, endoscopy, etc.) Operative site or pathway (e.g., percutaneous (location), transoral, transrectal) Number of attempts/passes Reason for deferral, discontinuation or failure, if procedure not completed – Access device and position Manufacturer, type, diameter, length, other pertinent characteristics Tip or target position – Equipment and supplies used – Procedure time, fluoroscopy time, or estimated radiation dose – Type and adequacy of anesthesia/sedation/analgesia – Procedural complications (e.g., pneumothorax, unintended gastrointestinal perforation or rupture, bleeding) and management – Adjunctive procedures (e.g., bowel decompression, intracavitary sclerotherapy, tract embolization) – Complications (major or minor), including Procedure-related discomfort (include dates) – Type – Management (e.g., NSAIDs, narcotics) – Outcome Gastrointestinal catheter complications (include dates) – Type (e.g., transcolonic puncture, lumen perforation or rupture, peritonitis, granulation tissue, intussusception) – Method of diagnosis – Management (e.g., observation, intervention, surgery) – Outcome Bleeding or vascular injury (include dates) – Type (e.g., hemorrhage, AV fistula or pseudoaneurysm, thrombosis) – Method of diagnosis (e.g., hemoglobin, US, CT scan, arteriogram) – Management (e.g., observation, transfusion, embolization, thrombolysis) – Outcome Dislodgment or malposition (include dates) – Method of diagnosis or documentation – Management – Outcome – Other procedure-related complications or interventions – Complications, additional details Major – Admission to hospital for therapy – Unplanned increase in level of care – Prolonged hospitalization – Permanent adverse sequelae – Death Minor – No sequelae – Nominal therapy – Short hospital stay (for observation) Procedurally related (within 24 hours) Early (within 30 days) Late – Removal or replacement (reason and date; endpoint achieved?) – Outcome at follow-up (method and date; endpoint achieved?) Postprocedural lab studies (e.g., fluid pH, culture or biopsy findings) Response (e.g., reduction in fever, dyspnea, debilitation, discomfort) Results (e.g., daily volume of fluid drained, radiographic evidence of resolution, hospital days) Treatment failure (e.g., recurrent abscess, gastroesophageal reflux, dysphagia) |
Indications
Since the introduction of the percutaneous approach to placement of feeding tubes, there has been a steady increase in the number of indications in the pediatric population (Table 4.2). At this time, it can be said that any child with a need for medium- to long-term nutritional support who has a functioning GI tract is a candidate for PG. It can be broadly stated that the indications are failure to thrive, inability to take adequate calories and essential nutrients by mouth, need for chronic gastric decompression or drainage, and rarely for associated procedures such as esophageal dilation. Common underlying conditions in candidates for percutaneous feeding include neurologic disorders (e.g., cerebral palsy), cystic fibrosis, and underlying malignancies. With increasing complexity and acuity of patients, and improved survival of patients with severe metabolic, congenital cardiac, and other diseases as well as solid organ and bone marrow transplantation, there is a continually growing population of candidates for placement of either a PG or PGJ.
| Percutaneous gastrostomy Neurologic disorders Static encephalopathy Progressive encephalopathy Brain tumors Coma Pulmonary disease Cystic fibrosis Recurrent aspiration Bronchopulmonary dysplasia (severe) Chronic pulmonary disease (severe) Respiratory failure Head and neck Swallowing and chewing disorders Malignancy Macroglossia secondary to amyloid or other condition Syndromes Gastrointestinal Short gut syndrome Esophageal dysfunction Inflammatory bowel disease Motility disorder Epidermolysis bullosa Miscellaneous Failure to thrive Prematurity Pre or post liver transplantation Anorexia and cachexia (e.g., cystic fibrosis) Severe congenital heart disease Metabolic stress (e.g., trauma, burns) Inflammatory myopathy Connective tissue diseases Storage diseases |
| Percutaneous gastrojejunostomy – Children at risk for aspiration – Children with proven GER – Poor gastric emptying – Superior mesenteric artery syndrome – Small intestinal motility disorder – Partial obstruction of the stomach or duodenum – Pancreatitis – Static or progressive encephalopathy – Need to simultaneously vent the stomach and feed – Abnormal gastric function |
Few contraindications to PG exist; however, an uncorrectable coagulopathy, instability of vital signs, and inaccessible anatomy may make placement of a PG unwise. Addressable coagulopathies and bleeding abnormalities should be corrected prior to gastrostomy insertion (see Chapter 1). Cardiorespiratory abnormalities that limit deep sedation or general anesthesia may require local anesthesia augmented by careful use of intravenous or inhalational sedation, usually with the assistance of cardiac anesthesiologists.
Specific maneuvers (described under “Technical variations,” below) or time may adequately resolve anatomic barriers to safe access such as dilated loops of bowel. In a small number of children, abnormalities such as severe scoliosis, high horizontal orientation of the stomach, an incompetent pylorus (preventing adequate gastric insufflation), abdominal masses or organomegaly may represent fixed obstacles to successful percutaneous access and mitigate for surgical or endoscopic alternatives. While coexistence of a ventriculoperitoneal (VP) shunt is not in itself a contraindication to gastrostomy insertion, an access site should be chosen well away from the shunt to minimize the chance for shunt infection. In addition, elective percutaneous transgastric procedures should not be performed within 30 days of VP shunt placement or revision, as this is the most vulnerable period for development of a VP shunt infection. In our experience, children with VP shunts, peritoneal dialysis, or Crohn’s disease may otherwise safely receive a PG. To encourage effective maturation of the tract, dialysate or ascitic fluid should be drained prior to the procedure.
The antegrade (pull) gastrostomy cannot be safely performed if the esophagus is too small in diameter to permit atraumatic passage of the device, or if there is an esophageal obstruction or a pathologic process such as epidermolysis bullosa that makes passage of a tube through the esophagus dangerous or unwise. Of course, with the exception of a small esophageal diameter in infants <5 to 7 kg, these problems rarely occur in children and in many cases can be circumvented by using the retrograde, push–pull, or the antegrade approach using a retention device with a smaller diameter.
Surgical anti-reflux procedures have failure and complication rates in the range of 8 to 12% and approaching 20%, respectively. These problems are especially prominent in children with neurologic problems and those with repaired esophageal atresia with or without tracheoesophageal fistula. There have been discussions and disagreements over the issue of whether GER contraindicates placement of a PG in favor of an SG. In children with severe encephalopathy and GER, or those with the propensity to develop GER, it is better to insert a PGJ than to perform an SG and fundoplication in most instances. Percutaneous gastrojejunostomy has the advantages of a lower major complication rate, shorter hospitalization, and a less costly procedure. The cost differential is about 5:1, with the SG and fundoplication averaging about US$25,000 per patient and the PGJ about US$5,000, at the time of writing. An initial PGJ appears to be a good strategy since most children tolerate feedings and gain weight. In our experience, only a small percentage of children (<8%) have problems that require subsequent fundoplication.
Technique
Equipment
The equipment selected depends on the operator’s approach to tube insertion: antegrade versus retrograde versus push–pull technique. However, in general, the procedure is relatively simple to perform and the majority of the equipment used is similar regardless of approach save for the PG type selected (Table 4.3).
| Antegrade gastrostomy – Monitoring equipment (pulse oximeter, blood pressure monitor, and other monitors prn). – Oral barium meal four to six hours prior to PG insertion or barium enema at the time of the PG. – 8 to 10 French feeding tube for NG placement. – Topical anesthetic (e.g., EMLA®, ELA-Max®) – Bite block or side mouth gag to keep mouth open in uncooperative children who might bite or those who will not voluntarily open their mouths. – 8 to 10 French feeding tube with end cut off to create an end-hole catheter or a 5 French JB-1 catheter. – 0.035- or 0.038-inch Bentson guide wire. – 34 mm nitinol snare (Microvena, White Bear Lake, MN) – Betadine or other skin prep. – 1% lidocaine or other local anesthetic. – Ross-Flexiflo® peg kit (Ross Products Division, Abbott Laboratories, Columbus, OH) 18-gauge needle Scalpel with #10 or #11 blade 0.038-inch, 260 cm guide wire 14 to 16 French Corpak Antegrade gastrostomy tube (Corpak Med Systems, Buffalo Grove, IL) with: – Outer friction lock disk to stabilize PG at the skin surface. – Yellow adapter to connect to the feeding pump or syringe. – Water-soluble contrast. |
| Retrograde gastrostomy – Monitoring equipment (oximeter, blood pressure, electrocardiogram, other monitors prn). – 8 to 10 French feeding tube or 5 French JB-1 catheter. – Betadine or other skin prep. – 1% lidocaine or other local anesthetic. – Pediatric gastrointestinal suture anchor set. – Syringes and needles, including a 27-gauge, 1.5 inch needle for administration of local anesthetic. – 18-gauge single wall puncture needle. – Slip-ring extension set. – Low-osmolar contrast (e.g., iohexol 300 mg I per ml). – 70 cm non-Teflon coated 0.035-inch guide wire – Dilators appropriate for the size of the gastrostomy tube selected. – Peel-away sheath appropriate for the catheter/tube selected. – Gastrostomy tube (e.g., Dawson–Mueller Mac-Loc™ ultrathane catheter, 15 cm, 8.5 to 12 French, Cook, Inc.). |
| Percutaneous gastrojejunostomy – Obtain percutaneous gastric access as described under Antegrade gastrostomy or Retrograde gastrostomy. – Jejunostomy tube (e.g., 8 French Frederick–Miller (FM) tube modified by cutting off its weighted tip creating an end hole catheter, a 6 French Corpak® or a 9 French FlexiFlo® tube), or – Unibody transgastric gastrojejunostomy tube (16–18 French) – Directional catheter (e.g., 5 French JB-1, Kumpe or Berenstein catheter) – Bentson 0.035- or 0.038-inch guide wire – Silicone spray (Rusch Silkospray, Willy Rusch AG, Rommelshausen, Germany), mineral oil, Pam vegetable spray, or K-Y Jelly (Roxane Laboratories, Inc., Columbus, OH). |
Patient preparation
Clinical and radiological evaluation of children prior to the PG insertion is important in order to identify those individuals who will benefit from this approach to feeding. The evaluation should focus on identifying children requiring at least six weeks of total or near-total nutritional support, for whom long-term nutritional support may offer substantive benefit. Patients should be excluded who have anatomic or functional abnormalities likely to preclude safe and successful PG insertion or function, including those with abnormal gastric emptying. Those children with GER, poor gastric emptying, or risk of aspiration of gastric contents, should be considered for a PGJ (Table 4.2). A PG is preferred whenever possible since it is easier to care for, is less apt to clog or be prematurely dislodged, and allows for eventual bolus feeding. Both PGs and PGJs can be converted to a low profile device at a later date.
Currently, only the rare child with complicated GER is primarily referred for an SG and anti-reflux surgical procedure. The vast majority of children are considered for PG or PGJ insertion. Thus the question of the optimal and most cost-effective work-up to help decide the appropriate feeding procedure(s) becomes important. While there is no prospective study to suggest the best approach to preoperative evaluation, a variety of diagnostic tests are available. Children who are candidates for a PG or PGJ may be examined with an esophagram and upper gastrointestinal series (UGI series), nuclear gastric scintigraphy, pH probe to identify and grade GER, and endoscopy.
We have found the esophagram and UGI series to be adequate for preoperative decision-making prior to PG or PGJ insertion. The esophagram and UGI series is performed using barium, and images of the esophagus are obtained in frontal and lateral projections. An image is obtained with a scoliosis ruler in the field so that the esophageal diameter can be measured. Measurement can also be made electronically if digital fluoroscopy is available. The remainder of the UGI series focuses on the size and position of the stomach, gastric emptying, and the presence of GER. The position of the duodenojejunal junction is noted to exclude a malrotation, and the proximal small intestines are visualized to rule out the possibility of a malabsorption syndrome and motility disorder.
If necessary, gastric scintigraphy, using sulfur colloid in milk, can be performed. This examination can more accurately assess and quantitate gastric emptying and GER, but does not permit measurement of the esophageal diameter and evaluation of the anatomy. Therefore fluoroscopic examination is preferred, especially in young children in whom esophageal size is important for procedural planning. Diagnostic evaluation using a pH probe and endoscopy are utilized in selected cases.
In our experience, antibiotics do not need to be routinely given unless the child: (1) is immune depressed or immune deficient; (2) has a history of postoperative infections; or (3) has a procedural complication or visualization of free intraperitoneal air on postprocedural abdominal radiographs. This approach, however, is not universally accepted and some groups prefer to give prophylactic antibiotics to all patients, or to additional specific subgroups such as patients with ventriculoperitoneal shunts. A similar approach is taken toward the use of routine preoperative laboratory testing. It is our preference not to obtain a routine CBC and coagulation profile or other blood tests unless there is a specific history or risk of bleeding abnormality (see Chapter 1). Those laboratory tests obtained are tailored to the child’s specific clinical problems.
In most cases, preparation for insertion of a PG or PGJ is relatively straightforward. The child is kept NPO according to hospital policy for sedation and anesthesia. Whenever possible, a barium meal is given prior to gastrostomy insertion so that the transverse colon is opacified at the time of the procedure. If an esophagram and UGI series is not needed and a barium meal cannot be given, then a thin barium contrast enema is carried out at the time of the PG. When an UGI series is necessary, we find that it is most efficient to complete the contrast study the morning of the procedure so that contrast will be in the transverse colon in the afternoon at the time of the PG insertion. When the child arrives in the department, the details of the procedure are reviewed with the patient, parents, or guardian and last minute questions are answered.
Standard technique
Nasojejunal tube insertion
Although a large number of children need nutritional support, not all require a PG or PGJ. In the short term, in a child with a functional GI tract, temporizing with a nasogastric (NG) or nasojejunostomy (NJ) tube may be sufficient. There are no definitive guidelines to suggest the optimal time period for these measures and each patient should be considered individually. It is our policy to consider children for a PG or PGJ if it is expected that they will require nutritional support for about six weeks or longer. If the expected need is less than six weeks, an NJ tube is recommended.
Nasogastric tubes are usually inserted at the bedside by the clinicians caring for the child unless a problem or anatomic variation makes fluoroscopic guidance preferable. Nasojejunostomy tubes may also be inserted without guidance by using a weighted tube and keeping the child in the right lateral decubitus position to encourage passage through the pylorus into the small intestine. Unfortunately, it may take days for the tube to get into the duodenum. In our experience, these tubes usually do not get distal to the second portion of the duodenum. We do not recommend the bedside approach since it is both costly and usually delays the onset of nutritional support. The high cost of bedside placement is due to the need for multiple chest radiographs and longer hospitalization resulting from delayed feeding. Therefore if rapid deployment of an NJ tube is desired, it is done in the IR suite with fluoroscopic guidance.
Although a relatively mundane procedure, it is one that is commonly requested in the pediatric population and serves as practice for other catheter-guide wire manipulations, e.g., vascular interventions. There are a variety of catheter-guide wire combinations that can be used successfully; however, we prefer the combination of a 4 or 5 French directional catheter and a 0.035-inch guide wire (e.g., Bentson guide wire) for all gastrointestinal procedures and at this time rarely use anything else (Table 4.4). If a patient comes to the radiology department with an NG tube, it will usually need to be removed since it has only side holes. Attempts to advance a feeding tube are usually unsuccessful and may entail considerable radiation exposure, so beginning with a directional system is advisable.
– Directional catheter (JB-1, Berenstein).
– Floppy tipped guide wire (Bentson, J wires).
– 8 or 9 French jejunostomy tube (8 French Frederick–Miller, 9 French Flexiflow).
– Silicone spray (Rusch Silkospray, Willy Rusch AG, Rommelshausen, Germany), mineral oil, Pam vegetable spray, or K-Y Jelly (Roxane Laboratories, Inc., Columbus, OH).
– Tegaderm®, Opsite®, micropore tape to secure NJ to upper lip or gastric tube (GT).
– Restraints: sock mittens, no-no’s.
Using a directional system, a >99% success rate and virtually no complications can be expected. Once the catheter is in the distal stomach, the tip is directed first superiorly and then inferiorly while the Bentson guide wire is used as a probe (Table 4.5). It is important to extend the guide wire out of the catheter until it becomes J shaped and slightly coiled. This allows the guide wire to search for the pylorus and duodenum. In some instances, the guide wire coils in the duodenal bulb. If this occurs, it is best to advance the catheter to that point and then retract the guide wire back into the catheter.
– Advance a 5 to 8 French directional catheter over a 0.035- to 0.038-inch guide wire via the naris to the stomach.
– Monitor initial insertion through the nasopharynx and hypopharynx to proximal esophagus with intermittent fluoroscopy.
– Monitoring during passage through the esophagus is not necessary.
– In the event of coughing or decreased oxygenation on oximetry, confirm non-tracheal position of the catheter tip.
– Once in the stomach, turn catheter tip toward the right upper quadrant and advance toward the pylorus.
– If the catheter tip does not easily engage the pylorus, a small amount of dilute contrast may be used to define the antral and pyloric anatomy.
– Rotating the catheter tip and translating it forward and back will usually enable engagement of the pylorus.
– Angling the tube may assist visualization of relationships in the gastric outlet, but will not change those relationships.
– Rotating the patient will change relationships, and may permit alignment of the catheter tip with the pylorus in difficult cases.
– Probing the pylorus with small, gentle movements of the wire and catheter tip is preferred.
– Pylorospasm, sometimes caused by repeated or ungentle instrumentation of the pylorus, may significantly degrade success.
– Once the catheter tip has passed the pylorus, the catheter and guide wire are iteratively advanced until they are beyond the ligament of Treitz.
– The internal catheter length is measured by marking the catheter where it exits the naris, and the catheter is then exchanged over the wire for an 8 French Frederick–Miller tube trimmed to appropriate length.
– Confirm appropriate position with a small amount of contrast.
– The NJ tube is fixed to the skin of the face from the naris to the ear with micropore tape on the skin and over the tube, then the tube is positioned out of reach of the child. Precautions may be necessary (including no-no’s if indicated) to prevent the child from accidentally dislodging the tube.
The catheter should then be pointed inferiorly and the Bentson pushed out into the duodenum. If this maneuver is repeated a few times without success, it is best to inject contrast and distend the lumen. In addition, the C-arm can be rotated into the right anterior oblique (RAO) position to profile contrast in the pyloroduodenal junction. Likewise, the patient may be rotated into the RAO position to encourage contrast to fill the bulb. These maneuvers usually aid rapid positioning of the guide wire distally. These steps are repeated until the guide wire is maneuvered into the proximal jejunum. At this point the JB-1 is exchanged for a modified 8 French Frederick–Miller tube cut to length for the patient. The same approach is utilized for insertion of a GJ tube since the same anatomic problems are encountered.
The NJ tube is secured to the skin by making a tape moustache. Before the tube is fixed in place the skin is treated with a skin adhesive such as benzoin or Mastisol® then covered with tape, Tegaderm® or Opsite®, cut to the proper size and shape. The tube is brought across the cheek and put behind the child’s ear to minimize the chance for accidental dislodgment. The entire length of NJ tube on the face is secured by covering it with tape or occlusive dressing strips. In children who are prone to pull tubes out, additional protective measures can be used to keep the tube in place. Arm and hand movement can be restricted with sock mittens, ‘no-no’s’ or other devices can be positioned over the elbows to dissuade the child from pulling out the tube.
Antegrade gastrostomy
The antegrade placement of a gastrostomy tube begins with a limited abdominal ultrasound (Figure 4.2). The left lobe of the liver is identified and its position is outlined on the anterior wall with an ink marker. A line is also drawn one to two finger-breadths below the left inferior costal margin. The transverse colon is opacified by a prior barium meal or retrograde enema, so that it may be avoided (Figure 4.3). A nasogastric (NG) and an orogastric (OG) tube are inserted. We find that in most instances it is fastest and easiest to use a 5 French JB-1 catheter and 0.035- or 0.038-inch Bentson guide wire to ease passage of both tubes through the oropharynx into the stomach (Table 4.6).
Thin barium or water-soluble contrast solution is administered by way of a transrectal enema. Once contrast reaches the transverse colon (between arrows), the flow is reversed and as much contrast as possible drained to avoid obscuring structures. A nasojejunal tube will be pulled back until the tip is in the stomach and used to insufflate the stomach with air after administration of glucagon and prior to percutaneous puncture.
| Antegrade gastrostomy – Ultrasound abdomen and identify the left lobe of liver. Mark liver and costal margins on skin surface. – Barium meal (four to six hours prior to procedure) or enema to identify transverse colon. – Insert NG and OG tubes. – Exchange OG tube for 34 mm nitinol snare. – Inflate stomach via NG tube. – Puncture stomach under fluoroscopic guidance after transverse colon is cleared. – Insert, grasp, and retrieve guide wire via the mouth. |
| For “push–pull” method, continue at * below – Position antegrade PGT over guide wire and pull through anterior abdominal wall. – Insert outer retention disc over GT and hub fitting onto GT. – Coaxially insert JT if needed. – Secure JT to GT with Tegaderm® or other device/method. |
| “Push–pull” method (* continues from above) – Position antegrade PGT over guide wire and pull through anterior abdominal wall until 14 French portion of dilator is visible. – Position 14 French balloon-tipped GT retrograde over guide wire and tightly couple to dilating tip of antegrade PG. – Simultaneously pull back PGT at the mouth while pushing the balloon-tipped PGT at the skin surface until the balloon-tipped tube is in the esophagus. – Visualize the balloon-tipped PGT in the mouth and uncouple the tubes. – Partially inflate the balloon with dilute contrast and using fluoroscopic guidance, pull the balloon into the stomach and fully inflate it with water (3 to 7 ml). – Leave guide wire in position and inject contrast to confirm intragastric PG position. – Coaxially insert JT, if needed. – Secure JT to GT with Tegaderm®. |
| Retrograde gastrostomy – Antibiotics, if preferred. – Identify left lobe of liver and transverse colon. – Insert NG tube. – Inflate stomach. – Insert T-fasteners. – Inflate and puncture stomach. – Maneuver guide wire into stomach or small intestines. – Insert peel-away sheath, if desired. – Dilate tract. – Insert pigtail, unibody GJT, or other catheter type as preferred. – Place catheter to suction for 24 hours. – Cut retention sutures in one week. – Later, sequentially dilate tract as needed. |
Once the wire is coiled in the stomach, the OG tube is exchanged for a 5 French Teflon® sheath to guide the nitinol snare (Figure 4.4). The guide wire is removed and replaced with a large (25 to 34 mm) nitinol gooseneck snare. Once the snare is in the gastric lumen, it is kept in the open position adjacent to the greater curvature (Figure 4.5). Occasionally, depending on gastric shape, a more posterior location of the snare is preferable. To accomplish this, the snare may be positioned closer to the esophagogastric junction. The best position depends on the needle position and angle, and on the gastric anatomy.
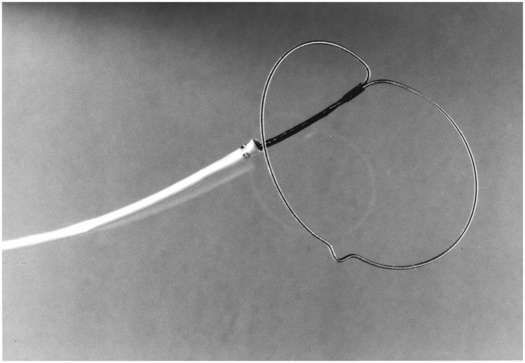
A large (34 mm) gooseneck snare (arrowhead) is delivered transorally to the gastric body just proximal to the antrum, where it is opened and directed to serve as a target for percutaneous transgastric puncture.
In most patients, the PG puncture site is selected just lateral to the margin of the rectus abdominus muscle, inferior to the left lobe of the liver (if it is in the area), and one to two fingerbreadths below the costal margin (Figure 4.6). The potential entry site is confirmed by placing a hemostat on the skin surface and observing its relationship to the transverse colon, the liver, and the snare. In children with a transverse, midline, or high stomach, a sub-xyphoid entry site may be necessary. Puncture through the rectus abdominus muscle is not preferred since it may cause cramping discomfort and may place the inferior epigastric artery at risk of injury. However, when necessary, a transmuscular approach may be used.
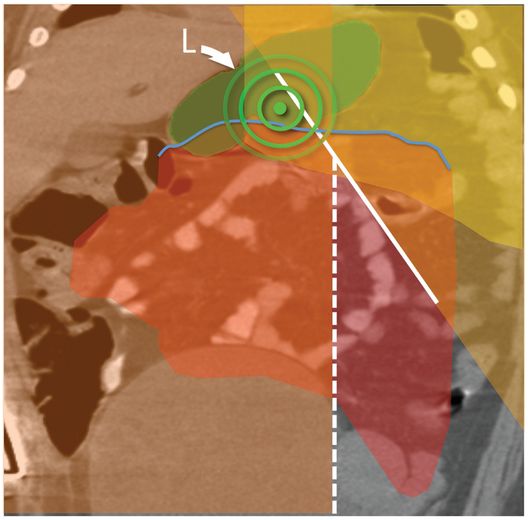
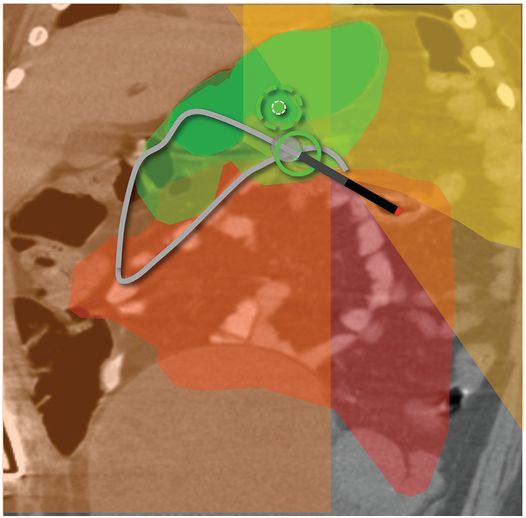
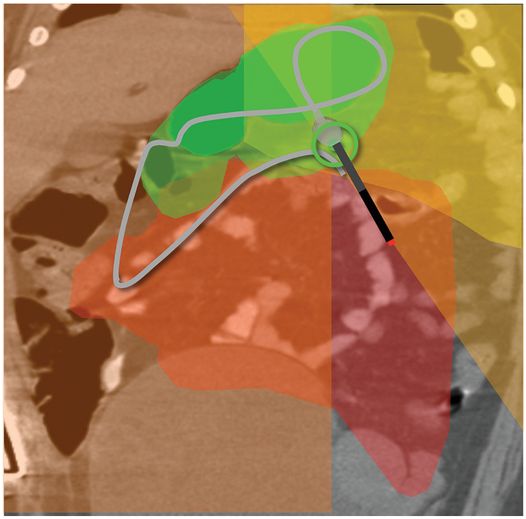
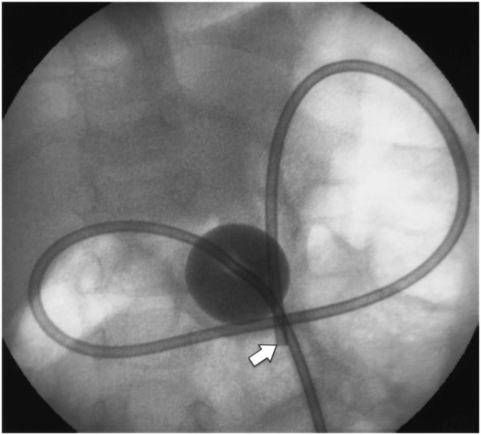
(a) An anteroposterior image shows a large hiatal hernia and organoaxial rotation of the stomach, which is partially filled with contrast. As a result, the inferior margin of the stomach is at the level of the inferior costal margin, making percutaneous access difficult. (b) Coronal CT from the same patient shows the inferior borders of the liver (L) and spleen (not shown), the costal margin (solid line), the lateral margin of the rectus abdominus muscle (dashed line), and, when it lies anterior to the stomach (green-shaded region), the superior margin of the transverse colon (blue line). These borders together define the safest region (target) for percutaneous puncture of the gastric wall. (c) When the stomach is distended with air (light-green shaded region) through a nasogastric tube prior to puncture, the altered anatomic relationships frequently provide a more optimal safe zone (solid target). This allows a stoma site and angle that directs the gastrostomy tube (black line) and jejunostomy tube (gray line) toward the gastric outlet. (d) A choice of site and angle, common to surgical and endoscopic placement, that directs the gastrojejunostomy tube (gray line) to the left of the lesser curvature and toward the gastric inlet, often leads to formation of a Waltman loop and to inexorable and frequent dislodgment. (e) During surgical gastrostomy in this patient, the stomach was pulled inferiorly to reach the gastrostomy site, distorting the already abnormal gastric anatomy. (f) Anteroposterior and (g) lateral contrast studies of the newly placed gastrostomy obtained due to irregular vital signs demonstrated extragastric position of the gastrostomy retention balloon (arrow).
The entry site is prepared in sterile fashion and then draped. The skin at the entry site is anesthetized with a slow injection of 1% lidocaine buffered with sodium bicarbonate (8 ml/2 ml mixture) using a 27- to 30-gauge, 1.5 inch needle to minimize discomfort.
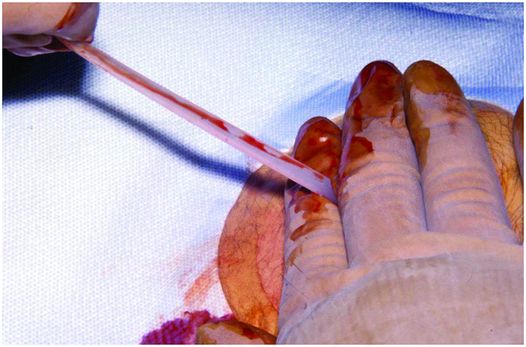
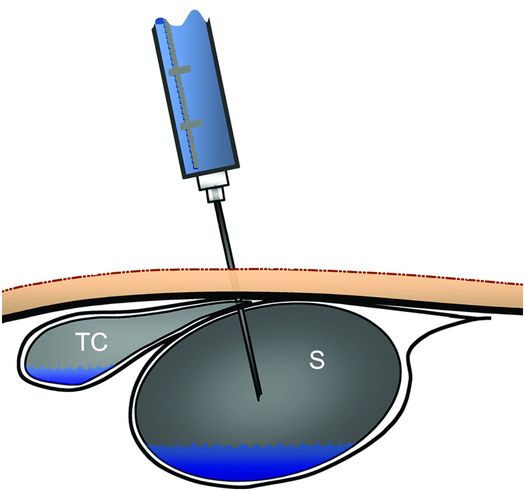
Once the child is sedated or anesthetized and the skin adequately anesthetized, a 1.0 to 1.5 cm skin incision is made at the previously selected entry site with a scalpel blade. The incision is purposely made larger than the diameter of the PG tube so that the possibility of ischemia leading to fasciitis is reduced in the rare case of postoperative infection of the abdominal wall. The subcutaneous tissue is then bluntly dissected to make passage of the GT easier. Some interventionalists prefer to administer glucagon at this point in an IV dose of 0.1 to 0.5 mg, in order to increase the tone of the pylorus and decrease the risk of air escaping into the small bowel during percutaneous access.
Under fluoroscopic guidance, the stomach is inflated with air via the NG tube. The 18-gauge needle is inserted into the incision in an almost vertical orientation with the tip pointed toward the pylorus (Figure 4.7). When the needle tip is observed to clear the transverse colon it is thrust into the gastric lumen as if throwing a dart (rapid needle acceleration). In cases where there is uncertainty that the needle will clear the transverse colon, it is helpful to angle the C-arm in a caudocranial direction to confirm a satisfactory route. Once the anterior gastric wall has been punctured, intragastric position of the tip may be confirmed with a small amount of contrast. This is most easily achieved if a syringe of contrast is attached to the access needle with a T-connector prior to puncture. Observation of a drop of contrast freely falling through the gastric lumen provides positive confirmation of successful puncture (Figure 4.8). At this point, the tip of the needle is redirected toward the center of the open snare.
After the gastric lumen has been distended with air, the access needle is directed toward the gastric outlet and advanced with a sharp jab. Angulation of the C-arm may be necessary to confirm an entry point within the scope of the snare loop.
A “hanging drop” (arrow) of non-ionic iodinated contrast falling through the lumen confirms intraluminal position of the access needle prior to deployment of the retention suture and guide wire.
The puncture of the stomach and capture of the guide wire is easily accomplished in most instances using single-plane fluoroscopic guidance alone. However, for problem cases, biplane fluoroscopy is helpful since it enables more precise needle positioning, makes puncture of the stomach easier, especially for patients with a high or horizontally oriented stomach, and assists grasping the guide wire if the process is not progressing quickly or smoothly. When using biplane guidance, the trick is to be sure that the needle is directed toward the center of the snare in both planes. Once the needle is in the stomach, a 260 cm guide wire is advanced through the snare until it deflects off of the posterior gastric wall. This also positively confirms intragastric position of the needle.
Once the snare is closed around the guide wire (Figure 4.9), it is pulled up through the esophagus and out of the mouth. Nearly the entire length of wire is fed through the needle so that there is enough length for the PG tube. A 16 French (a larger tube is rarely necessary) over the wire or pull type gastrostomy tube is fitted onto the wire, liberally lubricated, and advanced until the needle is pushed out of the puncture site indicating that the dilating tip of the GT (Figure 4.10) exits the puncture site and is visible. The dilating tip is grasped with one hand while the other hand is placed on the skin surface to apply counter-traction (Figure 4.11). Counter-traction is applied to the skin surface and the GT is then quickly pulled out through the anterior abdominal wall until there is resistance to further forward movement. This indicates that the retention disc is up against the anterior gastric wall.
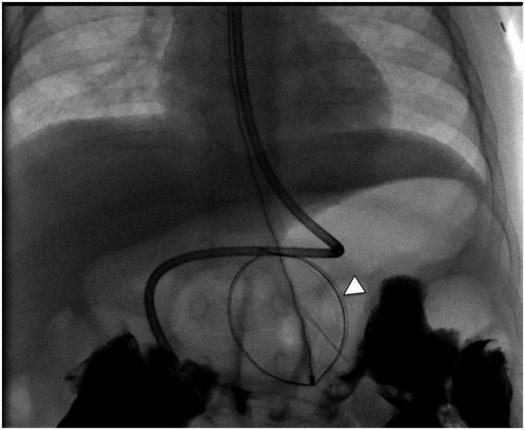
The guide wire is advanced through the access needle and through the snare loop. It is then snared (arrowhead) and exteriorized in retrograde fashion through the mouth.
The tapered tip of the gastrostomy tube is grasped with one hand while the other hand is placed on the skin surface to apply counter-traction as the tube is pulled externally.
When the GT is in place, before the dilating segment is cut off, a friction lock is slid over the GT until it rests loosely (2 to 3 mm from the skin surface) against the anterior abdominal wall (Figure 4.12). It is important not to pull the PG tube too tightly against the skin. When this occurs, there is a greater chance over time for the disc to ulcerate the gastric mucosa and become embedded within the gastric wall by granulation tissue. No sutures are necessary to stabilize the GT. Contrast is injected via the PG to confirm intragastric position and exclude a gastric leak. Postoperatively frontal and, if necessary, cross-table lateral radiographs are taken to evaluate the abdomen and exclude free intraperitoneal gas or gastric leakage (Figure 4.13). With antegrade placement there is less than a 1% chance for this to occur. Even if free air is identified it is not indicative of imminent peritonitis or other complications. In spite of this, when free intraperitoneal air is observed, these children are usually given 24 to 72 hours of a broad-spectrum antibiotic.
The balloon internal retention bumper (arrow) of a freshly placed percutaneous antegrade gastrostomy is seen in satisfactory position in this 27-day-old male with adrenal leukodystrophy. Placement is complicated by extensive free intraperitoneal air (arrowheads). The patient was kept NPO and placed on a course of triple antibiotics. Feeding was resumed uneventfully after three days.
Retrograde gastrostomy
The retrograde or push technique was introduced by Gauderer and colleagues in 1980 and is used in children and adults. The push technique was popularized by Russell in 1984 and subsequently used for both endoscopic and fluoroscopic gastrostomies. Over the years, interventionalists have selected this approach most often for placement of a PG. However, relatively few reports of the retrograde technique have been published in the pediatric population.
In general, the procedure is similar to that outlined for antegrade gastrostomy insertion. The primary difference is the use of anchor sutures. In addition, the initial tube inserted is often smaller. Otherwise, the approach to monitoring and localization of the left lobe of liver and transverse colon is the same.
Primary retrograde gastrostomy insertion in children may be performed using intravenous sedation and local anesthesia or under GA. In most series, a single dose of antibiotics (e.g., cefazolin 40 mg/kg) is given intravenously. Intravenous glucagon may be given (0.1 to 0.3 mg) to relax (close) the pylorus and deter loss of insufflated air into the duodenum. The position of the left lobe of the liver is identified using US and marked on the skin surface. The transverse colon is opacified and an NG tube is inserted. The stomach is insufflated with air to bring it into firm contact with the anterior abdominal wall.
At this point, access is obtained with an 18-gauge single wall needle in the same manner described for antegrade insertion, above. The needle can be preloaded with an anchor suture near the tip, and connected through a T-connector to a syringe containing half-strength contrast. When the needle has been “darted” through the abdomen and anterior wall of the stomach, intraluminal position is verified with a small amount of contrast, and the guide wire deployed. As the guide wire is advanced it pushes the preloaded anchor suture ahead. When the needle is removed, the external strands of the anchor suture are grasped with a hemostat and gentle traction maintains apposition of the stomach and abdominal wall throughout the remainder of the procedure. Some practitioners prefer to insert one to three anchor sutures first to fix the stomach in position against the anterior abdominal wall. Under fluoroscopic guidance, the stomach can then be punctured between the retention sutures and the guide wire coiled within the stomach or proximal small intestine.
In either case, the tract is then dilated to the size of the intended catheter and an 8 to 12 French locking pigtail catheter is inserted. It is important during both tract dilation and catheter insertion to push with the dilator or catheter rather than pull the anchor sutures. Exerting substantial traction on the anchor sutures may cause them to pull through the stomach wall, with potential loss of the newly formed tract. Intragastric position of the catheter is confirmed with injection of contrast material. If needed, a peel-away sheath may be inserted to aid in catheter placement or to protect the fresh tract while other manipulations, i.e. JT insertion, are performed. The GT is placed to drainage for 24 hours.
Initial follow-up is at one week to cut the retention suture(s) and check the ostomy site. If a button is planned, the locking pigtail drain is exchanged for a 12 French balloon catheter at six weeks. Thereafter, serial catheter changes to 14 to 18 French are performed over the next six weeks. At three months the child is brought back and a button inserted. Alternatively, the child can be scheduled three months postgastrostomy insertion for tract dilation using either progressive dilators (our preference) or a 5 to 7 mm angioplasty balloon, depending on the size of the button selected. Button insertion is generally performed on an outpatient basis. If tract dilation is needed, it is usually performed using local anesthesia and intravenous sedation. The patient is kept NPO for a minimum of six hours and a button inserted. The latter approach is our preference since it is less costly and requires fewer steps. Subsequent care is on an as-needed basis for treatment of skin problems or replacement of jejunostomy tubes.
The retrograde gastrostomy inserted without the use of retention sutures has the disadvantage of not pulling the stomach into close contact with the anterior abdominal wall. If this occurs, the fibrous tract that develops may be long. This can predispose to tract perforation and communication with the peritoneal space during button insertion.
Percutaneous gastrojejunostomy
When indicated, a gastrojejunostomy may be inserted following dilation of the gastrostomy tract. If needed, a jejunostomy tube (JT) may be inserted coaxially through the GT either at the time of antegrade GT placement (Figure 4.14), or at a later date (Figure 4.15). Currently, we are using three tubes for jejunostomies: an 8 French Frederick–Miller (FM) tube modified by cutting off its weighted tip creating an end-hole catheter, a 6 French Corpak® or a 9 French Flexiflow tube. In most situations, the FM tube is preferred because of its combination of stiffness, easy pushability, its tendency to harden without straightening out, and its durability. The 6 French Corpak® is used for children less than 10 kg with smaller lumen GTs and the 9 French Flexiflow JT is softer and has a greater tendency to kink.
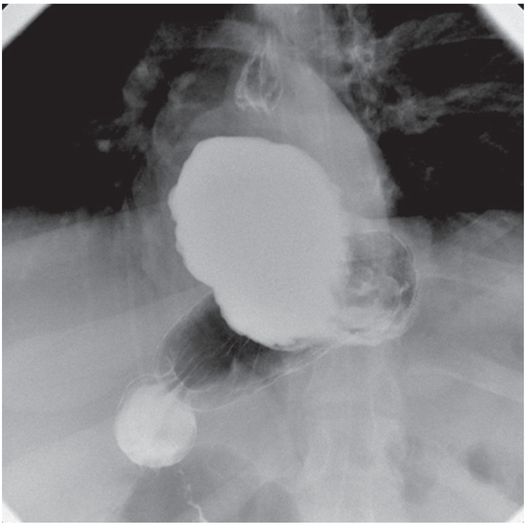
Four-month-old male with a replacement transgastric gastrojejunostomy system comprised of a 14 French balloon-tipped end-hole gastrostomy (Ross FlexiFlo®) and an 8 Fr shortened Frederick–Miller jejunostomy tube (Cook Medical) coaxially inserted with the tip in the proximal jejunum (arrow).
To expedite JT placement, a 5 French JB-1 catheter and Bentson guide wire are used to maneuver through the pylorus into the proximal jejunum just distal to the ligament of Treitz. After JT position is confirmed by contrast injection, the tubes are secured to one another. Initially, the tubes are coated with benzoin or Mastisol® to enhance their adhesiveness. Then the GT and JT are bound together by wrapping them with Tegaderm® or Opsite®.
A PGJ may also be placed directly through the PG tract, again either at the time of retrograde access or at a later date (perhaps following an unsuccessful trial of GT feeding). In this case, the GJ tube of choice is usually an 8.5 or 10.2 French unibody gastrojejunostomy catheter with a proximal fixation loop, balloon or malecot retention device in the stomach, and a straight or non-locking pigtail silicone catheter positioned within the small bowel.
If primary PGJ is planned, a glide wire of suitable length is used rather than the 70 cm non-Teflon® wire. This wire is guided through the duodenum to the proximal jejunum using a directional catheter. The guiding catheter is exchanged for the PGJ catheter. Once the catheter tip reaches the proximal duodenum it may be carefully advanced off the stiffener until the tip is securely in place past the ligament of Treitz. The intragastric retention device is secured and a small amount of contrast injected to demonstrate that the tip is in good position and that there is no intragastric leak of contrast. (Since most patients referred for PGJ are at risk for reflux and aspiration, intragastric leak defeats the purpose.) A high level of caution must be exercised throughout to assure that control of the newly formed tract is not inadvertently lost during manipulation of the wire and catheters. Regardless of the type of tube inserted, an NG tube is often left in place for 24 hours to drain the stomach and to reduce the risk of leakage. The postoperative orders are the same as those described for gastrostomy.
Technical variations
The “push–pull” gastrostomy for infants
The push–pull method of percutaneous gastrostomy insertion is considered for most infants less than 7 kg or those with an esophageal diameter less than approximately 1.2 cm. Although an antegrade gastrostomy tube has been successfully inserted in children weighing as little as 2.3 kg, we have found that in this subgroup of children there is a chance that the retention device at the end of a gastrostomy tube may traumatize the esophagus during passage into the stomach. In these children, the problem is usually the diameter of the normal anatomic narrowing at the level of the cricopharyngeus muscle or thoracic inlet. To solve this problem, we have developed an alternative: the push–pull method. The push–pull approach is usually employed either electively in small infants or, if excessive tension is appreciated, while attempting an antegrade gastrostomy. Alternatively, an antegrade PGT with a smaller disc can be used.
When utilizing the push–pull method, the initial steps of the procedure are the same as for the antegrade technique. The colon is opacified and the left lobe of the liver is identified with US and marked on the skin surface. An NG tube is placed into the stomach. An OG tube is then inserted and the guide wire exchanged for a 34 mm nitinol snare. While observing with the fluoroscope, the stomach is inflated with air and punctured as soon as the transverse colon is moved away. The percutaneous guide wire is snared and exteriorized at the mouth.
The tube is pulled through the anterior abdominal wall until its dilating segment has enlarged the skin tract to 14 French. Then, a 14 to 16 French balloon-tipped Flexiflo GT is back-loaded over the guide wire onto the dilating segment of the antegrade gastrostomy tube until it is firmly engaged. The tubes are simultaneously maneuvered. The antegrade gastrostomy tube is pulled back at the mouth while the Flexiflow GT is pushed at the skin surface of the abdominal wall until the GT passes into the stomach coming to rest in the esophagus. The Flexiflow catheter is pushed back until it is out of the mouth, facilitating separation from the antegrade gastrostomy tube.
The balloon catheter is pulled into the upper esophagus and the balloon is inflated with 1 to 2 ml of contrast to confirm its position. With the balloon partially inflated, the GT is pulled back into the stomach where the balloon is inflated with 5 to 10 ml of water. A Christmas tree adapter is connected to the GT while the wire is maintained in position and contrast is injected to confirm that the balloon is in the gastric lumen. Once proper position is confirmed, the guide wire is removed. It is essential not to remove the guide wire until satisfactory tube position is confirmed.
In most instances, the procedure is easily accomplished. However, if the GT cannot be pushed into the stomach, several maneuvers can be used to safely get the GT into place: (1) the tract can be dilated in retrograde fashion to 16 to 20 French with progressive dilators or a PTA balloon and the push–pull technique repeated; (2) a tapered pigtail (8 to 10 French) or other catheter can be inserted without further dilation; (3) retention sutures can be placed followed by either choice (1) or (2); or (4) the skin incision can be enlarged by sharp dissection down to the fascia. In most cases, option (4) is the best solution.
Percutaneous jejunostomy
Occasionally, transgastric access to the small bowel for long-term feeding may be impeded by a proximal stricture or obstruction of the duodenum or other contraindications. In such a situation, direct percutaneous access to the jejunum may be obtained by a technique similar to that described for retrograde gastrostomy, above. Several authors have described direct jejunostomy, either as a primary procedure or as an alternative to gastrojejunostomy. This procedure is facilitated by the presence of a dilated segment of proximal jejunum. In the absence of this fortuitous finding, identification of a proximal loop of jejunum can itself be problematic. Even once identified, selective dilation of such a loop is inhibited by the absence of any functional sphincter.
Bowel decompression
Interposition of transverse colon or a dilated loop of bowel between the abdominal wall and the anticipated entry point into the gastric wall (or other planned access) can result in cancellation or delay in the planned procedure (Figures 4.16 and 4.17). If angulation of the fluoroscope or alteration in the patient’s body position is unsuccessful in moving the bowel away from the tract, then deflation of the interposed bowel loop may permit continuation of the procedure. This is accomplished by percutaneous puncture with a thin (27-gauge) needle, and subsequent aspiration of the gas from the bowel lumen. A small amount of contrast can be used to confirm deflation of the bowel loop. This maneuver can provide a safe route of access to the stomach, jejunum, cecum, or other targets of percutaneous access obstructed by an overlying loop of distended bowel.
In this 12-year-old male, fluoroscopy shows a nasogastric tube tip and orogastric snare placed in preparation for percutaneous gastrostomy. Thin barium contrast in the transverse colon projects over the open gooseneck snare. An orthotopic view is required to determine whether the colon is posterior to the gastric lumen, permitting the procedure, or interposed between the anterior abdominal wall and the targeted portion of the anterior gastric wall, as was found in this case.
Multiple loops of air-filled bowel are interposed between the abdominal wall and the stomach in this anteroposterior radiograph of the upper abdomen in a 14-year-old candidate for percutaneous gastrojejunostomy. The procedure was delayed until a subsequent radiograph demonstrated a safe access path.
Postprocedure and follow-up care
Postoperative orders and initial tube care
Postoperative orders are generally minimal regardless of the tube inserted. Vital signs are initially obtained every 15 minutes for the first half hour, every 30 minutes for one hour, then every one hour for a minimum of two hours or until the child has returned to baseline. Depending on the hour of the day the procedure is completed, the child is usually kept NPO and given nothing by GT for a minimum of six hours. Children with PGJs are kept NPO for at least two hours. Fluids and medications are given intravenously. In general, full PG or PGJ feeding is initiated at 08:00 the morning after tube insertion provided bowel sounds are normal.
Prior to initiating feeding, dietary and home care consultations are obtained. Initially, a consultation from the dietary service is obtained so that the child’s ideal caloric requirements and preferred formula can be determined. Whenever possible, the dietary service is notified prior to the insertion of the PG or PGJ so that the feeding recommendations can be prepared and in place on the first day after gastrostomy insertion. The home care service is consulted in order to facilitate a timely hospital discharge. An infusion pump, a supply of formula, the assorted tubes and syringes, and the home services are all arranged so that a smooth transition from hospital to home can be made. The home care provider is expected to educate the caretakers on the proper use of the equipment. The radiology nurse or others familiar with proper PGJ feedings and care will teach the family about the care of the tubes, give discharge instructions, and provide written instructions, including telephone numbers to call for future appointments and emergency services. Currently, in uncomplicated cases, children are discharged to home approximately 36 hours after PG or PGJ insertion.
All patients are initially fed by continuous pump infusion. Feeding is started with a clear electrolyte solution (e.g., Pedialyte®) to test the system. The volume of infusate is calculated at 1/24th the total daily caloric requirement. For example, if the child is to receive 1,200 ml of formula per day, then Pedialyte® would be started at a rate of 50 ml/h. If this initial feeding with Pedialyte® is tolerated for one to two hours without difficulty, the recommended daily volume of full strength formula is given by continuous feeding over 24 hours. Reduced hourly rates or use of dilute formula (e.g., ½ strength concentration) is rarely necessary and is reserved for those children who have feeding problems that make them unable to tolerate full strength formula.
We have found that nearly all children who have previously tolerated feeding, albeit at reduced volumes, do well with this regimen. This approach obviates a gradual build-up of calories or volume that may prolong hospitalization, makes care more complex and tedious, and takes longer for the child to get into positive nitrogen and calorie balance.
If postoperative day one feeding is tolerated, on day two the rate is increased. The calculated daily volume is now infused over an 18-hour period, e.g., again using the example 1,200 calories per day, if a volume of 1,200 ml of a 1 Calorie/ml formula is selected, the rate will be increased to 67 ml/h for 18 hours. This adjustment can be made incrementally or as a one-time change. Thus there will be a six-hour period each day during which the child can be off the feeding pump. Currently, most children are discharged in the afternoon of the second postoperative day if they have tolerated the 18-hour rate without problems. The remainder of the volume progression is carried out from home following the prescribed feeding regimen.
The 18-hour rate is maintained for the remainder of the first week. At the end of this time the infusion is increased to a rate that delivers the recommended daily volume in 15 hours, with 9 hours off the pump each day. This rate is maintained for one to two weeks. Again, if tolerated, the rate is advanced to allow 12 hours on and 12 hours off the pump each day. Children fed through a PG (but not those fed through a PGJ) are candidates for bolus feeds. Patients with PGJs are kept on pump feedings and not advanced past 12-hour rates since they would be at increased risk for developing a dumping syndrome secondary to osmotic diuresis.
When bolus feeds are instituted, the total volume of daily formula is divided into multiple portions and generally given to the child at the family’s meal times, snacks, and before bed. In children who are able to tolerate oral feeding, solid food can be started to partially replace tube feeding. As the child becomes able to take a significant amount of calories by mouth, the pump feedings are reduced proportionally and used only as a supplement. In most cases, a significant volume of formula is given while the child is asleep. We have found that it is best to first establish successful feeding by pump before adding a significant amount of calories by mouth. Therefore it is important to closely monitor the child’s weight gain and growth during these first few months of gastrostomy feeding. The child’s primary care physician usually provides this follow-up.
The interventionalist often manages the child’s care while an inpatient. However, upon discharge, the interventionalist remains involved in the technical management of the tubes, skin care, and performing normal and emergency tube maintenance. In addition, depending upon the preference and expertise of the primary care physician, the interventionalist may play an active role in the management of the child’s feeding regimen.
In the early stages of our experience it is our preference to electively replace transgastric JTs every three months to avoid the risks of tube hardening and potential bowel injury. However, we have not seen any children who have sustained bowel injuries so we now replace the JTs on an as-needed basis. The GTs are only changed if necessary, and usually last at least 9 to 12 months. All parents are instructed to clean their child’s skin with ½ strength hydrogen peroxide or mild soap at least once per day and carefully dry it in order to keep the skin from becoming inflamed or infected.
Catheter exchange and reinsertion
With the large number of children with gastrostomies, it has become increasingly common for patients to require gastrostomy tube replacement or conversion to a gastrojejunostomy because of GER, equipment failure, or inadvertent removal. In addition, children with gastrojejunostomies (GJ) may require gastric venting. There are now a variety of tubes, in a range of sizes that are available to the interventionalist for these purposes (Figure 4.18). In addition to gastrostomy tubes through which a jejunostomy can be coaxially inserted, there are unibody gastrojejunostomy tubes. Both tube types have their pros and cons and the ultimate choice should be tailored to the needs of the child tempered by the experience and preference of the interventionalist. The coaxial replacement GTs are technically easy to insert and the same approach is used as described for NJ or GJ insertion. In general, we prefer the coaxial system since it is more flexible and less costly. However, these GJs do not vent well when a 14 to 16 French GT and 8 French JT are used. When venting is a priority, it is usually best to substitute a gastrostomy >18 French for the 14 French GT or use a different stoma for the PG or PGJ tube. The length of the JT is customized so that its tip is positioned at, or distal to, the ligament of Treitz. This position is favored since it minimizes reflux of feedings into the duodenum and stomach, reduces the likelihood of vomiting and aspiration pneumonia after feeding, and best stabilizes the JT minimizing the frequency of JT malposition and dysfunction.
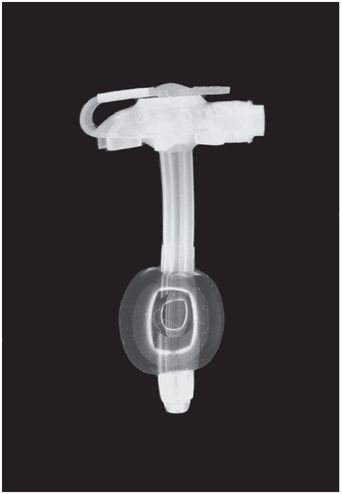
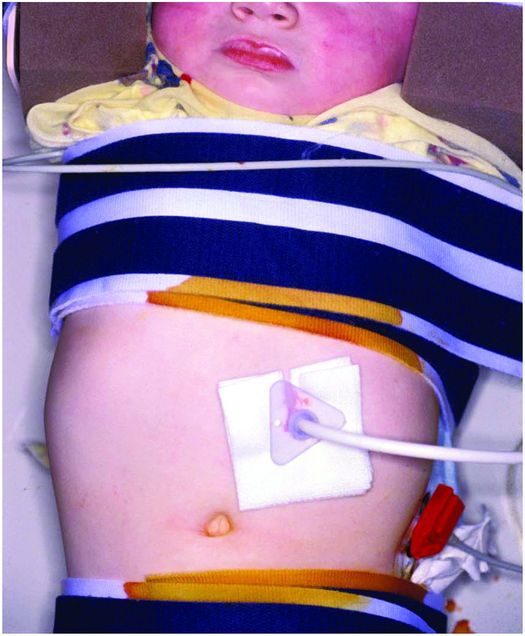
This low-profile gastrostomy device has an inflated balloon internal retention bumper. These devices come in a variety of shaft diameters and lengths.
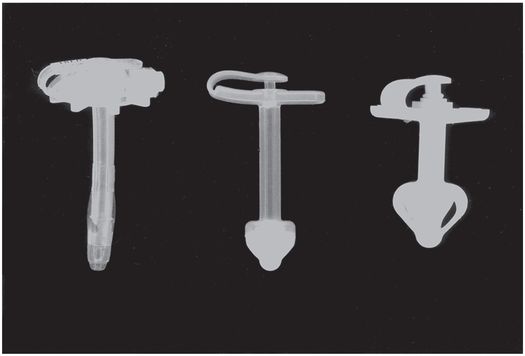
Deflated balloon (left), mushroom (middle), and Malecot (right) internal retention bumpers are shown. There are numerous variations commercially available.
Today, the button GJ tubes (Figure 4.19) have become the tube of choice for long-term GJ feeding. They are low-profile devices that parents prefer and have the advantage of being easily vented and inserted in a single step. However, they may be problematic in small children and toddlers because the gastric component is too long and stiff and often projects into and deforms the distal stomach or duodenal bulb. This results in discomfort and may predispose the child, especially infants, to ulceration or perforation of the stomach or duodenum. In addition, the jejunostomy component is generally longer and of a larger French size than needed and therefore requires shortening. In some children, especially infants less than 10 kg, the jejunostomy produces gastrointestinal discomfort and, on occasion, obstruction of the gastric outflow tract. It is possible that symptoms are due to tube-related small bowel irritability or intermittent small bowel intussusceptions. Also, GJ button tubes may not move easily over a guide wire. In these situations, a hydrophilic guide wire, silicone spray, or other lubricant (e.g., sterile mineral oil), may be needed.
Low-profile button gastrostomy tube (top) and button gastrojejunostomy (bottom). Examples of connection tubing for low-profile gastrostomy tubes. Straight connectors have a larger volume and therefore better flow rate, but tend to kink. The angled tube has a narrower caliber but resists kinking.
When replacing a GT or converting it to a GJ, it is most convenient and the least invasive, to use the same tube size as the primary GT. However, if the GT is less than 16 French, we have found it best to enlarge the tract to at least this size to minimize the chance of clogging. A GT larger than 16 French is rarely used if feeding is the only goal. When necessary, however, GTs of 18 French to 24 French are utilized. Other indications for >14 French GT include replacement of a large tube already in place, as is often the case when replacing surgical gastrostomies, or when the ostomy site is leaking and the skin is inflamed.
An unexpected source of referrals for GT or GJ replacement is to care for children with skin breakdown secondary to gastrostomy leakage. This problem has most often resulted from gastrostomies that have developed an asymmetric hole (usually an SG), gastrostomies too small for the hole that has been created, and from ostomies that have rapidly enlarged due to inflamed skin. When this occurs and gastric contents begin to leak, it is imperative to treat this promptly to resolve skin inflammation and allow the hole to reduce in size. With successful treatment, the problems of secondary infection, discomfort, and further ostomy enlargement with the potential of gastric mucosal herniation requiring surgical repair, can be avoided.
Replacement gastrostomy tubes and primary gastrostomies inserted using the retrograde technique may be secured by a balloon-tipped catheter, which has a high resistance to accidental dislodgment when the balloon is inflated, and essentially no resistance to dislodgment when the balloon is deflated or ruptures. They are less commonly retained by a mushroom-tipped catheter, for which resistance to accidental dislodgment is less but constant (cannot be deflated) and requires a device to stretch the mushroom in order to deliver or retrieve the device (Figure 4.20). Both types are prone to premature loss, so it is important to educate the caregiver how to safely reinsert the tube. To safeguard against the inability to replace a lost GT, outpatients are given a Foley catheter 2 French smaller than the gastrostomy. This enables the caregiver to place the temporary tube at home to help avoid the risk of ostomy closure before the GT can be replaced. The caretaker is instructed to initially attempt reinserting the tube that has come out before inserting a smaller tube. It must be stressed that the ostomy will shrink in size rapidly, thus replacement at home is strongly preferred. If the retention balloon has ruptured and a smaller tube is not available, the 14 to 16 French system should be reinserted and secured to the skin with tape.
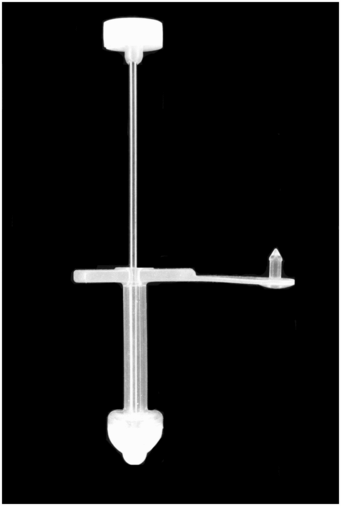
An obturator is passed through the gastrostomy lumen, stretching the button body and narrowing the internal mushroom-type retention device to allow the device to be passed through the gastrostomy stoma during insertion and removal.
If the GT is not replaced or if a smaller tube is utilized, the tract probably will have to be enlarged at the time of reinsertion. This can be accomplished using a PTA balloon or progressive dilators. We prefer the latter approach since it is less expensive. We have found that it is usually necessary to dilate the ostomy to about 2 to 4 French larger than the replacement GT. In order to ease the GT reinsertion, the balloon-tipped GT is lubricated with sterile mineral oil, silicone spray, or K-Y jelly. If a “knitting needle” type 10 French guide catheter is used with Amplatz® dilators (Figure 4.21), one may insert the replacement gastrostomy catheter (or button) over it making tube reinsertion easier.
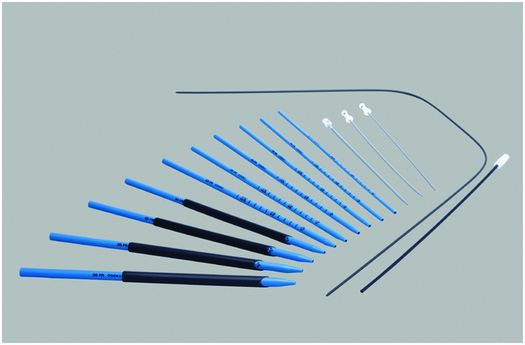
Amplatz® progressive dilators and sheaths (Cook Medical) provide a 6 to 30 French working channel from the skin to the renal collecting system through which endoscopes, balloon catheters, and other equipment can be passed. They can also be used to serially dilate a percutaneous tract, such as a gastrostomy or cecostomy stoma.
No special preparation is necessary. Since the technique of tube insertion is relatively easy, the procedure can be completed in less than 15 minutes in most instances. With replacement there is no associated discomfort, and sedation or local anesthesia is usually not required. Therefore there is no need for an intravenous line nor is the child changed into a gown. The shirt is pulled up to expose the gastrostomy or gastrojejunostomy site and the clothing is covered with a chuck to keep them dry and clean. No special equipment is needed in most cases. If the tract has reduced in size, it will require dilation with progressive dilators or a PTA balloon.
If there is a mature tract, the GT or GJ may be removed without any special precautions. If the tube has been in place for less than two weeks, there is a known problem with wound healing, malnutrition, or there is a question concerning the integrity of the gastrostomy tract, it is safest to remove the preexisting catheter over a guide wire. Removal of a primary tube may be as easy as deflating the balloon tip or may require an over the guide wire technique as described above in the section for removal of a gastrostomy retention disc. If a mature tract is present, the GT can be removed without guide wire insertion and a new GT with an end hole reinserted. If a JT is required, a directional catheter and Bentson guide wire is used to catheterize the proximal jejunum or fourth portion of the duodenum. The catheter is marked at the level of the hub of the GT to record the tube length and is then removed. The JT is measured from the mark on the catheter and is cut to the desired length. The JT is lubricated with mineral oil, silicone spray, or K-Y jelly and inserted through the GT. The JT is then secured to the GT using a cable tie and covered with tape to prevent skin abrasions.
Gastrostomy button or button jejunostomy
Regardless of the method of insertion, all patients with gastrostomies without gastrojejunostomies are candidates for replacement with a gastrostomy button. In the past, children requiring GJ were ineligible for buttons since there was no good method for securing a low-profile JT and preventing significant leakage of gastric contents. Today, there are several types of low-profile devices (Figures 4.18 and 4.21). The button type selected is dictated by the needs of the child. In general, the button has become the tube of choice for all long-term feeding.
The gastrostomy button is a soft, 14 to 24 French, low-profile tube with a one-way valve. This device has several advantages over other types of gastrostomies. First and foremost the button is low profile, which is much preferred by patients since it is less noticeable, does not move around as much with activity causing less irritation and reactive granulation tissue, and is easy to use. The one-way valve effectively prevents leakage of gastric contents. The button jejunostomy and gastrojejunostomy tubes are also low-profile devices. The button jejunostomy has a single jejunostomy lumen that may be tailored to length. The device is accessed in the same way as a gastrostomy button. However, there is no available lumen into the stomach. The button gastrojejunostomy has two lumens. Today, the button GJ is most commonly utilized.
It is important to understand that a replacement button should not be electively inserted until the GT tract is mature. Although this may be in as little as two weeks, we prefer to wait six to twelve weeks before electively inserting a button. Insertion of a balloon-tipped button is an easy task and relatively atraumatic to the child (Table 4.7). After removal of a primary gastrostomy or if a child has gained weight, a calibrated balloon-tipped measuring device (Figure 4.22) is inserted into the stomach to determine the length of the tract (Table 4.8). The balloon is inflated with water and gentle traction is applied. The distance from the skin surface to the anterior gastric wall is determined by the markings on the measuring device. The button selected is generally the same French size as the GT removed. If the gastrostomy tract is less than 14 French or a diameter that is non-standard, either the tract must be dilated or in the case of tracts greater than 14 French, a smaller button can be inserted. If the option of a smaller shaft diameter is chosen, one must be careful that there is no leakage of gastric contents onto the abdominal wall. If this occurs, the ostomy will not reduce in size, and progressive skin injury and tract enlargement may result. This problem is easily prevented by using the next larger button shaft diameter.
– Remove preexisting PG or PGJ over a guide wire if the tract is not mature.
– Insert replacement GT into gastric lumen.
– Dilate tract if necessary.
– Using directional catheter and Bentson guide wire maneuver system into distal duodenum or proximal jejunum.
– Exchange catheter for modified 8 French Fredrick–Miller JT.
– Secure JT to GT.
– Inject contrast via JT to confirm satisfactory tube position.
| Replacement gastrostomy tube – Replacement gastrostomy (e.g., Flexiflow 14 French, 16 French, 18 French, 20 French, 24 French), or – Unibody tube – Progressive dilators or PTA balloon |
| Conversion to a percutaneous gastrojejunostomy – 5 French JB-1 catheter – 0.035- or 0.038-inch Bentson guide wire – Benzoin – Tegaderm® or Opsite® – 8 French Frederick–Miller tube (Cook, Inc., Bloomington, IN) – Plastic hemostat |
| Gastrostomy button or button jejunostomy – Sound (depth gauge) – Gastrostomy button (balloon-tipped or mushroom type) or GJ button – Dilators (if mushroom type used) |
Regardless of the button size, to insert it, the tip is lubricated and with gentle forward pressure, is pushed into the stomach until it is flush with the skin. The balloon is inflated with water, usually to a total of 5 ml, depending on patient size. The balloon should never be inflated with air since it is semi-permeable and will deflate over the next several hours. Intragastric position of the gastrostomy button is confirmed with contrast injection.
In contrast, the placement of a mushroom-tipped button requires tract dilation in most cases. If the tract is larger than 18 French (e.g., a surgical gastrostomy), insertion of a 14 French button may be attempted without predilation. If the attempted insertion does not go smoothly, the attempt is abandoned and further enlargement of the tract is performed. For replacement of a 14 French gastrostomy tract, dilation is generally needed. To accomplish this, a guide wire is introduced into the stomach directly through the ostomy or via a vascular dilator. Progressive dilators or a PTA balloon (usually not used because of the cost) may be used to enlarge the tract to 18 or 20 French. An L-shaped measuring device (Figure 4.22b) is inserted into the gastric lumen and the tract length is determined. In order to insert a mushroom-tipped button, an obturator is introduced into the button lumen so that the shaft is elongated and deformed (Figure 4.19), making the tip smaller in diameter. The stretched button is then placed into the dilated tract, and using moderate downward force, pushed into the gastric lumen. When the button is seated the operator will notice a substantial decrease in resistance. The obturator is removed and the intragastric position confirmed by contrast injection. Because of the considerable force required, there is a higher incidence of separation of the stomach from the anterior abdominal wall. Because of the related discomfort sedation or general anesthesia may be needed.
Regardless of the type of button utilized, feeding is initiated in the same manner. A specially designed connecting tube is fitted into the button. The selection of pump infusion or bolus infusion is of no importance from the technical standpoint and is the choice of the team managing the child’s nutrition.
Technical problems and pitfalls
Avoiding transcolonic puncture
We have found asymptomatic transcolonic gastrostomy tube location over a year after insertion during routine tube exchanges. Accidental transgression of the colon during primary insertion can also occur and leads to peritonitis or to bowel obstruction. Brief fluoroscopic observation of mucosal movement and the relationship to surrounding structures during anesthetic injection and again during percutaneous transgastric puncture can verify the safety of the proposed tract. If movement of contrast in the transverse colon is seen during manipulation of the anesthetic needle or the transgastric access needle, it is possible the needle is transgressing the transverse colon and a different angle of approach should be used (Figure 4.23).
Contrast in the transverse colon (TC) and in the gastric lumen (S) may appear to be separate in an anterior projection, yet the access needle may transfix the decompressed portion of the transverse colon where it depends from the gastrocolic ligament and drapes across the greater curvature, before it enters the stomach, as illustrated.
Inability to access the gastric lumen
Occasionally, the stomach is difficult to puncture and, as a result, the guide wire is extragastric in location. Incomplete penetration of the gastric wall can be anticipated if one sees a subtle, grayish, curvilinear interface at the needle tip, which likely represents the gastric mucosa being displaced by the needle embedded within the serosa, or if the needle and guide wire are lined up in both frontal and lateral planes but the wire cannot be grasped. Lateral fluoroscopy will quickly confirm this impression. Anatomic issues such as malrotation, microgastria, an enlarged or midline liver, spleen, or colon, gastric position above the inferior costal margin, or incompetent pylorus allowing air to escape into the small bowel can all lead to inability to access the stomach. If such issues cannot be corrected the procedure will need to be abandoned in lieu of an open or laparoscopic gastrostomy, although the risk of malposition still exists despite a surgical approach if the stomach must be mobilized over a distance to reach the anterior abdominal wall (Figure 4.6e–g). We have, on occasion, used a catheter with a large toy balloon attached to inflate the stomach. The balloon is popped when the needle enters the stomach.
Deep structures at risk
Be mindful that the pancreas and its vessels, the IVC and the aorta, and the kidney may lie deep to the needle pathway during gastric access procedures and may be placed at risk from overly aggressive puncture attempts. Conversely, slow and ineffectual acceleration of the needle tends to compress the anterior gastric wall against the posterior wall, making it difficult to achieve gastric puncture without advancing to whatever structure lies deeply at that point. Adequate inflation of the gastric lumen, a satisfactory skin incision, and a short sharp thrust of the needle through the anterior gastric wall will significantly reduce risk.
Difficult delivery of the retention device or J tube
On the occasions when the fascia is tough or the GT tip is difficult to deliver through the puncture site, it is helpful to dilate the skin tract with a 6 or 7 French vascular dilator in retrograde fashion. The GT will then advance easily. When advancing the GT, there are usually two areas of increased resistance encountered: first at the junction of the stiff dilating section and softer feeding component of the GT, and second as the retention disc passes the region of the cricopharyngeus muscle and thoracic inlet.
In small children (<7 kg) with esophageal diameters less than about 1.2 cm, the collapsed retention disc of the PGT may not pass through the esophagus. If significant resistance occurs, it is best to abandon the antegrade approach and use a device with a smaller retention disc, e.g., Corpak PGT, or the modified (push–pull) or retrograde techniques for gastrostomy placement.
A problem that is commonly encountered, especially in children with an SG inserted in the mid or distal third of the stomach, those with a horizontally oriented stomach, those in whom the GT is directed toward the fundus, or patients with gastric distention, is the tendency for the JT to buckle and loop as it exits from the GT into the stomach. When this occurs, it may become a frustrating and time-consuming problem. The best solution is early identification of the potential for this occurrence and its prevention by carefully pulling back and rotating the catheter in the appropriate direction (usually counter-clockwise) to uncoil the JB-1 catheter and recreate the preferred arc-like configuration of the catheter–guide wire system. It is important to firmly pin the guide wire to eliminate all slack while advancing the catheter. Laxity of the catheter or guide wire is the most common source of difficulty in creating a gastric loop with secondary problems positioning the JT in the proximal jejunum. If there is still difficulty moving the JT into position, here are a few tricks that may help. First, you can use short piston-like movements to assist a tube moving around a bend and if this is not successful exchange for a Roadrunner® or other stiff guide wire. If a stiff guide wire is used, one must be careful to avoid injury to the bowel wall.
Treating inadvertent dislodgment
If access is inadvertently lost at the time of primary insertion or before the tract has matured, it is safe to repeat the procedure and make a second puncture and tract as long as no variance from the child’s baseline vital signs is noted. If a second tract is made, we recommend: (1) keeping the child NPO for at least 24 hours; (2) keep an NG tube in the stomach. Attach the NG to suction in order to keep the stomach empty and to minimize the chance of leakage; and (3) insert a GJ or NJ to bypass the stomach so that the unused insertion tract has a chance to heal. Arbitrarily, we maintain GJ feeding for at least three days in the absence of peritoneal signs, and begin the child on antibiotics to minimize the chance of peritonitis.
If access is lost after tract maturation, it is often possible to regain access, although the window of opportunity is time limited and of uncertain duration. Patients and families should be prospectively advised to keep a small-caliber blunt tube, such as Foley or red rubber tube, in case the percutaneous transgastric device is dislodged and cannot be easily replaced. The caretaker should be counseled against persistent or vigorous attempts to replace the tube, either by family or by medical staff without real-time image guidance and adequate experience. This event should be considered an urgent indication for intervention. Our technique for re-establishing a closed or probe patent track is the same for any ostomy or fistula. In the case of a closing gastrostomy or cecostomy track, a 3 French dilator and 0.018-inch glide wire is used to gently probe (Figure 4.24). It is essential to avoid creating a false lumen. If this occurs, successfully re-establishing the gastostomy or cecostomy is unlikely. If there is any resistance or buckling of the guide wire, injection of small amounts of contrast under fluoroscopy is recommended to create a road map. Once access to the gastric lumen is positively confirmed, the wire can be upsized and a stiffer wire used if needed to suit the device. We have found it convenient to use a coaxial dilator e.g., a 3 to 4 French dilator in the micropuncture set or a directional catheter to complete the wire exchange. If access cannot be regained, then the guidelines above for formation of a second tract may be followed on an elective basis.

A probe-patent tract may be gently tested with a narrow-caliber (e.g., 22-gauge or 3 to 4 French) cannula (arrow) in an attempt to regain the gastric lumen. An angled hydrophilic wire and a small amount of contrast may also be useful to define and regain the abandoned tract after accidental dislodgment of a gastrostomy tube.

Once the cannula is within the lumen, a guide wire is coiled within, then the cannula exchanged for dilators of serially increasing diameter (see Figure 4.20) until the tract is large enough to admit a new gastrostomy tube.
Complications
General considerations
Percutaneous gastrostomy is a safe and effective technique in the pediatric population as documented by numerous reports. Successful percutaneous insertion of a PG or PGJ occurs in over 98% of cases, and has been performed in patients of all ages, ranging from 800 g to >80 kg. Postprocedural complications occurring within the first 30 days have been reported in 3 to 12% of patients. In our experience, major complications have been identified in approximately 3% while minor complications have occurred in about 8%.
The major complications that have been described include erosion with catheter migration, acquired gastrocolic fistula (Figure 4.25), occult transfixation of small bowel or colon (Figure 4.23), gastric or small bowel perforation or intraperitoneal leakage, peritonitis, anterior abdominal wall abscess, infectious or non-infectious stoma ulceration, esophageal laceration, gastric herniation through an enlarged ostomy, and exacerbation of respiratory distress and congestive heart failure in children predisposed to these problems. At least one death has been reported following duodenal perforation (Figure 4.26). Minor problems have included tract granulation (Figure 4.27), localized cellulitis, pneumoperitoneum, premature tube loss, intermittent intussusception (Figure 4.28), malposition of the tube (Figure 4.29) or the retention device (Figure 4.30) and localized pain.
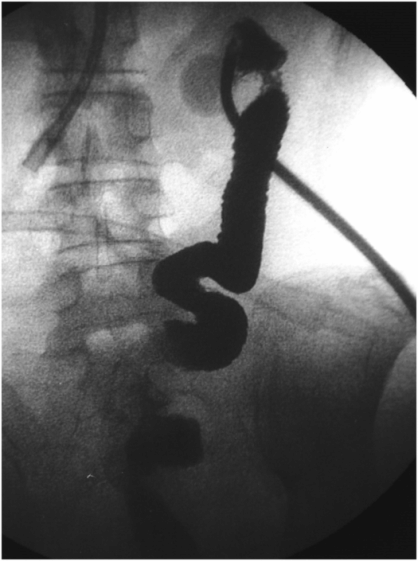
A contrast fluoroscopic study is performed in a 14-year-old boy with severe neurologic sequelae of anoxic brain injury who has been expressing feces through a long-term percutaneous transgastric gastrojejunostomy tube. Injected contrast through the gastric port is immediately apparent in the descending colon, indicating a gastrocolic fistula.
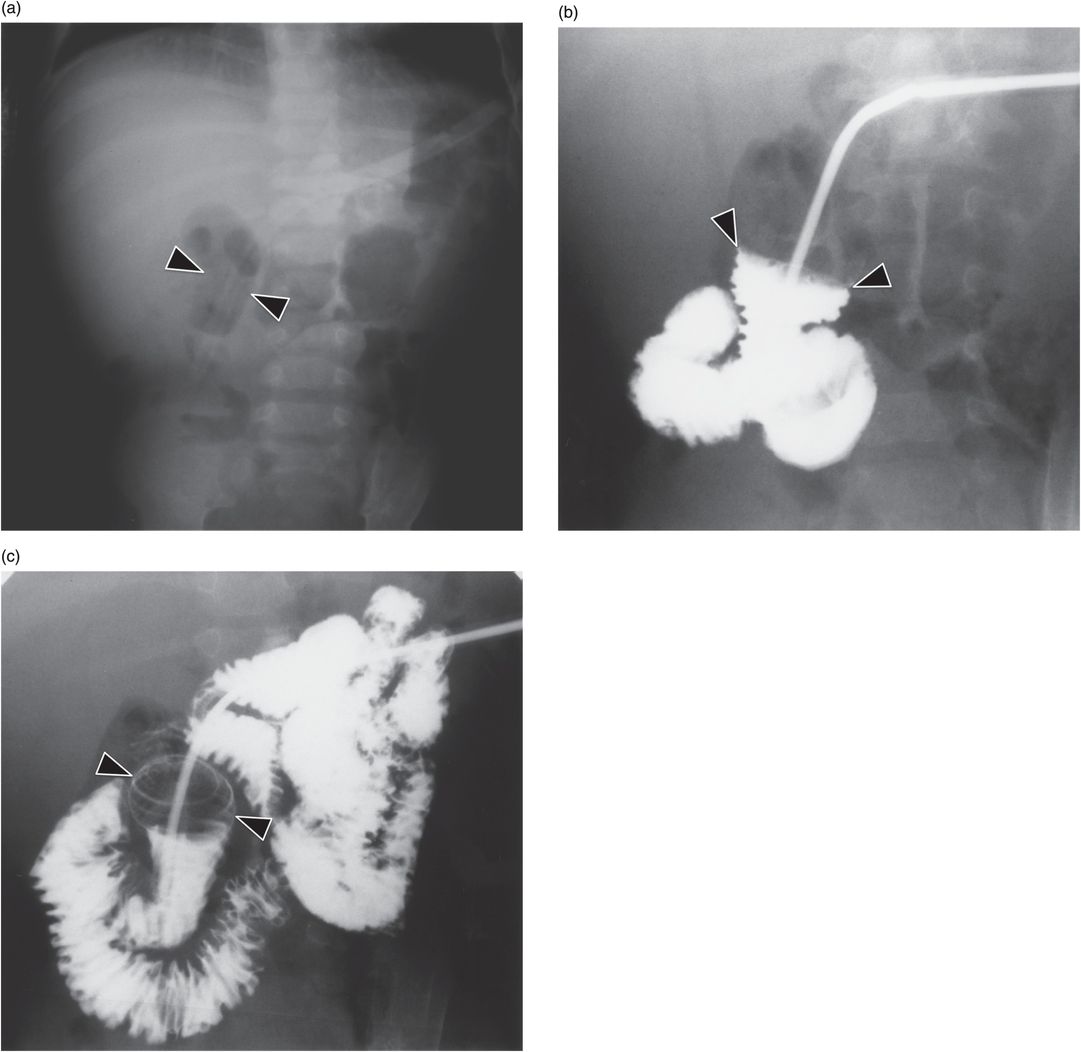
(a) An 18-month-old female with cerebral palsy has a surgical gastrostomy tube for enteral nutrition. The internal retention balloon (arrowheads) is evident on this plain radiograph of the abdomen. She presented with symptoms of small bowel obstruction. (b,c) Contrast injected into the small bowel through the gastrostomy tube outlines the retention balloon (arrowheads), which has migrated into the first part of the duodenum.
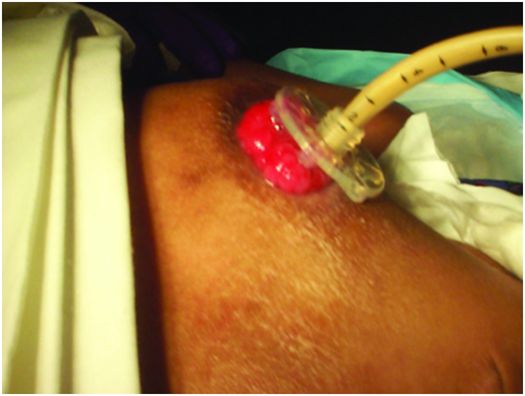

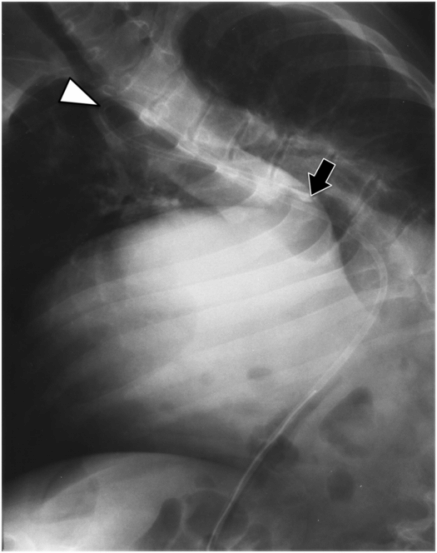
In this 14-year-old male with severe kyphoscoliosis, the surgical gastrojejunostomy tube enters the antrum, directed toward the gastric inlet. The body (arrow) and tip (arrowhead) are malpositioned in the esophagus. Poor choices in position and orientation may lead to organoaxial rotation of the stomach with increased reflux, as well as creating a significantly more difficult angle for conversion to a gastrojejunostomy, with increased frequency of tube loss, dysfunction or, as in this case, malposition.
A 32-month-old neurologically devastated infant presented with grimacing and fussiness.
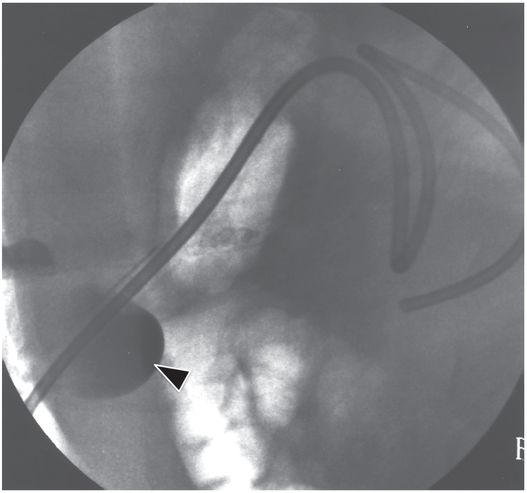
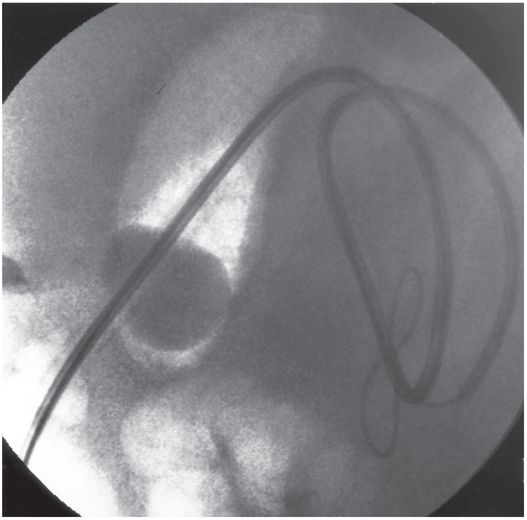
The tube was easily repositioned.
The results of the percutaneous technique compare favorably with the operative and endoscopic approaches. Like with the PEG, the morbidity and mortality of the PG is lower than with surgical gastrostomies. Comparison of the PEG and PG is more difficult. However, comparison of large series suggests that major complications were as much as two times more common with the endoscopic approach, and minor morbidity as high as three times more frequent. Although there are many similarities between the endoscopic and fluoroscopic techniques, fluoroscopic guidance offers many advantages. First, fluoroscopic guidance does not require the presence of an endoscopist and surgeon skilled in PEG and an anesthesiologist. Therefore, the fluoroscopically guided procedure is easier to perform and less costly. In addition, the identification of adjacent organs, such as the left lobe of liver with US and colon with contrast, is accurately made and minimizes the risk of adjacent organ injury. Also, the fluoroscopic approach enables placement of a PGJ at the time of initial feeding-tube insertion. Lastly, but perhaps most significantly, the fluoroscopically guided GT is usually positioned in the lateral third of the gastric body while PEG, laproscopic, and surgical gastrostomies are usually located in the antrum making conversion to GJ technically difficult and mechanically unstable (Figure 4.6). These patients often have a higher incidence of JT loss due to recoil of the tube into the stomach. Although extreme measures may be used to replace these tubes into the small bowel (Figure 4.1), the need for increased frequency of hospital visits, increased exposure to radiation, and cost mitigate for abandoning the initial site and creation of a new stoma more suitably located and directed for the purpose of gastrojejunostomy.
The SG has the additional disadvantages of a greater frequency of skin problems secondary to leakage through irregularly shaped or ovoid ostomies. The PEG, laproscopic, and open surgical methods may have a higher incidence of GER. A prospective study is needed to answer this question. We speculate that when the child is anesthetized and the stomach becomes flaccid the stomach falls into the abdominal cavity making it difficult to determine the in situ gastric position. Without gastric distention, when the stomach is approximated to the anterior abdominal wall, it does not always lie in anatomic position. This results in an alteration of the relationship of the esophagogastric junction leading to GER.
Since G and GJ buttons are usually inserted into mature tracts to replace indwelling tubes, complications are less frequent. Interestingly, there appears to be a relationship between the length of the tract and the potential risk of button insertion. The longer the tract length, the greater the risk. Tracts longer than approximately 4.5 cm have a high failure rate. The button, especially mushroom tipped, can be misdirected and perforate the tract leading to failure to successfully insert the button into the stomach. This failure of placement elevates the risk of peritonitis and may result in the need to redo the gastrostomy. However, loss of gastrostomy access can be prevented if this problem is anticipated. In patients with long tracts, suggested by unexpectedly long tube shaft lengths, the feeding tube can be exchanged over a guide wire. The 10 French dilator from the Amplatz® progressive dilator set or an 8 French or 10 French catheter with its hub cut off, is positioned over the guide wire and coiled in the stomach. A 14 French balloon-tipped button can be fitted over the catheter and guide wire and guided into the stomach. If the button cannot be easily inserted the tract should be dilated 2 French to 4 French larger than the button shaft diameter selected. Once the button is assumed to be in position it should be injected with contrast to confirm intragastric positioning prior to initiation of feeding. If feeding occurs into the abdominal cavity, serious morbidity or mortality can occur.
In addition to tract perforation and potential leakage, other complications have been reported. Approximately 25% of patients complain of mild abdominal discomfort that usually resolves within a week after gastrostomy placement. Treatment with analgesics is rarely necessary. Skin irritation beneath the wings of the device may occur, especially in a child who sweats a lot or whose skin remains damp after bathing. This is easily averted by keeping the skin dry and, when necessary, placing a slotted gauze between the button and skin. Also, the button can be rotated 45 degrees daily so that it does not chronically create the same footprint. Leakage around the tube causing skin irritation may occur. Again, treating this problem in a timely manner to prevent further skin injury with subsequent tract enlargement is important.
Accidental dislodgment of the button occurs. This is more common with balloon-tipped buttons than with mushroom-tipped buttons. If the button is replaced quickly there is usually no problem. However, if there is a delay in reinserting a catheter, the tract will rapidly begin to close. We have seen children with tracts that have become pinhole in size in less than eight hours after tube loss. Therefore it is now our practice to give the caretaker a Foley catheter 2 to 4 French smaller in size to insert if an unexpected dislodgment occurs. It is for this reason that we prefer the balloon-tipped buttons.
There are several strategies that may be used if a button or gastrostomy is unexpectedly lost. First, if the child has a button, a prescription for a second button can be given to the caretaker at the time of discharge. We ask that a second button (balloon tipped) is kept in the house or care facility. When the indwelling button fails, the new one can be easily reinserted by lubricating the tip and with mild to moderate forward pressure, pushing it back into the gastric lumen. If this cannot be accomplished, the interventionalist on call is contacted and the button is replaced in the interventional suite. In children, even those whose tracts are small and difficult to visualize, the ostomy can be re-established with a 3 French dilator (Figure 4.24). The dilator is used to probe the center of the old ostomy. In most instances, a tiny opening will be identified into which the dilator can be advanced. Then, a 0.018-inch glide wire is advanced into the stomach. In most cases, the tract can then be easily enlarged using progressively larger vascular dilators until the desired tract diameter is attained. Another button is then inserted. Before discharge, contrast is injected to confirm satisfactory placement.
Failure of the anti-reflux valve remains a problem and may occur in 10% or more cases. This problem is usually identified after six months of use although we have seen buttons last for considerably more than 12 months. If it occurs in the first weeks after insertion, a defective product should be considered. When valve failure occurs, button replacement is required.
Tract and skin surface complications
There are a few minor but nagging problems that are seen in children with long-standing GTs that require brief discussion. In the rare instances when an infection does occur, normal skin organisms are the most common agents. However, fungal infection should also be considered if the skin appears dry and scaly or if routine antibiotic therapy is unsuccessful. When a bacterial infection is present, there may be associated erythema, mild induration, and occasionally expressible pus. If an abscess is present, with or without systemic signs and symptoms, the abscess is incised and debrided and oral antibiotics are begun along with standard skin care. In rare instances, the child is admitted to the hospital for intravenous antibiotics. If a minor infection is suspected, treatment with hydrogen peroxide and an antibiotic ointment, such as mupirocin, is initiated three to four times per day. If this is ineffective, the site is cultured and an oral broad-spectrum antibiotic is given.
In our experience, secondary skin infection with a yeast is occasionally identified. Clinically, these children have erythematous, dry, flaky skin without an associated purulent discharge. In these instances, treatment with a topical antifungal cream is usually successful.
In general, it is important to keep the skin around the ostomy dry and clean. Once the skin becomes reddened, inflamed, and gastric contents begin to leak, there is a rapid skin breakdown and discomfort. The result will be enlargement, sometimes quite rapidly, of the gastrostomy tract and more serious leakage of gastric contents. To prevent this cycle, it is important to identify and treat this complication as early as possible. Children who perspire a lot, those with granulation tissue with associated serous secretions, or whose skin is not carefully dried after cleaning, are also prone to develop irritation and skin breakdown. To prevent these problems, the skin must be kept dry and granulation tissue treated. To accomplish this, attention to detail is important with frequent observation of the skin and, if needed, a slotted 2 × 2 cm gauze or DuoDERM® is positioned between the disc and skin surface.
Erosion and ulceration of the stoma may occur with or without fungal infection. Especially where the gastrostomy tip is proximal to a functional gastric outlet obstruction, increased intragastric pressure or loosening of the stoma relative to the tube may lead to chronic exposure of the peristomal skin to gastric secretions, leading to irritation or ulceration. This may become superinfected, often with fungus, and may lead to profound excavation of the stoma (Figure 4.31). Restoration of skin integrity and of a useful stoma can be accomplished, but requires skilled wound care and may take weeks to months of inpatient care to heal. During this time it is helpful to replace the usual tube with a narrow-caliber transgastric jejunostomy tube to maintain access.
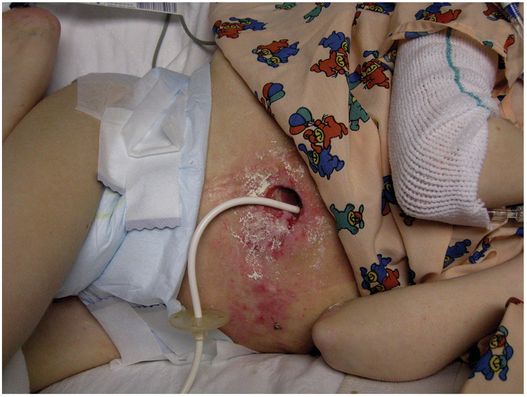
Iatrogenic gastric plication caused by the surgically placed gastrostomy in this 14-year-old boy with cerebral palsy resulted in poor gastric emptying and chronic leakage of gastric contents from the stoma. He developed ulceration and erosion of the stoma margin and fungal superinfection. The original gastrostomy and transgastric jejunostomy tubes have been exchanged for an 8 French jejunostomy tube shown here, to allow the stoma to heal to a small diameter.
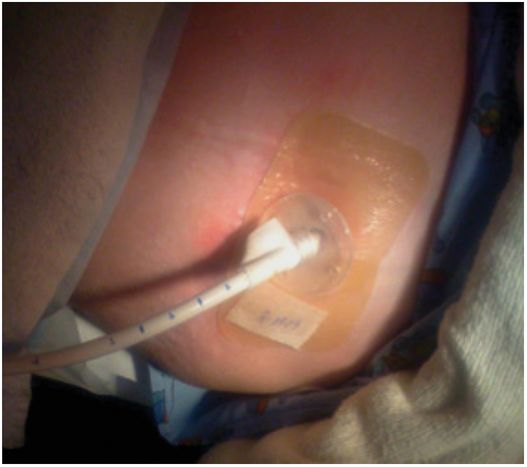
Three months of intensive inpatient wound management by the interventional nurse practitioner and the stoma nurse were required to heal the stoma and surrounding skin. This allowed restoration of the original feeding tube, although re-siting the stoma will ultimately be necessary to avoid the effect of the iatrogenic deformity.
When the skin is injured or other skin problems have developed, the skin may be protected by covering the affected area with REPLICARE® or DuoDERM®. These products are non-allergenic, colloidal suspensions that create a barrier to further injury while allowing the damaged skin to heal. As a secondary benefit this also will help secure the GT so that it will be positioned perpendicularly to the skin surface and will not freely move and further enlarge the ostomy site. The REPLICARE® or DuoDERM® is cut to size so that all of the abnormal skin is covered. In addition, a second piece may be placed over the GT skin disc to stabilize it. If further tube stabilization is needed, a Hollister® disc is utilized. The REPLICARE® or DuoDERM® is left on for several days until it becomes wet or falls off. In most cases, this will help the skin irritation to resolve and, more importantly, allow the enlarged GT tract to heal and again become water-tight. Control of leakage of gastric contents is critical for skin healing. If the above does not work then the gastrostomy tube should be removed and exchanged for a tube large enough to fill the ostomy and stop the leakage. In the rare instance when this approach does not work, several options remain. The GT may be removed and the site covered with an occlusive dressing allowing the ostomy site to shrink. The site should be examined every 12 to 24 hours to make sure that it does not close completely. In addition, an NG tube can be inserted and placed to suction, and drugs to reduce gastric secretion may be given. As a last resort, the site may be surgically closed and a new GT inserted.
In summary, the key to treatment is to stop the leak of gastric acid and protect the skin to avoid secondary problems. An approach that we have found to be effective is to make the ostomy round by putting in a button or replacement gastrostomy tube that is large enough to completely fill the hole. Once the skin inflammation subsides the ostomy size is reduced with successively smaller tubes (2 to 4 French each one to two weeks), then the skin should be treated. If the skin is not infected the entire area of abnormal skin is covered with DuoDERM®. If infection is suspected it may be cultured then treated with oral antibiotics and covered with DuoDERM®.
A question that is often asked by parents or caretakers is, can the child have a bath or go swimming? We recommend that they do not take a bath or swim for a minimum of six weeks so that the tract can completely heal and seal itself. In children in whom wound healing is suspect (such as the severely neutropenic and those on chronic systemic steroids), a minimum of 12 weeks is suggested. After this time we ask the parent to first place the child in bath water and watch for bubbles. If none are identified then we assume that the GT site is water-tight and bathing or limited swimming is allowed. An additional precaution that can be taken is to cover the ostomy site with a clear, waterproof, occlusive dressing (e.g., Tegaderm® or Opsite®) to further minimize any potential problems. For older children taking a shower is usually no problem.
A significant percentage of children develop a granulation tissue collar around the GT ostomy site. This tissue is highly vascular, may grow to a size of 1 to 2 cm or more, and secretes a yellow or yellow-green fluid that may be mistaken for purulence. In the vast majority of instances, no infection is present and cauterization is all that is needed. In most situations, the granulation tissue is treated with silver nitrate sticks until the tissue appears gray-black. It is important to avoid cauterizing normal skin or into the tract so as not to cause skin injury or tract enlargement. This procedure is repeated as needed.
Peritonitis, tube dislodgment, and bowel perforation
Peritonitis following primary gastrostomy is rare, albeit underreported. Causes include inadvertent colonic puncture, leakage of gastric contents during access maneuvers, and leakage of feedings into the peritoneal cavity due to tube malposition, tract elongation, or elevated intragastric pressure. Symptoms may include prolonged or severe pain after the gastrostomy procedure, pain during feeding, or external leakage of gastric contents. Unexplained changes in vital signs following the procedure should raise suspicion of peritonitis. Retching during the early postprocedure period may also cause leakage of gastric contents into the peritoneal cavity. If peritonitis is suspected, feedings should be held immediately. A contrast study under fluoroscopy or CT may help confirm the diagnosis.
Intraperitoneal leakage of gastric contents usually causes a chemical peritonitis, but a course of broad-spectrum antibiotics with coverage for common gastrointestinal pathogens is prudent. If free intraperitoneal fluid is observed, a sample may be obtained for culture and sensitivity to help guide appropriate coverage. Presuming the reason for leakage has been corrected and the gastrostomy tube is properly positioned, feeding can usually be safely resumed on the third day of antibiotics.
Intraperitoneal tube malposition or disruption of the gastrostomy tract may be suspected if after exchanging the tube through a mature tract there is difficulty or pain while injecting water through the new tube. Similarly, if the existing tube was accidentally dislodged, a low threshold for suspecting complication should be maintained. In such cases a contrast study under fluoroscopy should be performed to positively confirm appropriate position and function of the new tube. If peritoneal contamination is suspected, feeding should be stopped and the patient treated with broad-spectrum antibiotics as described above. If access to the gastric lumen cannot be safely regained through the old tract, the gastrostomy may have to be re-sited.
If bowel transgression is suspected, after the tract has matured the tube can be removed over a guide wire and a catheter with a caliber large enough for injection of contrast around the wire can be introduced into the gastric lumen. Contrast may be injected under fluoroscopy during withdrawal of the catheter (leaving the safety wire coiled in the stomach), looking for contrast escaping into the colon or peritoneal cavity to confirm the diagnosis (Figure 4.25). If bowel transgression is proven, the gastrostomy should be re-sited.
Occlusion and leakage
Although virtually no technical expertise is required to unclog a blocked feeding tube, the interventionalist is frequently called upon by their patients to either replace or re-establish flow in feeding tubes of all sizes. A variety of materials cause tube obstruction. In our experience, the most common causes are formula or other foods and medications such as crushed lansoprazole (Prevacid®) tabs. The tubes that are most prone to clogging are jejunostomy catheters since they are usually 8 to 9 French in diameter. Larger tubes, such as gastrostomies and buttons, can become blocked but much less frequently. Regardless of the type of tube, the approach to re-establish luminal patency is the same. Since there is a large number of children who are dependent on feeding tubes for their nutrition, dealing with obstructed tubes is a common problem and often comes to attention in the evening hours. Over the years, we have developed an approach that is successful in the vast majority of cases.
The best treatment for a clogged feeding tube is prevention. Parents and caretakers are instructed to flush the tube after each use with a clear carbonated diet soda, warm tap water, or other liquid that does not contain sugar. For children on continuous 24-hour feeding, we recommend flushing the tube two to four times per day. Caregivers are also advised to avoid rotating the tube while attaching and removing syringes used for flushing, as rotation over time will cause the tube to twist and will eventually dislodge the jejunostomy component from the small bowel (Figure 4.32).
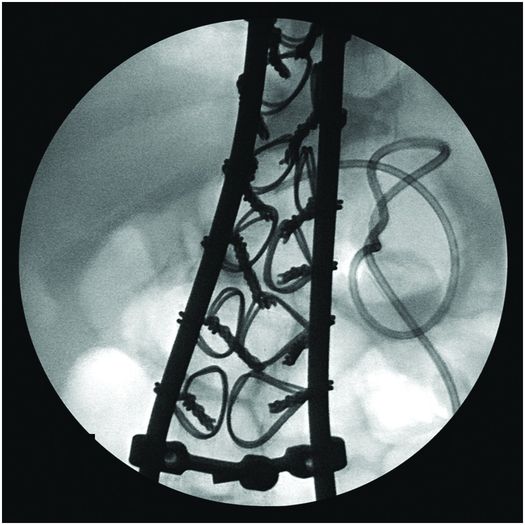
Turning the hub while attaching flush syringes can cause the catheter to “corkscrew,” as shown here, resulting in accidental dislodgment of the tip from the small bowel into the stomach.
In addition to the above, it is suggested that all medication be ground into fine particles or diluted into 5 to 15 ml of liquid if possible. This approach will maximize tube life. In spite of even the most meticulous care, a tube clog may occur. If this happens, the tube is flushed with a 1, 3 or 5 ml syringe with one of the recommended liquids until the tube function returns to normal. If tube patency is not rapidly returned to normal, a regimen of flushing with syringes of decreasing size is begun. Initially a 5 ml syringe is filled with a carbonated or other liquid and forcefully injected. If the obstruction is not cleared, then the procedure is repeated with the 3 ml and 1 ml syringes. In our experience, the 3 ml syringe is the one that most effectively clears the catheter.
If this maneuver fails, then a flowswitch is connected and a forceful injection is repeated with the 3 ml syringe. When peak pressure on the syringe plunger is achieved, the flowswitch is closed creating pressure within the tube. The flowswitch is left closed for 30 to 60 minutes. At the end of this time the flowswitch is opened and alternating suction and injection is applied using 60 ml and 3 ml syringes respectively. This procedure may be repeated several times. If the tube remains obstructed, Zap-it, an enzymatic cleaner, may be injected into the tube to digest the food or other material obstructing the tube. This material appears to work for a variety of material especially food. Zap-it is not used earlier since it costs >US$20 per unit. If these measures fail, the tube will need to be replaced.
The timing of tube replacement may become a significant issue with the parent or caregiver. Our approach is to consider tube replacement elective in most instances. Therefore, it is usually replaced the next working day. To help this policy work effectively, it is important to explain this in detail after the initial tube insertion, provide the caregivers with written instructions, and repeat the discussion at each tube change. Indications for non-elective tube replacement are children less than 10 kg who can become dehydrated, those with metabolic problems requiring continuous calories or glucose, and children with severe gastroesophageal reflux (GER) unable to tolerate any fluid in the stomach. Feeding children with less severe GER is approached by reducing the volume of formula or other fluids to half their usually hourly volume or, at minimum, providing the equivalent of insensible fluid loss. In addition to reducing the hourly rate of infusion, the child is fed in a sitting or upright position or prone oblique position to avoid aspiration if vomiting or GER occurs.
Whenever a gastrostomy tube (alone or with a jejunostomy) inadvertently comes out, it must be replaced as soon as possible to avoid closure or marked reduction in the ostomy. Gastrostomy sites may reduce in size or close rapidly. Reductions in ostomy size preventing reinsertion of the GT may occur in as little as one hour. Whenever possible, instructions are given by telephone to aid the parent or nurse in replacing the tube. If the parent is unable to or refuses to replace it, the child is brought to the interventional suite and the tube(s) replaced. Alternatively, the patient may be treated in the emergency room although they will not be able to insert a jejunostomy, thus requiring another hospital visit.
Intussusception
It is possible for the jejunostomy tube to act as the lead point in development of small bowel intussusception (Figure 4.28). This condition is usually transient, and may cause intermittent sharp cramping discomfort for the child. The most common situation in which this occurs is when the jejunostomy tube terminates in a modified tip, such as a Cope loop or pigtail. The prevalence of intermittent small bowel intussusception in children with such devices may approach 30%. The diagnosis can be made with transabdominal ultrasound, although the search is most likely to be successful when the patient is acutely symptomatic. Potential solutions include trimming the tip of the tube or using a different device.
Controversies/issues
Since its introduction, there has been rapid and widespread acceptance of the gastrostomy button for use in both children and adults requiring long-term nutritional support. Several authors have explored the potential for insertion of a gastrostomy button as a single-step procedure. These authors suggest that the single-step insertion technique has the advantages of avoiding a second procedure and any associated risk and cost. A number of studies have shown that this procedure can be performed safely.
The technique initially described employed endoscopy for button insertion with sedation and local anesthesia. In an alternative approach to single-step button placement the gastrostomy button is delivered transorally, coaxially fitted to a tapered silastic tube. More recently, retrograde single-step insertion has been performed radiographically by advancing the button and measured tube through a telescoping sheath that is removed once the gastrostomy has been delivered. Other technical modifications for one-step button insertion have also been described.
In all cases, accurate measurement of the prospective tract is an essential component of the insertion procedure. There are tract-measuring devices, or a balloon catheter can be advanced coaxially over a guide wire through the fresh tract, and the balloon inflated within the gastric lumen. The balloon is pulled back until it is in contact with the anterior gastric wall and the balloon catheter is marked at the skin exit. The balloon is deflated and removed, then reinflated. The distance from the proximal end of the balloon to the mark is the tract length. In most cases the button selected has a catheter length 0.5 cm longer than the measured tract length.
The one-step approach, while a potentially attractive alternative, suffers from several potential problems. The complication rate is higher than percutaneous endoscopic or fluoroscopic gastrostomy techniques. The complication rate ranges from 3 to 30% for PEGs and 5 to 15% for fluoroscopically inserted tubes. The complication rate with the one-step button may be as high as 17 to 29%. The most common complication is peristomal wound infection, occurring in 5 to 30% of PEG insertions and less than 5% using the fluoroscopic method. The advantages of a low-profile device and significantly decreased risk of accidental dislodgment or tube clogging can be obtained through conversion from a tube gastrostomy to a button placement after the tract has matured, with negligible delay. Nevertheless, primary insertion of the low-profile device remains attractive to many referring providers and caregivers.
Conclusions
Percutaneous feeding techniques have rapidly become established as safe and effective methods. In a relatively short period of time they have become the procedure of choice for placement of feeding tubes in most situations. Today the interventionalist is routinely consulted for placement of PGT, PGJT, gastrostomy buttons, and NJT. These assisted feeding techniques have now become one of the most often performed procedural groups in the pediatric population. It is likely that their frequency will continue to grow in the near future.
Percutaneous cecostomy
Introduction
The number of people, young and old, with loss of bowel control or fecal soiling is quite large. Spina bifida, the most common underlying disorder in children with fecal incontinence, occurs in about 1/1,000 births. Patients with other underlying diagnoses, such as imperforate anus, cloacal abnormalities, sacral agenesis, paraplegia, and cerebral palsy may also be at risk for fecal soiling. There may be as many as 3 million people with fecal incontinence in North America.
Bowel control depends on a normal internal sphincter, normal external sphincter, sensation, peristalsis, a normal ano-rectal angle, psychosocial factors, and the absence of scarring. Normally, stool enters the rectum and results in relaxation of the internal anal sphincter. This is independent of the central nervous system. Voluntary contraction of the external sphincter is needed to contain flatus or feces. When any component of this system fails, or is not normally developed, this may result in “fecal incontinence,” or the inability to control bowel function. Treatment of fecal incontinence may include spontaneous defecation, dietary modification, laxatives, manual expression, disimpaction, bowel training, biofeedback, suppositories, electrostimulation, and large volume enemas delivered via a special rectal balloon catheter.
Antegrade colonic enemas have been described as a surgical procedure where the appendix is used to form a cutaneous cecostomy for fluid irrigation (Malone Antegrade Colonic Enema – MACE). Transcolonoscopic extraperitoneal cecostomies have also been described. A percutaneous approach to the placement of a cecostomy catheter was described for colonic decompression in adults, and was adapted for the introduction of antegrade enemas in pediatric fecal incontinence by Chait and Shandling.
Placement of the cecostomy tube involves two different procedures that take place about six weeks apart. In the first, a temporary cecostomy catheter (C-tube) is inserted into the patient’s colon through the skin usually in the lower right part of the abdomen, to encourage maturation of a short, straight tract. Approximately six weeks later, a more permanent tube is exchanged over the wire in a brief outpatient procedure. The C-tube insertion procedure is designed to provide a comfortable, convenient way to deliver a small-volume enema to periodically cleanse the colon. By emptying the colon in this regular, predictable way potentially embarrassing accidents are avoided and the patient often gains freedom to pursue activities previously prevented by fear of incontinent episodes. After their C-tube insertion, some patients are able to give their own enemas and thus manage a significant component of self-care for the first time. All of our patients have described almost complete resolution of their fecal incontinence with few unexpected accidents.
Related posts:

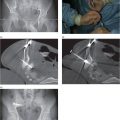
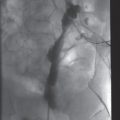
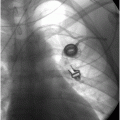
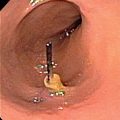
Stay updated, free articles. Join our Telegram channel

Full access? Get Clinical Tree


