The kidney is contained in a tough, fibrous capsule. The relationships of the renal fossa and surrounding structures are illustrated. (a) psoas fascia, (b) renal hilum, (c) renal fascia (anterior layer), (d) peritoneum, (e) perirenal fat, (f) pararenal fat, (g) renal fascia (posterior layer), (h) quadratus lumborum muscle and fascia (anterior layer of thoracolumbar fascia).
Multiple renal arteries are seen in 30% of cases. When multiple renal arteries are present, there is usually a main renal artery arising normally from the aorta at the level of L1 or L2. Before reaching the hilum the main renal artery divides into anterior and posterior branches. Segmental branches of the anterior division supply anterior and polar regions of the kidney. In most cases, the posterior segmental artery is located on the posterior surface of the kidney in its middle to upper half, and supplies the remaining portion of the posterior kidney. The posterior segmental branch is particularly at risk during posterior puncture of an upper pole calyx or infundibulum medial to Brödel’s line of relative avascularity.
Normal segmental vessels (or rarely, accessory or aberrant vessels) frequently cross the ureteropelvic junction (UPJ) as they course to the kidney to supply the lower pole. Specific surgical interventions were directed at these “crossing vessels” in the 1950s and 1960s, when they were considered primary candidates in the etiology of UPJ obstruction. It now appears that the likely cause of UPJ obstruction is often a dysplastic, aperistaltic segment of upper ureter, which may either happen to coexist with a crossing vessel or predispose to obstruction at that point. Because crossing vessels supply as much as 50% of the renal parenchyma, sectioning these vessels at surgery or injuring them at endopyelotomy may be a significant source of complication (e.g., new-onset hypertension or hemorrhage) or procedural failure. On the other hand, there has been no conclusive evidence yet shown that crossing vessels should be a contraindication to endourologic interventions for UPJ obstruction. If needed, CT angiography is a useful method for identifying crossing vessels, although we do not advocate this as a necessary part of preprocedural preparation at this time.
Interventional radiology and UPJ obstruction
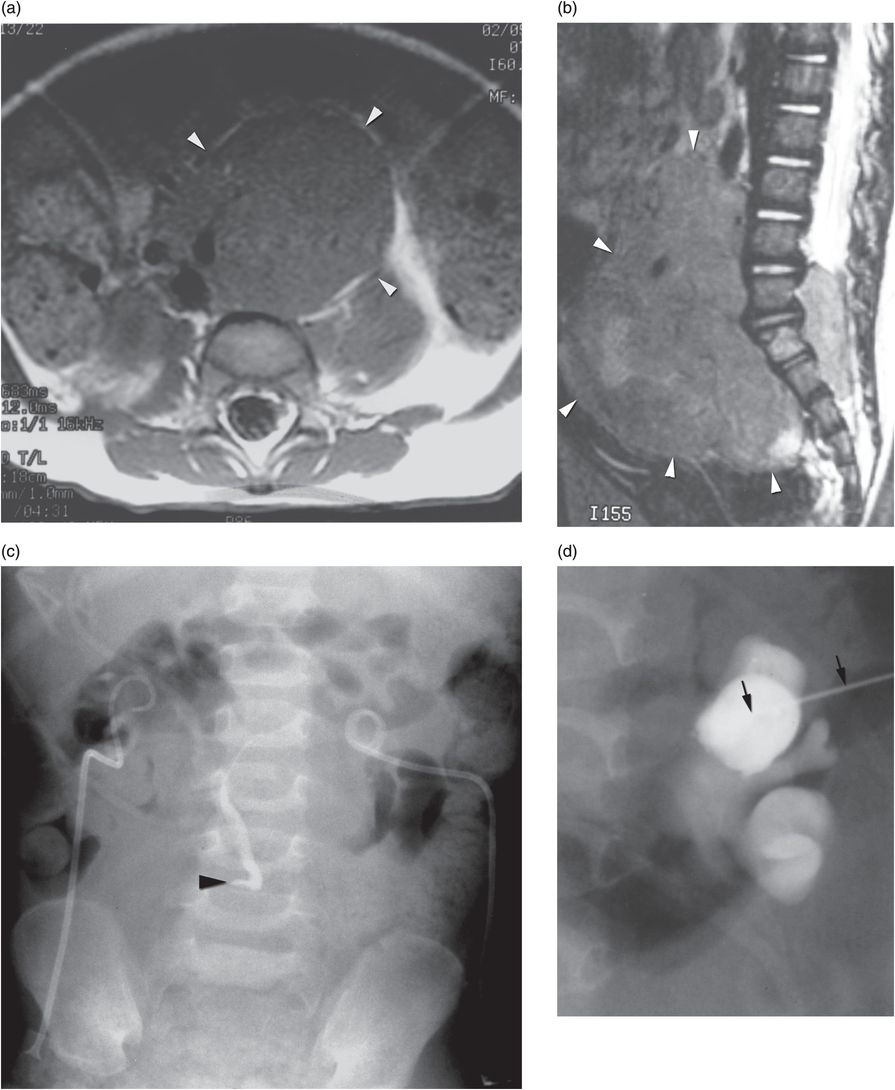
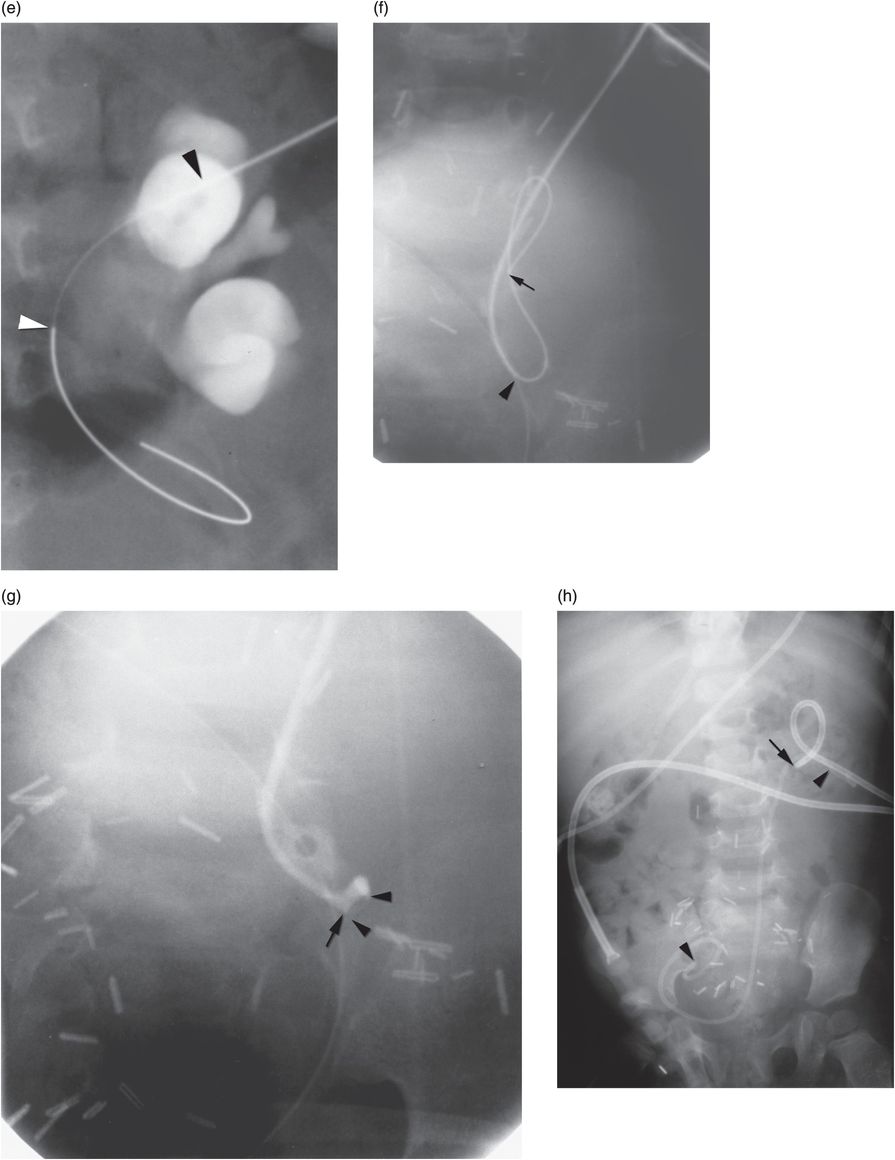
Accurate etiologic diagnosis of UPJ obstruction, relation of apparent hydronephrosis to long-term functional impairment, and selection of an appropriate intervention remain difficult clinical problems. Compounding this difficulty is the substantial differences in prognosis after interventions in children with congenital (Figure 6.2) versus acquired (Figure 6.3) UPJ obstruction. Patients with UPJ obstruction classically present with infection (UTI is the presenting symptom in 30% of children beyond the neonatal period), pain, calculus, and hematuria, but may be identified during investigation for abdominal mass (Figure 6.4) or anomalies with a strong renal association (e.g., VACTERL). Once UPJ obstruction is diagnosed, prompt treatment is important. Without treatment, high intrapelvic pressure, intrarenal shunting, and urine stasis lead to progressive renal injury, deterioration in renal function, pain, increased risk of infection, development of renal calculi, and hypertension. Infection may accelerate renal injury due to obstruction, and suspicion that the two coexist should be regarded as an interventional emergency. Most renal units affected by UPJ obstruction will preserve function with treatment. Some may regain lost function.
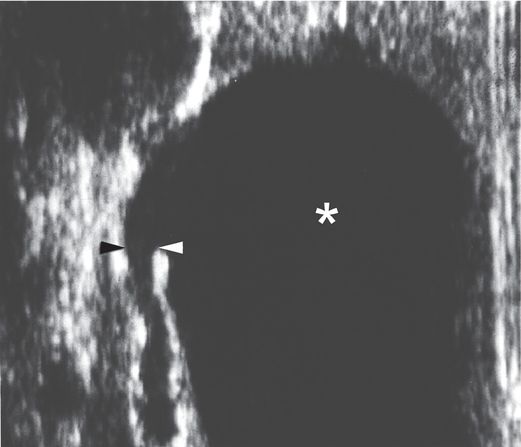
A longitudinal US view using a linear transducer shows the transition point (arrowheads) between the grossly dilated renal pelvis (asterisk) and the narrowed ureter in this newborn infant with UPJ obstruction. This image illustrates the difficulty often encountered during attempts to obtain antegrade access across the UPJ obstruction, trying to go from a large cavity to a small caliber tube. On the other hand, retrograde access (e.g., via cystoscopy) in this patient would likely be effortless.
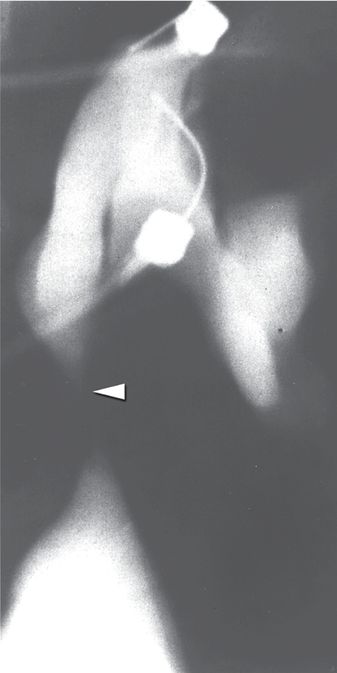
A fluoroscopic image obtained during provocative Whitaker testing in the same patient shows contrast medium administered at a rate of 10 ml/min through one needle into the renal pelvis. Abnormally elevated intrapelvic pressure (>35 cm H20) was recorded through the other needle. The fixed high-grade obstruction (arrowhead) characteristic of congenital UPJ obstruction is also seen in this image.
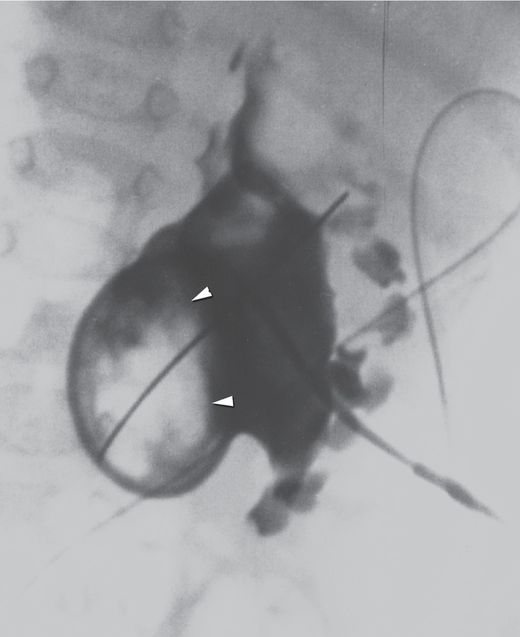
Initial needle access and subsequent guide wire manipulation can be impaired by retained material within the collecting system, whether by a stone or stones, hematoma, inspissated mucoid material, or as in this case by a fungus ball (arrowheads).
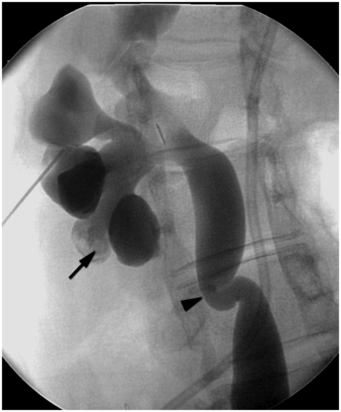
This 16-year-old girl had an open pyeloplasty performed in infancy for congenital UPJ obstruction. She now presents with caliectasis, tortuous ureter, and renal calculi (arrow) due to a secondary UVJ obstruction (arrowhead). Such acquired obstructions are often readily treated by endourologic means, with a high rate of success.
Four-year-old girl presenting with abdominal mass and bilateral hydronephrosis. Magnetic resonance imaging in the (a) axial and (b) sagittal planes shows a large abdominopelvic mass (arrowheads) with pre- and postsacral extension characteristic of neuroblastoma. (c) A preoperative pyelogram after insertion of bilateral percutaneous nephrostomy drainage tubes shows high-grade extrinsic mid-ureteral compression (arrowhead). (d) After a 21-gauge needle (arrows) was used to access a posterior calyx using US, dilute contrast material was injected to confirm tip location under fluoroscopy. (e) A stainless steel 0.018-inch mandril guide wire was coiled within the renal pelvis, assuring that the stiff portion of the wire (between arrowheads) was within the collecting system. (f) The needle is exchanged for a 4 French directional catheter (arrowhead) and the mandril wire is exchanged for a 0.035-inch guide wire (arrow). The catheter is gently advanced to the level of the obstruction, and is not advanced beyond the entry to the curve of the wire. (g) Dilute contrast medium is injected through the catheter (arrow) demonstrating the level of extrinsic compression (arrowheads) of the ureter. With the catheter tip wedged in the stricture origin, gentle probing with the directional guide wire may allow (as in this case) advancement of the catheter and wire across the stricture into the bladder. (h) With access across the narrowed ureter, an internal “double-J” stent (arrowheads) was deployed to relieve the obstruction. A temporary percutaneous nephrostomy drainage catheter (arrow) was left in place until antegrade drainage was confirmed.
Evaluation of UPJ obstruction for surgical intervention has historically been conducted radiologically with an intravenous urogram (IVU) or more recently by renal sonography. Today, it is more common to find hydronephrosis at antenatal ultrasonography or MRI. While upper urinary tract dilation is present in 1 of 100 pregnancies, only 20% of these represent clinically significant uropathy. With increasing frequency, the clinician must determine appropriate management for asymptomatic congenital hydronephrosis.
While hydronephrosis is not normal, it is also not synonymous with either functional obstruction or renal dysfunction in the long term. However, the implication that hydronephrosis will require surgical intervention has a significant impact on the patient and family, especially in the increasingly common situation where hydronephrosis is detected antenatally. The initial goal of medical imaging is to determine the anatomic site and functional significance of apparent obstruction. There are a number of diagnostic studies for qualitative assessment of obstructive symptoms, such as ultrasound (US), computed tomography (CT), magnetic resonance imaging (MRI), and intravenous urography (IVU), as well as for quantitative analysis of apparent obstruction, including drainage half-time by diuretic renography, resistive indices by US, and measurement of pressure–flow relationships during antegrade nephrostomy infusion (see “Whitaker (pressure–flow) perfusion test,” below). Although, like any diagnostic study, each has potential sources of error or misinterpretation, used rationally these tests will yield a correct diagnosis in more than 90% of cases.
Once the diagnosis of UPJ obstruction is made, several factors influence the likely outcome of corrective interventions, including age, primary or secondary obstruction, degree of hydronephrosis, presence of a crossing vessel, and overall and differential renal function. Even though UPJ obstruction is most often congenital, diagnosis clusters around the perinatal period (predominantly due to antenatal detection) and later in life (predominantly due to symptomatic presentation). In other words, neonatal presentation tends to be asymptomatic, and the challenge is to prove that the abnormality has a functional consequence.
Although hydronephrosis in some newborns may have a different natural history from that occurring in older children and adults, intervention for all groups is unequivocally indicated when UPJ obstruction is definitively proven, or when renal function is compromised by involvement of a solitary kidney or by bilateral involvement. Secondary obstruction following open pyeloplasty should probably be treated by endourologic means in all age groups. Due to the increased risk of injury, exposure to ionizing radiation (fluoroscopy), and potential need for multiple procedures under general anesthesia, endourologic interventions for other indications may best be reserved for treatment of older children and adults, especially at facilities with less experience performing interventions in the younger age groups. Neonates and infants should be treated at centers where neonatal caregivers and interventionalists experienced with neonatal procedures are available. The goals of therapeutic intervention include improvement in hydronephrosis and stabilization or improvement in function of the affected renal unit. Open surgical pyeloplasty, although more invasive and requiring more extensive recovery than endourologic alternatives, has an 85% to 98% record of success and remains the gold standard against which alternative interventions must be measured.
While endourologic treatment of preadolescents with UPJ obstruction remains somewhat controversial, we feel it is a reasonable approach if renal function is preserved, hydronephrosis is mild to moderate, and there is no evidence of crossing vessels. For adolescents and adults, endourologic intervention is widely accepted as first-line therapy given the same parameters. Secondary UPJ obstruction is known to respond well to endopyelotomy (EP), with even better results in children (91%) than adults (73%). As interventionalists gain experience, and patient selection gets better, response of primary UPJ obstruction to this approach continues to improve. Massive hydronephrosis (i.e., high-degree obstruction), especially with a concomitant crossing vessel, significantly decreases the success rate for EP.
The coexistence of lower pole crossing vessels with UPJ obstruction may be suggested by IVU, US, retrograde ureterography, or antegrade pyelography. Computed tomography angiography (CTA), magnetic resonance angiography (MRA), and endoluminal US are all sensitive methods for identifying crossing vessels (see “Anatomic considerations,” above); however, currently there is no proven ability to predict which crossing vessels are a significant factor in obstruction, or which will impact the success of EP. In the treatment of secondary UPJ obstruction, CTA may indicate the safest place to make the endopyelotomy incision (usually posteromedially). Historically, infant patients with the poorest renal function preoperatively have had the greatest improvement in function following open pyeloplasty, differing from results in adults. Experience with EP in such infants is too limited to give a recommendation at this time. In rare cases where non-function of the involved renal unit is confirmed with radiographic and radionuclide studies, and non-salvageability is confirmed following temporary relief of obstruction, nephrectomy may be the procedure of choice.
Percutaneous renal biopsy
Introduction
When tissue is required for the diagnosis or management of renal disease, a specimen may be obtained either by open surgery or with a needle percutaneously. In general, practitioners consider the percutaneous approach the initial procedure of choice in most cases. A percutaneous core biopsy of the kidney can be performed with or without image guidance. When image guidance is used real-time guidance, rather than marking a skin location for a blind biopsy, is the safest approach. Although all percutaneous approaches are currently considered acceptable, preference for the image-guided approach continues to grow because of the advantages of precision and safety. This section will discuss and illustrate a variety of real-time percutaneous approaches to renal biopsy.
Indications
A renal biopsy is performed in order to establish a histologic diagnosis, determine the prognosis, and clarify the therapeutic approach to a variety of renal disorders. In general, when there is a renal mass the biopsy is done using image guidance. However, when medical renal disease is suspected a biopsy may be performed with or without image guidance. Quality improvement guidelines recommend that image guidance is the key to maximize successful tissue acquisition and minimize untoward effects. In most clinical settings US guidance is all that is necessary. However, CT is an excellent alternative when it is needed in cases where a safe route cannot be visualized, for focal lesions conspicuous on CT but isoechoic on US, or in obese patients.
Technique
Equipment
There is no specialized equipment needed for a renal biopsy. The operator must decide if a biopsy guide will be used. If a guide is to be used then it needs to be fastened to the US transducer before the sterile probe cover is put on. Otherwise, all that is needed is a sterile preparation set, drape, scalpel with a #11 blade, and a biopsy needle (Table 6.1). Today, automated needles (see Figures 3.14 and 3.15) are used in most settings. It is our practice and recommendation that it is best to use the largest needle size appropriate for the size of the child and the lesion to be sampled. The needles used range in size from 14- to 18-gauge. In general, we suggest an 18-gauge needle with a 2 to 3 cm biopsy chamber for neonates and young children less than about 10 kg and any child with a greater than normal risk of bleeding. We find that a 22-gauge needle is less useful since the tissue samples obtained are often inadequate and the frequency of untoward effects is not significantly decreased compared with an 18-gauge needle. Larger children may have biopsies performed using a 16-gauge needle with a 2 to 3 cm biopsy chamber. The choice of needle size is generally based on operator preference in conjunction with pathology department needs.
Core needle
Automated (1 or 2 cm throw), semi-automated or manual biopsy needles
Removable core needles
Biopsy guide for US transducer
Sterile probe cover for transducer
Scalpel with #11 blade
Buffered local anesthetic
Syringe (3 to 5 ml) with 27- to 30-gauge needle for local anesthetic
Spinal needle (22 gauge) for deep infiltration of local anesthetic
Formalin or sterile test tubes or containers for specimens
One specimen may be sufficient for a parenchymal (cortical) biopsy related to a systemic disease process. The total number of specimens depends on the indication of the biopsy, the needs of the pathologist and other laboratory tests, and the quality of the sample obtained – these factors should be considered and appropriate discussions undertaken with the referring clinician and pathologist in advance of the planned procedure. We routinely get a minimum of two samples. Focal lesions are approached as in any solid organ biopsy. In order to reduce the risk for significant hemorrhage after biopsy we generally limit the maximum number of passes through one area to three, even if no tissue is obtained. Children with large renal masses (Figure 6.4) will routinely have the lesion sampled in two to four quadrants with 14- or 16-gauge needles to maximize the tissue samples for histologic examination and analysis for biological markers. The sample size will usually be discussed with the pathology service in advance to provide the specimens in the manner that is preferred.
Patient preparation
No special preparation is necessary for a renal biopsy. The procedure may be performed under sedation or general anesthesia depending on hospital/operator preference. The procedure may be performed under local anesthesia and intravenous sedation using US guidance or general anesthesia. The patient is kept NPO according to hospital anesthesia/sedation policy.
Standard technique
When a native kidney is biopsied, the child is positioned prone or with the side of the kidney to be biopsied elevated depending on the biopsy approach selected. For right-handed operators and depending upon the preferred approach, the left side is usually selected for convenience. A bolster under the abdomen may be helpful to stabilize the kidney in slender or young children. Prior to the biopsy, if cross-sectional imaging is not available, a diagnostic renal US is performed to assess both kidneys to exclude undiagnosed unilateral renal agenesis, to evaluate the size of the collecting systems and thickness of the cortex, and to identify renal masses or congenital anomalies, especially abnormal renal position. The procedure begins with US evaluation of the kidney to be biopsied and an entry site is marked on the skin surface with a permanent marker (Figure 6.5). Then the US probe is covered with a sterile probe cover.
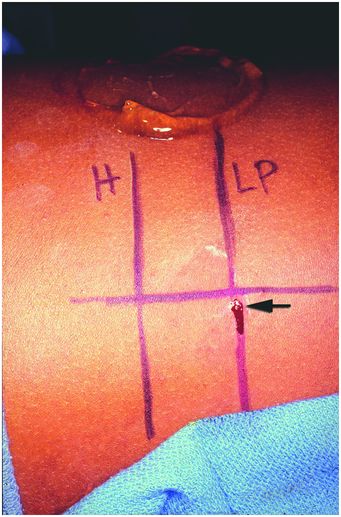
In this photograph, the patient is positioned right-side down (decubitus) with the head to the left. To obtain a core needle biopsy of renal cortex, the level of the renal hilum (“H”) and lower pole cortex (“LP”) were marked on the skin under US guidance with the linear transducer positioned as shown in Figure 6.7. The entry point (arrow) was selected in the mid-scapular line and specimens obtained using real-time US guidance.
Once the entry site is selected the area is prepared and draped in sterile fashion. Biopsies under intravenous sedation require local anesthetic. Procedures performed under general anesthesia do not require local anesthetic but it may be preferred for postprocedural pain control. Lidocaine 1% is infiltrated into the skin using a 30-gauge × 1.5-inch needle. A cutaneous wheal is first raised with the anesthetic, after which the remainder of the tract to the level of Gerota’s fascia may be infiltrated using a 22-gauge spinal needle. Ultrasound guidance may be used to assist in the delivery of local anesthesia. The needle used for infiltration of anesthetic may also be left in place as a “tandem needle” guide to assist selection of an entry point and angle of entry with the biopsy needle (Figure 6.6). This will minimize discomfort and motion during the biopsy, as well as allow for familiarization with the desired trajectory. The biopsy is carried out using real-time US guidance using either a freehand technique or a biopsy guide. When the freehand technique is selected the probe may be positioned either posteriorly, adjacent to the needle, or on the side (see Figure 1.1). All of these approaches have been extensively utilized with successful outcomes. Regardless of the approach selected it is important to visualize the needle throughout its entire course to maximize the chance for a successful biopsy while minimizing the chance of complications (Figure 6.7).
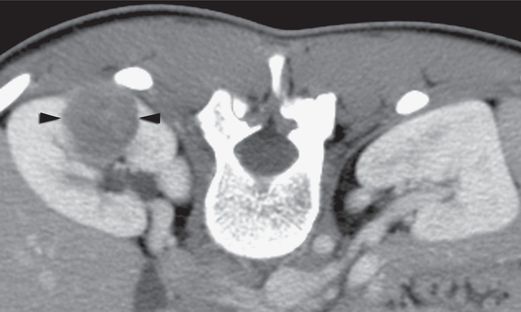
Axial CT image with intravenous contrast enhancement through the hilum of the right kidney in an 18-year-old female who presented with a 3 cm x 2.5 cm x 2 cm poorly enhancing mass (arrowheads) in the posterior midpole.
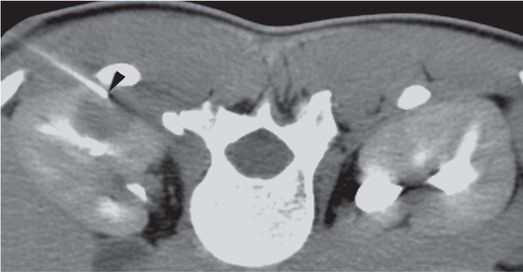
With intravenous sedation, a 22-gauge Chiba needle (arrowhead) was used to deliver local anesthetic to the level of Gerota’s fascia, then advanced to a depth of 4 cm to serve as a tandem needle guide and “guard rail”. Three core specimens were then obtained from different areas within the mass with a 16-gauge automated biopsy device under CT guidance.
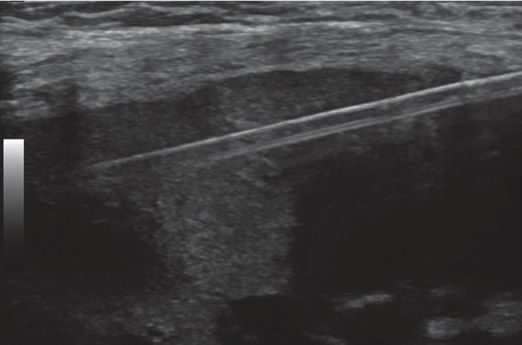
A nine-year-old renal transplant recipient presents for biopsy of the renal graft. Under US guidance, a single 3.3 cm specimen is obtained from the cortex with an automated end-cutting core needle.
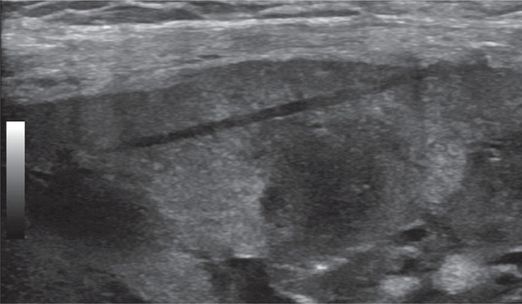
After the specimen is removed, the tissue defect is evident in the cortex.
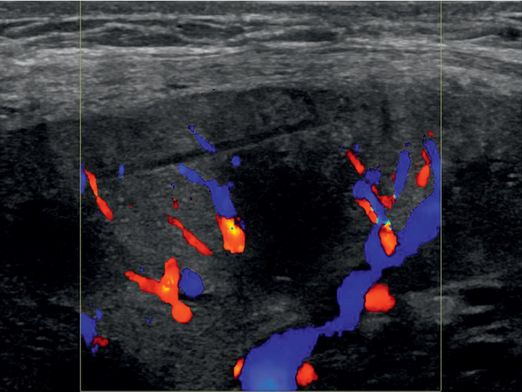
Color Doppler imaging demonstrates no evidence of bleeding.
Most parenchymal biopsies of native kidneys are obtained from the lower pole cortex of the left kidney. If possible, it is preferable to have a pathologist present or readily available to receive the specimen and confirm its adequacy. Working as a team will help keep the number of passes and procedural time to a minimum. When performing a biopsy on a transplant kidney it is especially important to understand the kidney’s position in the lower abdomen and pelvis. The interventionalist’s hand may be used to stabilize the more freely mobile transplant kidney during the biopsy. In these cases one may prefer to obtain a specimen from the upper pole. Since with transplanted kidneys the main concerns are rejection, post-transplant lymphoproliferative disease (PTLD), and infection, a small tissue sample (i.e., 18-gauge) may suffice. However, if a lesion is larger than 2 to 3 mm, is not round, or exerts mass effect, a neoplasm should be considered (Figure 6.8). Immune-suppressed children may have a tumor secondary to transformation of PTLD or another primary tumor. In these cases it might be prudent to obtain more tissue. Be sure to discuss the diagnostic needs with the pathologist in advance since it may be necessary to split the specimen in sterile fashion at the time of the procedure to send part to pathology and part to microbiology. Regardless of the position of the kidney it is important to make certain that the selected biopsy site is not near the renal hilum, reducing the risk for severe hemorrhage or renal loss.
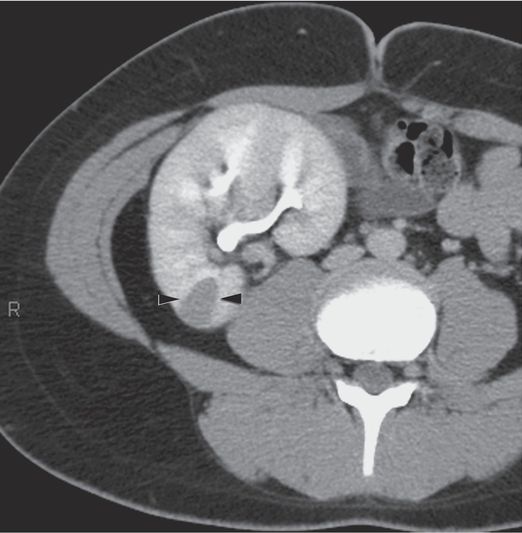
An axial CT section obtained with intravenous contrast enhancement in a 14-year-old boy with a history of abdominal pain shows a new poorly enhancing pyramidal-shaped, cortical lesion (arrowheads) in the pelvic transplant kidney that exerts local mass effect.
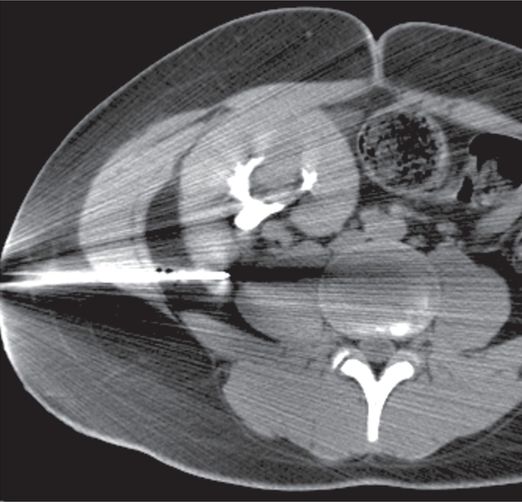
Several core specimens obtained with a 16-gauge automated biopsy device under CT guidance resulted in the unusual diagnosis of renal cell carcinoma, undiagnosed from the donor.
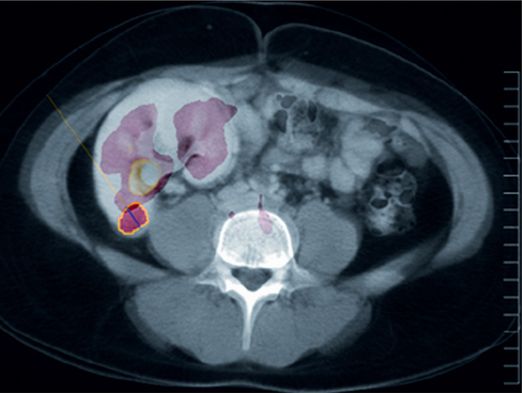
18-F FDG PET-CT fusion imaging obtained near the time of biopsy is shown here in the axial plane through the area corresponding to the location of the biopsied lesion (circled in yellow). There is abnormal uptake, but it is poorly distinguishable from physiologic radiotracer accumulation in the renal collecting system.
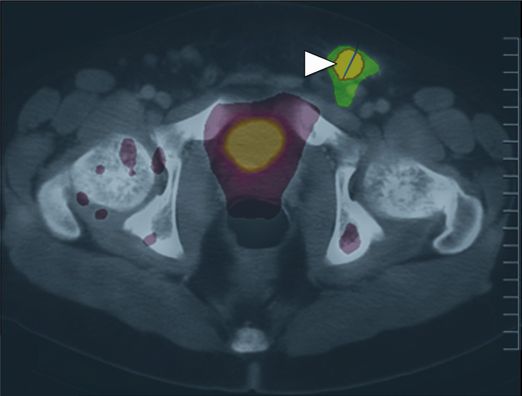
A PET-CT fusion performed in the same patient demonstrated much higher 18-F FDG uptake (arrowhead) in a left inguinal node, offering a potentially safer target for biopsy.
Postprocedure and follow-up care
Traditionally, care for patients after biopsy has consisted of bed rest, analgesia as needed, and 12 to 24 hours of observation including frequent monitoring of vital signs and urine for blood. Several studies have evaluated shorter periods of observation for patient convenience and cost. It has been demonstrated that approximately 98% of all complications were detected by 24 hours. However, only 46% of major complications were identified by four hours and 79% by eight hours after the procedure. By 12 hours all patients with major complications were known but 5% of patients with minor problems (Figure 6.9) were still not identified. However, we have found that patients who have a post-biopsy US that shows no significant bleeding or other complication, are asymptomatic, live nearby, and do not have gross hematuria by four hours after biopsy can be safely discharged to home, with clear instructions regarding when to return, confirmed contact information, and a mandatory follow-up phone call within 24 hours. For patients that do not meet these criteria, it is prudent to observe for signs or symptoms of biopsy-related complications for a minimum of 12 hours.
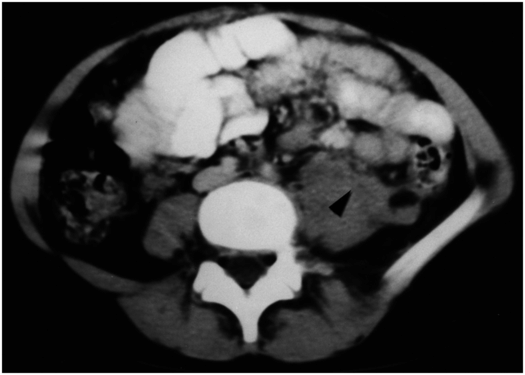
Axial CT imaging with IV contrast shows a psoas hemorrhage (arrowhead) after ipsilateral renal biopsy performed with image guidance. The patient complained of increasing back pain requiring IV narcotics for control approximately 12 hours after the procedure. The hemorrhage was self-limited without evidence of hypovolemia or anemia.
Complications
Although US-guided biopsy has improved the yield and safety of percutaneous renal biopsy there continues to be a high rate of complication. The literature contains experience in both adults and children, and the types and rates of complications are similar in both groups. Complication rates in reported series may vary substantially; however, clinically observable minor and major complications (Table 6.2) are observed following approximately 6 to 8% of all renal biopsies. This differs from the demonstration of asymptomatic bleeding that may be identified by imaging in up to 85% of cases. Notably, the rate of major complications is significantly lower after biopsies performed with real-time US guidance by experienced interventionalists compared to unguided biopsy with or without US marking. The use of a freehand technique for real-time US guidance is also associated with a very low rate of severe complications.
| Minor complications Gross hematuria without clinical sequela Hematoma or perinephric hematoma not requiring intervention Inadvertent biopsy of the liver or other organ |
| Major complications Clinically significant hemorrhage requiring transfusion or other intervention Hematoma with renal compression Urinary outflow obstruction Arteriovenous fistula or pseudoaneurysm formation Injury to non-target organ Infection requiring hospitalization or specific therapy Peritonitis Pneumothorax requiring intervention |
Bleeding complications are the most common after a renal biopsy. Almost all patients will have microscopic hematuria. However, macroscopic hematuria can be expected to occur in about 6 to 8% of biopsies, and may be more prevalent after biopsy of adult-sized renal transplants in children. Care must be taken to evaluate the renal unit after biopsy for acute evidence of complication, and to monitor the patient expectantly for signs of subacute complication in the hours after biopsy (Figure 6.10). Other untoward effects include hematoma within the renal parenchymal, perinephric and retroperitoneal spaces (Figure 6.11), as well as lumbar artery aneurysms and iatrogenic arteriovenous fistulae (Figure 6.12). As is true with any biopsy, failure to obtain adequate or representative tissue is always a possibility (Figure 6.13). Although in general, diagnostic yield from percutaneous biopsies is in the range of 90 to 95%, some cases will not yield diagnostic tissue despite careful preparation and meticulous technique. Integration of evolving imaging technology with interventional techniques may help improve diagnostic yields and more effectively direct biopsy procedures in the future (Figure 6.8).
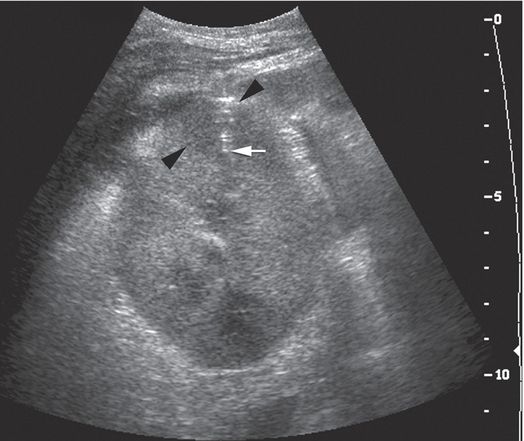
A 13-year-old boy with focal sclerosing glomerular nephrosis developed fever and flank pain following renal transplantation. With the 7 to 4 MHz curvilinear transducer in a transaxial orientation, a transverse approach was used to obtain two core samples from the round cortical hypoechoic lesion (arrowheads) using a 14-gauge automated biopsy needle (arrow).
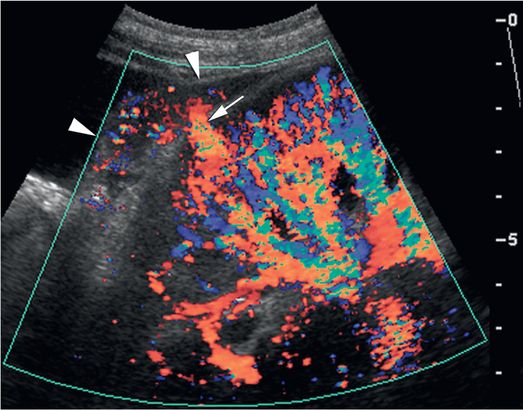
Immediately after the core biopsy procedure, the biopsy site was evaluated with color Doppler US in a longitudinal plane. This demonstrated active extravasation in the biopsy tract (arrow) with increasing subcapsular hematoma (arrowheads). The patient experienced persistent pain and progressive anemia requiring transfusion two days after the procedure. In similar cases direct compression with the transducer can be used to achieve cessation of transcortical color flow for five to ten minutes, usually resulting in hemostasis.
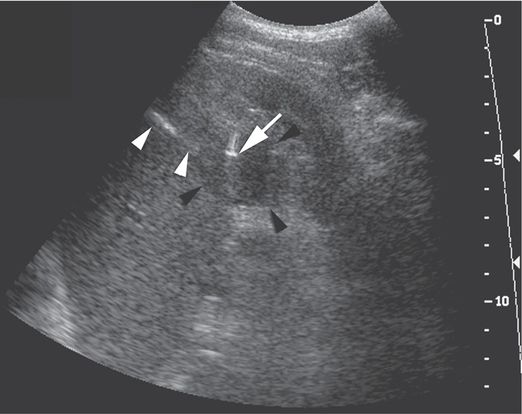
A poorly compliant 18-year-old liver transplant patient with immunosuppression-induced diabetes presented with multiple abscesses. The complex mass (black arrowheads) in the lower pole of the left kidney was sampled using a 5 to 2 MHz curvilinear US transducer and a 21-gauge Chiba needle. The needle shaft (white arrowheads) and tip artifact (arrow) are well visualized. Aspiration produced a small amount of frank pus. A single 18-gauge core biopsy specimen was culture-positive for Staphylococcus aureus.
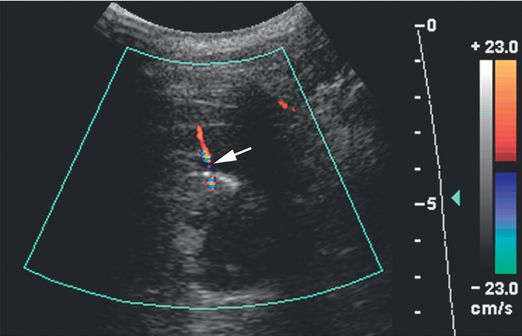
Color Doppler imaging obtained through the biopsy site immediately after the procedure shows a jet of extravascular blood flow (arrow).
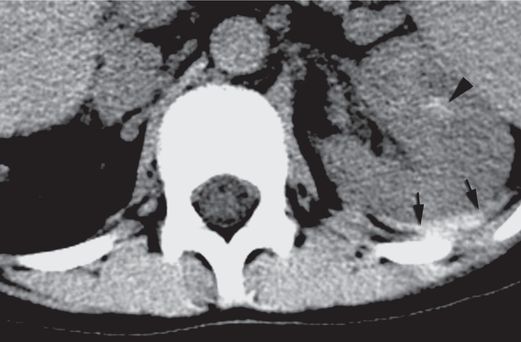
Axial CT image with IV contrast obtained 12 hours after the biopsy shows a hematoma (arrowhead) within the renal parenchyma as well as a large retroperitoneal hematoma (arrows). The patient required a transfusion two days after the procedure.
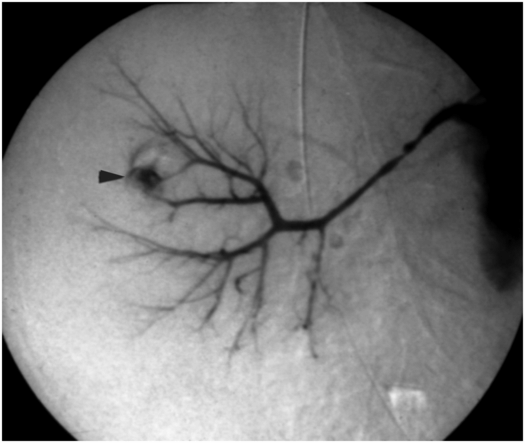
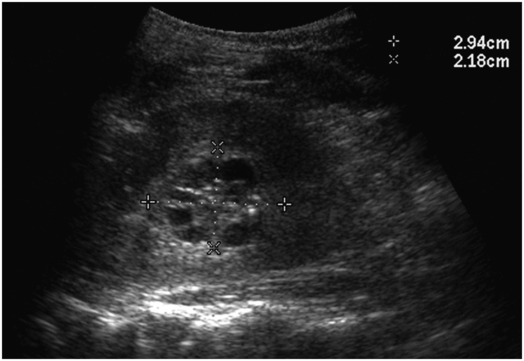
A complex cystic mass was noted in the hilum of the left kidney in this five-and-a-half-year-old boy with Henoch–Schönlein purpura-related nephritis. Under US guidance with a 7 to 4 MHz curvilinear transducer, several 16-gauge core biopsy specimens were obtained. Results were non-diagnostic, although open surgical wedge biopsy showed multicystic nephroma.
Conclusions
Percutaneous renal biopsy is most safely achieved under US guidance in most cases. For routine parenchymal biopsies a single core specimen from the cortex is usually sufficient. Biopsy of focal lesions in the kidney is performed as any solid-organ biopsy. Hematuria is common following renal biopsy but usually clinically insignificant, although the patient should be monitored for signs of persistent bleeding or hypovolemic shock. Severe complications are uncommon. Postprocedure US surveillance and appropriate observation will identify virtually all early complications. Late complications are usually related to vascular injury, and can often be managed using interventional techniques, such as embolization of arteriovenous fistulae.
Percutaneous nephrostomy
Introduction
Percutaneous nephrostomy is one of the most frequently performed interventions for treatment of urinary tract disease and is the core procedure for the development and performance of most complex interventional genitourinary procedures. The technique was first employed by Goodwin and associates in 1955 using a trochar needle for the treatment of hydronephrosis. In 1965, the translumbar catheter nephrostomy gained popularity after a report by Bartley and colleagues. In 1976, the first percutaneous stone removal was performed and eight years later endourologic technology was further extended when Clayman and colleagues showed that electrosurgical instruments could be safely used in the urinary tract. The development of these complex percutaneous endourologic techniques was made possible by the development of equipment such as progressive dilators and sheaths, the angioplasty balloon, stents, and the introduction of techniques and equipment borrowed from other specialties. These advances have led to better patient care and a closer working relationship between the nephrologist, urologist, pediatric surgeon, transplant surgeon, and pediatric interventionalist. In many instances these collaborations have led to a reduced need for open surgical procedures.
In numerous series, percutaneous nephrostomy has been successful in over 97% of pediatric patients ranging in age from one day to 18 years of age. These results compare favorably with surgical management. In most series, percutaneous nephrostomy has been performed with the entry site locally anesthetized and the child sedated with intravenous drugs.
Indications
There are several indications for placement of a nephrostomy tube in the pediatric population (Table 6.3). However, the most common indication for percutaneous nephrostomy is for relief of symptomatic urinary tract obstruction with or without renal insufficiency and pyonephrosis. The most frequent causes of ureteral obstruction were congenital ureteropelvic junction (UPJ) narrowing (Figure 6.14) and obstruction after ureteral re-implantation (Figure 6.15).
Relief of obstruction with renal insufficiency (native or transplanted kidneys)
Drainage of pyonephrosis
Whitaker test or antegrade pyelogram
Drug instillation (e.g., antifungal administration)
Treatment of renal or peri-renal collections
Treatment of urinary tract leaks (urinary diversion)
Access for other percutaneous endourologic procedures
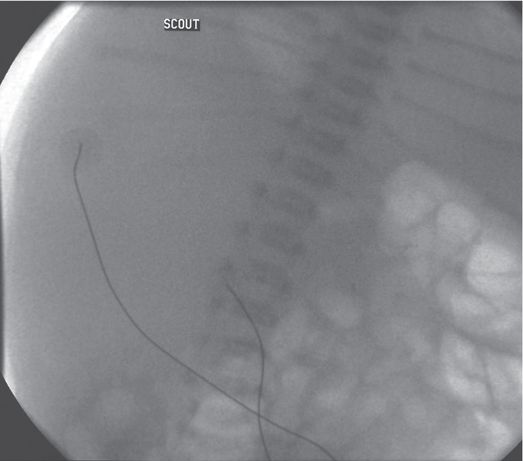
Scout fluoroscopic image in a one-month-old female who presented with an abdominal mass shows displacement of the abdominal organs to the left by a large mass. Ultrasound (not shown) demonstrated hydronephrosis from UPJ obstruction.
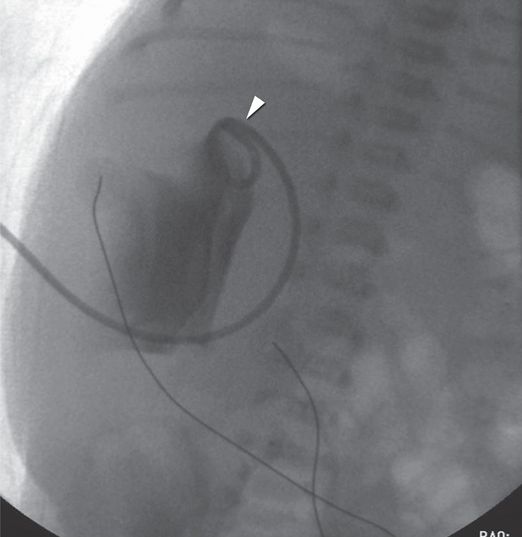
An antegrade pyelogram obtained with injection of contrast material through the 6-French percutaneous nephrostomy drainage catheter (arrowhead) shows a grossly dilated collecting system with no antegrade flow of urine past the right UPJ.
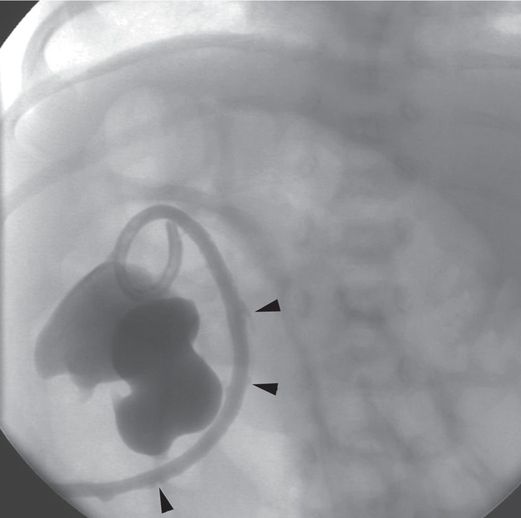
An antegrade pyelogram obtained two weeks later shows interval improvement of the hydronephrosis. Reflux of contrast along the catheter tract (arrowheads) indicates that one of the side holes in the catheter tip has been withdrawn outside the collecting system. This can lead to leakage at the skin insertion site or formation of a urinoma, or serve as a nidus of infection.
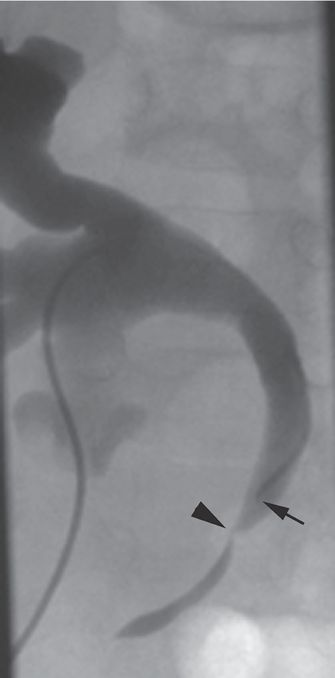
Hydronephrosis with a focal ureteral stricture (arrowhead) is seen on this antegrade nephrostogram through a directional catheter (arrow) in a seven-year-old girl after renal transplant. Vascular compromise of the ureter and anastomotic complications are the most common reasons for ureteric stricture in this population.
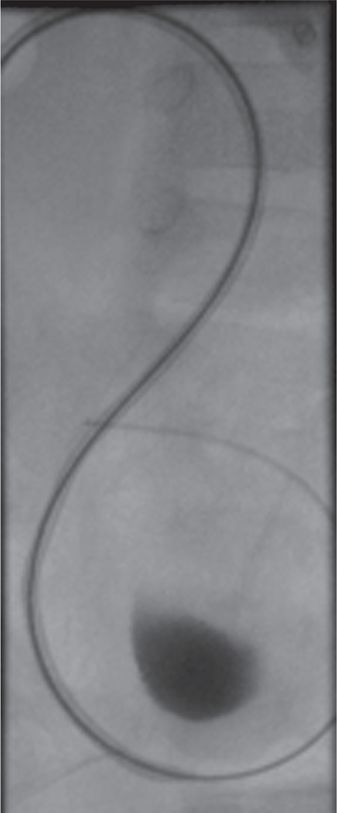
After angioplasty a guide wire and catheter have been maneuvered beyond the stricture into the bladder, the length of the ureter can be measured in preparation for stent selection and deployment.
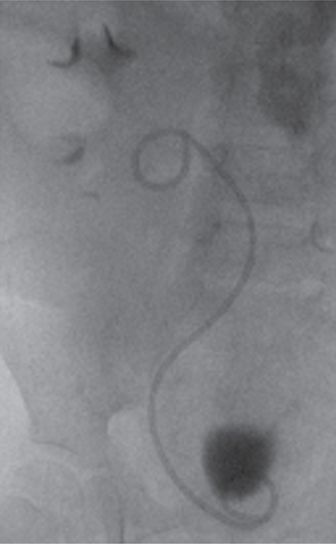
An adequate selection of stent lengths and sizes must be maintained. Small children, especially after transplant, may require stents that are quite short. Poorly sized stents are likely to become malpositioned and dysfunctional over time. The stent pictured here is of satisfactory length, freely coiling in the renal pelvis and bladder, without redundancy or impingement on the bladder wall.
The benefits of percutaneous nephrostomy are rapidly evident in most patients and are due to improved renal function and control of infection with prompt defervescence and symptomatic improvement. Elective performance of definitive therapy can then be scheduled when necessary. Other indications for percutaneous nephrostomy include assessment of renal function (Figure 6.16), demonstration of pathologic anatomy, and differentiation between obstructed and non-obstructed dilated systems using a pressure flow study (see “Whitaker (pressure–flow) perfusion test,” below).
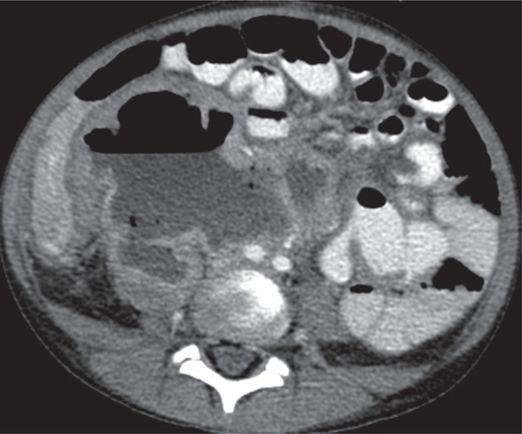
Computed tomography with vascular and enteric contrast enhancement shows the right kidney with a grossly dilated collecting system with an air–fluid level, and a thin and poorly enhancing cortex in this seven-year-old male with flank pain and poor renal function.
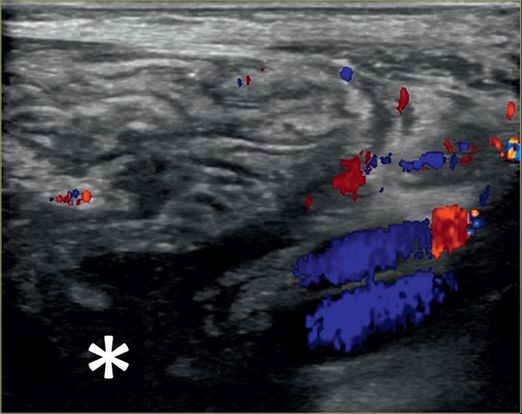
Linear US with color Doppler from the right flank shows dysplastic renal parenchyma and a dilated collecting system (asterisk) with debris.
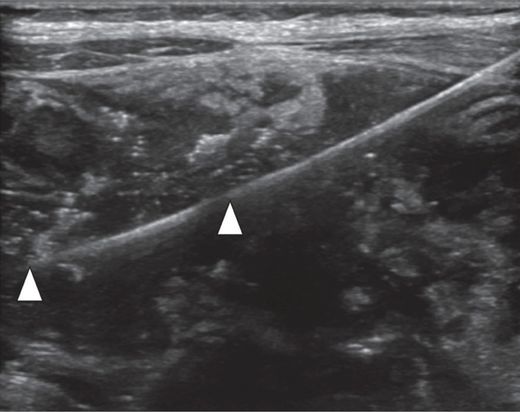
Percutaneous access was obtained with a 21-gauge Chiba needle. Ultrasound with a 6 to 18 MHz linear transducer provides high-resolution near-field guidance, with very conspicuous visualization of the needle and the 0.018-inch mandril guide wire (arrowheads).
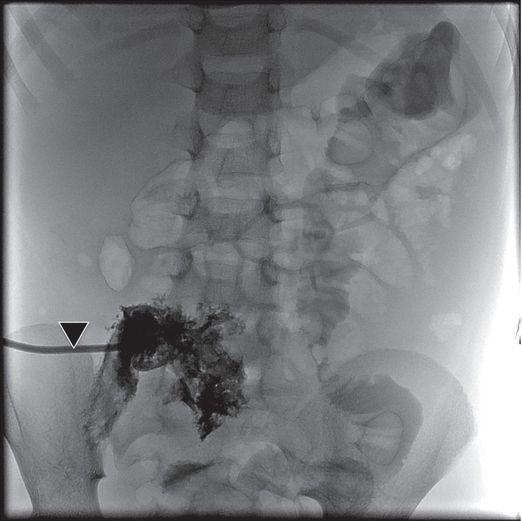
A 10-French nephrostomy drain (arrowhead) is seen within the dilated collecting system. The thin cortex of this dysplastic kidney does not provide a substantial anchor for the drainage catheter, so a small amount of extravasation is not unusual. Despite decompression, this compromised renal unit did not regain significant function, and the dysplastic kidney was eventually removed.
In patients with a distended, tortuous urine-filled system, it may be difficult to demonstrate the level of obstruction at the time of initial drainage. In addition, injection of contrast may lead to bacteremia and urosepsis. Therefore in obstructed systems it may be prudent to perform a nephrostogram after the system has been decompressed and the urine sterilized. In the rare instances of obstruction caused by a fungus ball (Figures 6.2, 6.17) percutaneous nephrostomy combined with infusion of chemotherapy (e.g., amphotericin or fluconazole) has been successful.
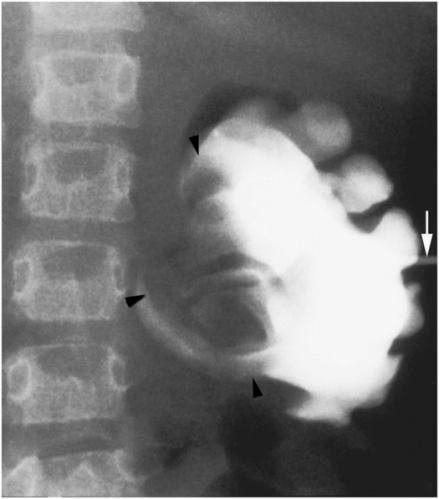
A neonate receiving IV antibiotics developed intermittent left renal outflow obstruction. A 5-French nephrostomy drainage catheter (arrow) was percutaneously inserted into the renal pelvis through a posterior calyx, and a sample grew Candida albicans. Contrast medium instilled through the catheter outlines the “fungal ball” (arrowheads). After transcatheter intracavitary treatment with an antifungal agent, the “fungus ball” was eradicated and the obstruction relieved.
In asymptomatic children with hydronephrosis, antegrade pyelography may be performed prior to surgical or endourologic correction to document the level and nature of the obstruction. In the child with an obstructed kidney and associated azotemia or pyonephrosis, percutaneous nephrostomy may lead to clinical improvement prior to correction of the underlying pathology. In addition, percutaneous decompression of the obstruction allows time for improvement in renal function, treatment of urinary sepsis, and a more accurate assessment of the renal unit. In some cases, such as in children with postoperative ureteral injury, leak, or obstruction from extrinsic compression or calculi, percutaneous nephrostomy may be the only intervention required. Finally, percutaneous nephrostomy may be the initial procedure required to gain access for other percutaneous endourologic procedures. Examples of these include percutaneous stone removal, percutaneous endopyelotomy, and percutaneous stricture dilation and stenting.
Few contraindications limit the performance of a percutaneous nephrostomy in a child. The primary contraindications are an uncorrectable coagulopathy and unfavorable anatomy making percutaneous access impossible or dangerous. In practice these problems rarely occur. Severe electrolyte abnormalities (i.e., hyperkalemia) should be corrected prior to percutaneous intervention.
Technique
Equipment
Performance of a percutaneous nephrostomy in the pediatric population is challenging because of the large variations in patient size (Table 6.4). Equipment routinely used in adults may be ineffective or dangerous, especially in the perinate and young infant. For example, the Cope introducer system facilitates exchange of a 0.035- or 0.038-inch guide wire for a 0.018-inch guide wire after puncture of the renal pelvis with a 22-gauge Chiba needle. While this system works well in older children and adults its use is problematic in small infants. Its side-port design (through which the 0.035- or 0.038-inch guide wire will exit) will often lie outside of the renal pelvis of a small kidney, making guide wire exchange difficult or impossible, and exposing the patient to untoward effects and procedural challenges. If the outer sheath is advanced it likely will kink at the side port again making guide wire exchange problematic. Thus it is preferable to use a coaxial end-hole system (see Figure 2.14) such as the AccuStick™ system or Neff introducer, a micropuncture introducer set, or a sheathed needle to insert a 0.035- or 0.038-inch guide wire directly into the renal pelvis.
| Introducer systems One-step introducer system AccuStick™ introducer system Cope introducer set |
| Access needles Micro puncture system Sheathed needles TLA 19-gauge needle (accepts an 0.035- to 0.038-inch guide wire) Van Sonnenberg one-step needle system with removable hub Yueh needle (accepts an 0.038-inch guide wire) |
| Drainage catheters Perinates and small children (<10 kg) 5-French Towbin pigtail drain 6-French APD 6-French sacks nephrostomy Older children (>10 kg) VTC nephrostomy catheter systems (6-, 8-, 10-French with locking pigtail) APD, all purpose drain catheter (6-, 8-,10-French locking pigtail) Ultrathane nephrostomy catheters with Simp-Loc™ or Mac-Loc™ locking loop |
It is also important to carefully consider guide wire selection. In perinates and small infants a standard 0.035- or 0.038-inch guide wire may injure or lacerate the thin renal parenchyma. In this subgroup of patients it is helpful to avoid rigid guide wires and minimize guide wire manipulations. Thin skin, paucity of subcutaneous fat, minimal paraspinal musculature, and the short distance from the flank to the renal pelvis offers little resistance to tract dilation. The only barrier to catheter insertion is the renal capsule, which may be surprisingly tough. Thus a guide wire that does not kink such as a 0.018-inch angled Glide® wire is useful for securing initial access to the renal pelvis. Meticulous control of the needle and guide wire is important to avoid loss of access.
In the past, a 0.018-inch stainless steel mandril guide wire was used; however, on occasion the floppy tip bends, making catheter insertion difficult. If the long floppy tip is not completely within the renal pelvis, the stiff portion of the wire may be extrarenal, making passage of a dilator problematic. In addition, the tip may angulate as it deflects off the posterior wall of the renal pelvis making guide wire repositioning impossible. If one tries to pull the guide wire back into the Chiba needle the floppy tip can shear off (Figures 6.18, 6.19). If the guide wire cannot be withdrawn, in most cases the only choice is to remove the entire system and repuncture the renal pelvis. We have also found that the stiffness of this wire can lead to perforation of the renal pelvis. As a result this guide wire is now rarely used. Regardless of the guide wire selected it is important to maintain a straight catheter–guide-wire course during catheter insertion to avoid buckling in the retroperitoneal soft tissues.
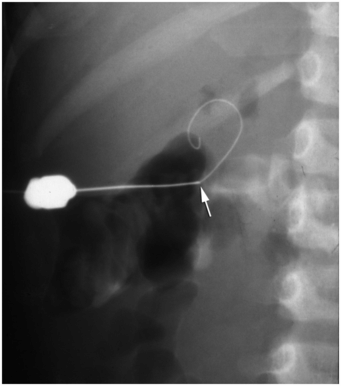
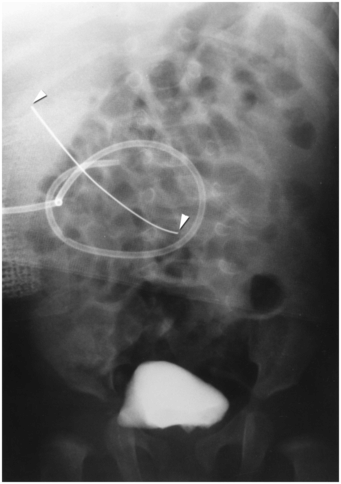
This wire fragment (arrowheads) was sheared off during attempts to obtain access to the renal collecting system in an infant with hydronephrosis. It was recovered using a loop snare via retrograde access using a cystoscope.
For insertion of drains ≥8-French, a variety of guide wires perform well including the Newton, angled Glide® wire, Roadrunner®, Rosen, and Amplatz® guide wires. In most cases the guide wire initially selected is the angled Glide® wire. Its hydrophilic coating and non-kinking properties facilitate catheter insertion. In those patients who are muscular or obese, or those in whom catheter insertion is difficult, a stiff guide wire such as a stiff or superstiff Glide® wire, Amplatz®, or Rosen wire is preferred.
There are a variety of nephrostomy drains available that can be used successfully in children. The choice of catheter is usually determined by physician preference. In perinates and small children a 5-French pigtail nephrostomy drainage system (Towbin drain) (Figure 6.20) or 6-French Dawson–Mueller pigtail catheter, both with a 1 cm loop, is used. The all purpose drainage (APD) catheter is available in 6-French and can be useful in the smaller patient. However, it is important to be aware that some drainage catheters require a 0.021-inch guide wire. When needed, a 0.021-inch stainless steel guide wire or Glidewire® performs well. However, the best strategy may be to avoid using these catheters so that the rarely used 0.021-inch wire does not need to be stocked.
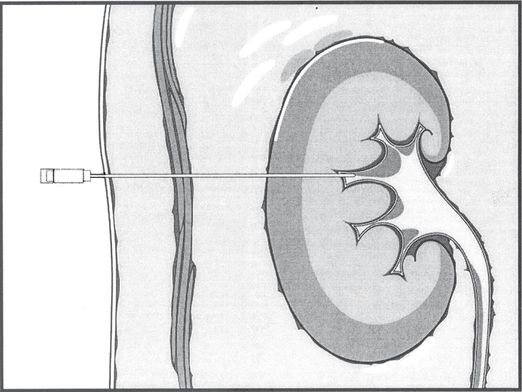
Percutaneous needle access to the renal pelvis is obtained, usually with cross-sectional imaging guidance, and usually through a posterior calyx. The return of urine through the access needle confirms location of the needle tip within the renal collecting system. Contrast medium can then be administered to outline the collecting system and guide additional manipulations using fluoroscopic control.
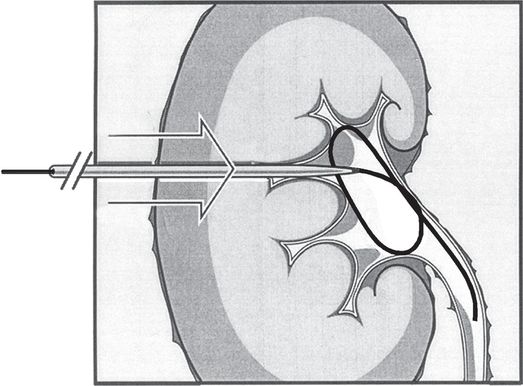
Once access is secured, a directional guide wire is advanced through the needle and either the wire is coiled within the pelvis or the tip is advanced into the ureter or beyond for stability during equipment exchanges and manipulation. Hydrophilic wires must be carefully controlled, by clamping or tightly pinning at the skin surface, to prevent recoil from the collecting system and loss of access. The tract may then be developed using fascial dilators to a diameter adequate for passage of equipment or devices over the wire.
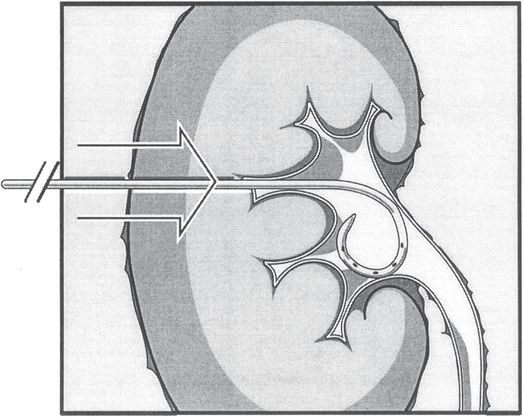
The nephrostomy procedure is completed by passing the pigtail catheter with its stiffener over the wire until the tip is well within the collecting system. Care is taken not to advance the stiffened catheter tip against the medial wall of the pelvis to prevent perforation or other injury. The catheter is advanced off the stiffener, and the pigtail formed, preferably within the renal pelvis. The catheter is then fixed to the patient’s skin as described under “Securing the catheter.”
The 5-French pigtail drain and 6-F Dawson–Mueller catheter have the advantage of a small distal loop (1 cm) and drainage holes positioned along the inner curve of the pigtail. This design prevents catheter occlusion resulting from contact with the wall of the renal pelvis and allows the pigtail to be formed within smaller cavities. The operator can be confident that all drainage holes are satisfactorily positioned within the renal pelvis once the pigtail reforms. In toddlers and older children, the standard 8-French pigtail drain works well. Locking pigtail drains may be preferred to prevent accidental dislodgment (Figure 6.21). For the rare instances where thick purulent or viscous fluid is present, larger caliber drains may be necessary.
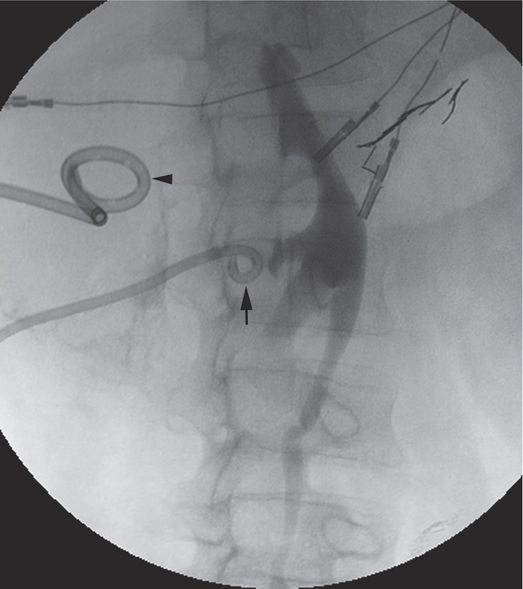
In this fluoroscopic image obtained after excretory urography in this 18-year-old male trauma patient, the 8.3-French locking pigtail nephrostomy drainage catheter (arrow) has been accidentally dislodged from the renal collecting system. The second drainage catheter (arrowhead) is draining a large retroperitoneal hematoma compressing the ureter.
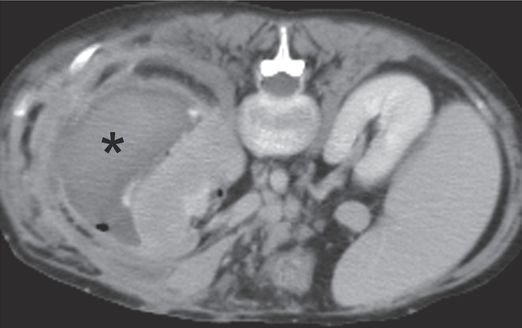
Axial CT image obtained with IV contrast through the kidneys shows a large subcapsular fluid collection (asterisk) related to dislodgment of the percutaneous nephrostomy catheter.
Patient preparation
Prior abdominal imaging should be reviewed. Specifically, available cross-sectional imaging should be evaluated to confirm the location of the colon, liver, and spleen, making certain that these organs are not in vulnerable positions along the planned pathway for nephrostomy access (see “Anatomic considerations,” above). For each child undergoing percutaneous nephrostomy placement or an endourologic procedure the following laboratory studies are usually obtained: CBC with platelet count, coagulation profile, and in rare cases a bleeding time. In addition, a urine culture may be obtained prior to the day of the urinary tract manipulation. Children with suspected or proven urinary tract infections are given preprocedural antibiotics. High-risk children, those with immune deficiency or other conditions predisposing to infection, children with congenital heart disease, and those in whom there are procedural difficulties or complications, are treated with antibiotics before, during, or after the procedure. The antibiotic chosen may vary with the age and underlying condition of the child. Empiric therapy guidelines are provided in Chapter 1.
Since each child will necessarily undergo either general anesthesia (GA) or sedation the child must be NPO. Those having procedures under local anesthesia and intravenous sedation are made NPO for a minimum of one feeding in neonates and four hours in older children. Individuals requiring GA are managed by the anesthesia service and the protocol used is the same as for other patients having an operative procedure. In addition, any other routine preoperative order is obtained.
Standard technique
Access to the renal pelvis
As with many other drainage procedures a combination of US and fluoroscopic guidance is often used to achieve and secure initial access (Table 6.5). The use of US obviates the need for contrast opacification of the collecting system in most instances, reduces radiation dose, and is especially useful in patients with impaired renal function. Also, US guidance allows drainage to be performed in the fluoroscopy suite or, if needed, at the bedside. Ultrasound guidance may be used in several ways including in the selection and marking of the skin entry site for a non-guided puncture of the renal pelvis, or for real-time US guidance, either freehand or using a biopsy guide. In most situations we prefer real-time guidance with a freehand technique. A variety of retrograde fluoroscopic approaches are described to achieve percutaneous access to the renal collecting system, but are seldom if ever required in the pediatric population. Recently, both CT and even MRI have been suggested for use in gaining renal access. However, in the pediatric population CT is rarely necessary for guidance and is only considered for children with unusual renal anatomy, severe kyphoscoliosis or obesity, or when other guidance methods have failed.
Select entry site in flank
Prepare and drape skin
Inject local anesthesia (buffered)
Small skin incision at entry site
Puncture renal pelvis
Insert guide wire and coil in pelvis or direct into ureter
Dilate tract (> catheter size)
Insert drainage catheter
Inject contrast
Secure catheter
The patient is placed either in a prone or prone-oblique position. Children are restrained on the angiography table. Children one year of age or less may be positioned on an Octostop® board or similar device while older children may be secured with Velcro® straps. Young children are usually placed on a warming device (e.g., Bair Hugger™) to maintain body temperature during the procedure. The procedure is initiated by selecting an entry site along the flank using image guidance. When anatomic landmarks are used in young children, an entry site is selected two to three fingerbreadths below the costal margin and two to three fingerbreadths lateral to the spinous processes. In older children four to five fingerbreadths are used. However, since US and fluoroscopic imaging is readily available in our practice all procedures are performed under imaging guidance. In the past renal puncture was fluoroscopically guided after injection of intravenous contrast. Currently, we have virtually replaced this approach with US guidance.
When intravenous sedation is used, skin anesthesia is initially achieved with a J-tip, then buffered local anesthesia is slowly injected into the skin at the entry site, after the usual sterile preparation, with a 30-gauge, 1½-inch needle to minimize discomfort. It is important to carefully and completely anesthetize the skin and deep soft tissues along the anticipated route. Inadequate local anesthesia will result in avoidable discomfort that will awaken the child and make the procedure more difficult and time consuming. The 30-gauge needle may be exchanged for a 22-gauge Chiba or spinal needle to complete anesthetizing a longer tract (to the renal capsule), when necessary. When general anesthesia is utilized this step is unnecessary. A skin incision is then made with a #11 scalpel blade and enlarged with blunt dissection.
In children, the position of the kidney in the retroperitoneum is often lower and more mobile than anticipated. In those patients in whom renal mobility is excessive, the kidney can be stabilized with a bolster positioned under the mid abdomen. In small children, manually fixing the kidney with a hand on the abdomen while the puncture is made may be helpful.
Route planning
Whenever possible an entry site is planned below the costal margin. Regardless of the approach it is important to traverse renal parenchyma and enter a middle pole calyx, if possible, especially if access to the ureter is needed. The middle and upper pole calices provide the most direct route to the ureteropelvic junction and ureter. If puncture is for decompression only, a lower pole calyx is adequate for access, and may help avoid the risk of inadvertent transpleural complications. A posterior calyx is much preferred for access, providing the most direct route for subsequent manipulations. Posterior calices are readily identified on US or using motion parallax with oblique fluoroscopic imaging, or by injecting a small amount of air or carbon dioxide gas into the collecting system.
In considering the initial approach to the kidney one should consider that any window to the pediatric kidney is likely to be narrow, and the interventionalist must work within the parameters offered by the individual patient’s anatomy and body habitus. In this context, such considerations may guide the interventionalist away from the infundibulum, especially in the upper pole, where there may be an associated higher frequency of injury to the interlobar vessels (e.g., posterior segmental artery) due to their particularly large size in this region. In all cases, access through a caliceal fornix is preferred over a caliceal infundibulum, since, at worst, it exposes the child to injury of small peripheral vessels (e.g., small venous arcades) rather than large interlobar vessels (e.g., posterior segmental artery) that may supply as much as 50% of the renal parenchyma. Likewise, direct puncture of the renal pelvis is usually avoided because the renal pelvis lacks supporting parenchyma to provide tamponade against bleeding, urine leak, or premature catheter loss. Direct puncture of the renal pelvis, however, may be used for Whitaker perfusion testing or if opacification of the collecting system is required for another procedure.
Transrenal access to the renal pelvis (Figure 6.20) is achieved using a 22- or 23-gauge Chiba needle or 19-gauge sheathed needle, minimizing the risk of pneumothorax or hydrothorax. In cases with significant hydronephrosis, a Yueh sheathed needle may be used. A posterolateral approach angling the needle toward the costovertebral junction is preferred. We have found that shorter length (7.5 to 10 cm) Chiba needles are easier to control in the small infant during renal puncture and wire insertion. Caudo-cranial needle angulation is used if necessary to avoid violating the pleural space. In order to create the most direct line to the renal pelvis, especially if subsequent endourologic manipulation is planned, a posterior mid-pole calyx is entered if possible. After the kidney is punctured and a guide wire coiled within the renal pelvis, the tract is often dilated two French sizes larger than the nephrostomy catheter to ease insertion of the drain. Overdilation is especially helpful in some perinates.
In the perinate and small infant, the kidney is punctured with a 22-gauge Chiba needle and a 0.018-inch Glide® wire is positioned within the renal pelvis. The 5-French pigtail (Duan/Tobin, Cook) catheter, together with its inner (metal) cannula, is advanced over the guide wire until it reaches the first turn of the guide wire adjacent to the back wall of the renal pelvis. The inner cannula and guide wire are pinned, and the catheter is advanced until it is coiled in the renal pelvis. Although no tract dilation may be necessary, if there is any difficulty advancing the catheter system, it is best to remove it and overdilate the tract by one to two French. In most cases the cannula prevents kinking of the catheter in the subcutaneous tissue and eliminates the need for larger or stiffer guide wires.
In older children, a 19-gauge sheathed needle is used to gain access to the collecting system in most cases. Using a larger needle avoids the need to exchange a 0.018-inch guide wire for a 0.035-inch or 0.038-inch guide wire. When a Chiba needle and 0.018-inch guide wire are used, a coaxial introducer system is needed to exchange for a larger guide wire.
Catheter insertion
After successful puncture of the renal pelvis the guide wire is coiled in the renal pelvis or directed into the ureter. The tract may be overdilated (by one to two French) using standard fascial dilators, and an 8.3-French locking pigtail catheter is inserted. After insertion of the drainage catheter, contrast medium is injected to confirm satisfactory catheter position, demonstrate potential complications, and document any pathology.
In patients with renal transplants (Figure 6.15), the approach to percutaneous nephrostomy depends upon the surgical anatomy. Most transplants are extraperitoneal and located in the iliac fossa. Thus the renal pelvis usually faces posteromedially. As a result, an anterolateral approach is usually best to avoid passage through the peritoneal cavity. Real-time US is used to guide needle puncture. With intraperitoneal renal transplants CT may be necessary for preprocedural imaging or intraprocedural guidance to avoid inadvertent injury to bowel.
Postprocedure and follow-up care
Following the procedure, appropriate notes and postprocedure orders are entered into the patient’s chart. It may be helpful to both patient care and ongoing quality assurance to maintain pertinent demographic and procedure-related data in an electronic database. Suggested items for data management are included in Table 6.6.
| To improve outcome and quality assurance analysis, it may be helpful to record the following information for each genitourinary interventional procedure performed: |
Demographic information (patient name, unique identification number, date and time of procedure, age, sex, weight, date of birth, etc.) Primary diagnosis Reason for procedure; referring service and provider Anticipated endpoint Primary provider responsible for procedure (interventionalist, urologist, surgeon, etc.) Collaborating provider(s) Procedure location (interventional suite, operating room, bedside, etc.) Provider responsible for anesthesia/sedation (anesthesiologist, nurse, etc.) Preprocedural evaluation serum creatinine metabolic status (e.g., hyperkalemia, metabolic acidosis) stone burden (mm3) Preprocedural interventions (e.g., antibiotics, blood products, imaging) Initial access entry method (e.g., needle nephrotomy, percutaneous nephrostomy, retrograde ureteroscopy) guidance (anatomic landmarks, US, fluoroscopy, CT, nephroscopy, etc.) operative site (e.g., upper pole calyx, UPJ) device number of attempts reason for deferral, discontinuation or failure, if procedure not completed Access device and position catheter manufacturer, type, lumen number and diameter, length tip position Equipment and supplies used Procedure time Type and adequacy of anesthesia/sedation/analgesia Procedural complications (e.g., venospasm, extravasation) and management Adjunctive procedures Complications, including: procedure-related infection (include dates) type (septicemia, UTI, catheter tract infection, abscess) suspected (basis) or proven (method and results) management (e.g., antibiotics, catheter removal, repeat cultures) outcome bleeding and vascular injury (include dates) type (e.g., hematuria, hemorrhage, AV fistula or pseudoaneurysm) method of diagnosis (e.g., hemoglobin, arteriogram) management (e.g., observation, transfusion, embolization) outcome thrombosis (include dates) method of diagnosis or documentation location and extent management outcome dislodgment or malposition (include dates) method of diagnosis or documentation management outcome other procedure-related complications or interventions outcome at follow-up (method and date; endpoint achieved?) residual stone fragments change in renal function |
Securing the catheter
Every precaution is taken to avoid dislodgment of the nephrostomy drain. Securing the catheter begins with placement of a 3–0 suture, which is tied tightly in a criss-cross pattern over the catheter shaft. This creates a locking stitch that works like a Chinese finger torture that tightens when strain is placed upon it. In the past a retention disc was used in all children except perinates. A skin fixation device such as a SorbaView® shield or Stat-Lock® is used to protect the catheter from accidental dislodgment. In small infants an alternative method is to secure the catheter with a criss-crossing suture augmented by a tape bridge (similar to the technique used to secure umbilical artery catheters; see below). Care is taken to avoid an excessively tight skin suture, which can cause discomfort and skin necrosis.
Prior to creating a tape bridge, the skin is coated with either a liquid adhesive (e.g., Mastisol®) or a barrier film to make it sticky. After the liquid dries, the bridge is made as illustrated in Figure 3.4. Gauze is used to support the catheter at the skin exit site to avoid kinking. The catheter can then be covered with Tegaderm®, Opsite®, or a SorbaView® shield. A wooden tongue blade may be taped to the drainage catheter for added support. These precautions are successful in the majority of cases.
Managing catheter exchanges and accidental dislodgment
Occasionally a damaged or partially obstructed catheter must be replaced prior to the completion of therapy. If the original catheter has been in position for two or more weeks, the tract has probably matured and loss of access is less likely during the exchange. If the catheter has been recently placed, the danger of tract loss due to inadvertent dislodgment is much greater (Figure 6.21). The internal locking mechanism of the indwelling catheter must be released. Although some catheters are designed to easily allow unlocking, this may be accomplished by cutting off the distal end of the catheter, while pinning the proximal catheter in place at the skin. If the patient is sensitive to manipulation of the catheter, the tract should be generously anesthetized with buffered lidocaine prior to exchange.
The next priority is to secure access with a guide wire through the existing catheter, with the tip preferably positioned in the ureter, or alternatively coiled in the renal pelvis. With the wire pinned the catheter is carefully removed, pinning the wire at the skin as soon as it is uncovered. If a Glidewire is used, the wire could be pinned with a hemostat at the skin surface, to prevent the wire from slipping out inadvertently, which it is embarrassingly easy to do! The new catheter is passed with its stiffening cannula over the guide wire past the renal capsule, advanced off the cannula, locked internally, and secured to the skin as previously described.
If a wire cannot be advanced through an obstructed catheter, the catheter hub can be cut off and, if necessary, a strong suture fixed to the distal (cut) end. Using this suture to pin the catheter, a peel-away sheath may be carefully advanced over the catheter until the tip is in the renal collecting system. The old catheter remnant may then be removed through the sheath, and a guide wire advanced through the sheath, completing the exchange as described above.
If the original catheter has been inadvertently dislodged, the tract may be gently probed with a directional catheter (e.g., JB-1 or Kumpe) and an angled Glidewire after injection of a small amount of contrast under fluoroscopic guidance. If the guide wire is successfully advanced into the renal pelvis or ureter, the exchange may be completed as above. Otherwise, if catheter access for drainage or other procedures is still clinically indicated a new tract must be developed, preferably through a new skin access site.
Complications
As is true with adult patients, major complications resulting from insertion of a percutaneous nephrostomy are unusual. Microscopic hematuria, or more rarely gross hematuria, is a common minor complication and may last up to 72 hours following the procedure. In this setting the catheter should be flushed frequently to prevent blood clots from obstructing the catheter. Pain, perirenal bleeding, urine extravasation, local infection, and accidental catheter dislodgment are also potential complications. When gross hematuria occurs we often monitor the patient using an automated urine chemistry analyzer after each void and intermittent complete blood counts (CBC). The child will not be discharged to home if there is any evidence of persistent bleeding.
The most serious complications of percutaneous nephrostomy include sepsis, severe hemorrhage, and vascular injury. Sepsis is the most frequent major complication reported in pediatric series. Children with infected urine or renal calculi are at greatest risk for the development of sepsis with nephrostomy tube placement. Overdistension of the collecting system at the time of catheter placement is likely the most significant factor leading to bacteremia. Decompressing the renal pelvis prior to performing an antegrade pyelogram, especially in patients with pyonephrosis, is important to minimize this problem. In this subgroup of children it is preferable to delay a diagnostic antegrade pyelogram for 24 to 72 hours to allow decompression of the obstructed system and sterilization of urine. Patients with suspected or documented pyonephrosis require antibiotic coverage before and after the procedure. Urine Gram stain and culture should be performed so that appropriate antibiotics can be selected. Also, sepsis is more likely to occur during performance of ureteral perfusion studies due to high intrarenal pressures.
Transient mild hematuria is common after percutaneous nephrostomy and usually clears within 48 hours. This should be considered a minor complication and requires no therapeutic intervention. Severe hemorrhage requiring transfusion or other intervention is unusual and may indicate vascular injury, a clotting disorder, or an unsuspected vascular malformation. When significant bleeding occurs arteriography may be required to establish the site and cause of bleeding (e.g., vessel laceration, pseudoaneurysm, arteriovenous or arteriocaliceal fistula). If a vascular injury is identified it can be treated by selective embolization. Using a posterolateral approach for renal pelvic access along Brödel’s line, and taking advantage of parenchymal tamponade, reduces the risk of vascular injury and severe bleeding. Bleeding requiring transfusion should be expected in fewer than 1% of children after image-guided renal biopsy.
Retroperitoneal hemorrhage is potentially more serious than pelvicaliceal bleeding, as it may be less evident clinically. In general, retroperitoneal hematomas are small and are asymptomatic. If a patient becomes symptomatic after unsuccessful percutaneous nephrostomy the possibility should be considered and examination with CT or US encouraged.
Leakage of urine with resultant urinoma formation has been reported in the pediatric population. This complication is more likely when the renal parenchyma is thin, as in children with chronic reflux, or when the free wall of the renal pelvis is punctured. While a small amount of urine leakage around the nephrostomy catheter can be considered normal, if the urinoma is large or becomes infected, percutaneous drainage may be required. Excessive leakage is usually due to catheter blockage especially in patients with pyonephrosis or excessive bleeding.
As noted above, surrounding anatomic structures are at risk during renal access procedures, including the liver, spleen, bowel, adrenal glands, stomach, and pancreas. Injury to these organs is usually minor and self-limited, and awareness and appropriate preprocedure imaging is usually sufficient to avoid such complications. Access to upper-pole calices, especially from an intercostal approach and more rarely from a subcostal approach, increases the risk of transpleural injuries. These may include pneumothorax, hemo- or hydrothorax, and nephro-pleural fistula. The complication rate associated with upper-pole access climbs dramatically when the route of access is above the 11th rib.
The most frequent catheter-related complication is accidental catheter dislodgment. This may be expected in 5 to 10% of patients and may happen despite suturing the catheter to the skin.
Stay updated, free articles. Join our Telegram channel

Full access? Get Clinical Tree


