Radial
Femoral
Access site bleeding
0–0.6 %
3–4 %
Artery complications
Rare local irritation, pulse loss 3–9 %, forearm hematoma
Pseudoaneurysm
Patient discomfort
Significantly reduced
Increased
Ambulation
Immediate
2–4 h
Extra costs
Band
Closure device
Procedure time
Perceived longer
Perceived shorter
Use of artery for CABG
Unknown
n/a
Estimated radiation exposure
Perceived longer
Perceived shorter
Access to LIMA
Harder (usually requires left radial approach)
Easier
Learning curve
Longer
Short
>8 F guide catheter
Maximum 7 French
No issue
PVD, obese
No issue
Problematic
Equipment Selection
Arterial sheaths commonly used for interventional procedures range from 5 to 8 F. Larger sheaths are required for valvuloplasty (12 F), Impella (14 F), and ECMO cannulation (18–22 F). Long sheaths may be utilized in patients with tortuous femoral and iliac arteries, which provide guiding catheter support and improve torque control.
Selection of catheter is an elementary decision, however, it can be the difference between success and failure. Diagnostic and guiding catheters come in multiple preformed shapes and sizes (Fig. 4.1) [3]. Diagnostic catheters are used for diagnosing coronary stenosis. However, a diagnostic catheter is exchanged for a guiding catheter when an intervention needs to be done and equipment needs to be passed through the catheter. Guiding catheters are preformed and generally constructed from polyethylene or polyurethane and contains a wire mesh within the distal aspect that allows torque to be applied to the catheter while minimizing kinking. In addition, they have a stiffer shaft and larger internal diameter, which are the properties necessary to perform successful PCI. Guiding catheters can provide variable levels of support depending on their structure. Judkin catheters provide the least amount of support, HB and EBU catheters provide more support through contact with the opposite aortic wall, and Amplatzer catheters provide the maximum support through contact with the aortic root and opposite aortic wall. The majority of coronary interventional and imaging procedures are performed through a 6 F guide. However, they may be performed with guide catheters between 5 and 8 F sizes. As a general rule, the outer diameter (OD) of the guiding catheter is the same dimension as the inner diameter (ID) of the sheath. This means that a 6 French guiding catheter will fit inside a 6 French sheath. However, the ID of a 6 French sheath is the same as the ID of a 8 French guiding catheter.
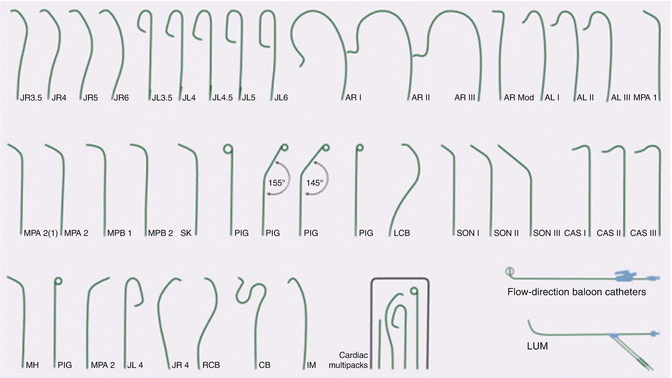

Fig. 4.1
Commonly used catheters. AL Amplatz left, AR Amplatz right, CAS Castillo, CB coronary bypass catheter, IM internal mammary, JL Judkins left, JR Judkins right, LCB left coronary bypass graft, LUM lumen, Mod modified, MP multipurpose, NIH National Institutes of Health, PIG pigtail, RCB right coronary bypass graft, SON Sones (From Bonow et al. [3] and Cordis with permission)
Judkins Catheters
The Judkins left catheter is preformed with two curves and the length of the segment between the primary and secondary curve is what determines the size of the catheter (Fig. 4.2) [4]. The length and size of the aorta is what is used to determine the correct size of catheter to choose. However, for the majority of adult patients the JL4 catheter is optimum. Short tip Judkin catheters are available and may be helpful for patients with short left main.
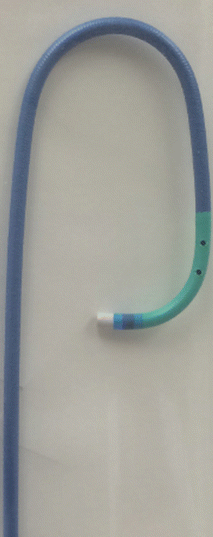

Fig. 4.2
Judkins left catheter with 4 cm distance from the primary curve to the secondary curve
The Judkins Right coronary catheter (JR) is sized by the secondary curve (Fig. 4.3). Access is gained into the right coronary ostium via any vascular access point by clockwise rotation.
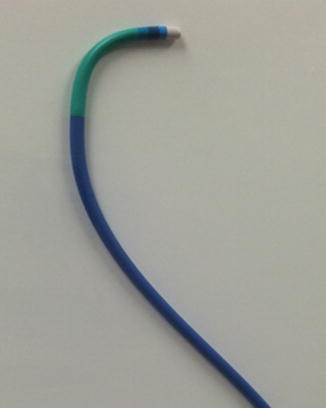

Fig. 4.3
Judkins right catheter which has a sharp primary curve and shallow secondary curve
Engagement of the Left Coronary Artery Using Judkins Left (JL) Catheter (Femoral Approach)
Engaging of the left coronary artery should be performed in the left anterior oblique projection ( LAO ). In the LAO projection, the ascending aorta and Sinus of Valsalva are not superimposed on the coronary ostium. There is minimal manipulation needed to engage the left coronary artery using the JL catheter, and in the words of Judkins, “the catheter knows where to go if not thwarted by the operator.” A J-tipped wire, either a 0.035 or 0.038 in., is advanced to the level of the aortic valve. The catheter is then seated in a position to face the left coronary ostium. The wire is then subsequently removed, the catheter is connected to a pressure line to assess for dampening, and a test injection is given. If the test injection reveals that the catheter is below the coronary ostium, it is gently withdrawn, which will allow for engagement. If the test injection demonstrates that the catheter is at the level of the ostium but not engaged, a small degree of torque either clockwise or counterclockwise, could be attempted to allow for engagement. In cases where the ostium is not cannulated properly, a different size Judkins or alternative catheter can be used. The smaller the JL catheter, the more likely the tip will point upwards and vice versa.
Engagement of Right Coronary Artery Using Judkins Right Catheter (Femoral Approach)
The right coronary artery is engaged in the LAO projection as well, for the same reasons mentioned above. In an approach similar to that of the JL technique, the JR catheter is advanced into the right coronary cusp facing to the left. The catheter can then be rotated 45–90 so that the tip is facing the right. Simultaneously the catheter should be withdrawn back 2–3 cm [2]. If difficulty is encountered engaging the right coronary ostium, the same technique can be employed at different levels.
Engagement of the Left Coronary Artery Using Amplatz (Femoral)
The Amplatz left catheter is a half circle with the distal tip extending perpendicular to the curve (Fig. 4.4). The catheter size indicates the diameter of the half circle. The AL catheter is advanced with the secondary curve sitting in the right coronary cusp, with the tip pointing at the left aortic cusp (Fig. 4.5). Once it is advanced into this position, alternating between advancement and withdrawal is performed while simultaneously applying slight clockwise torque. These motions allow the catheter to travel cranially along the left Sinus of Valsalva to allow for coaxial engagement of the left main coronary artery.
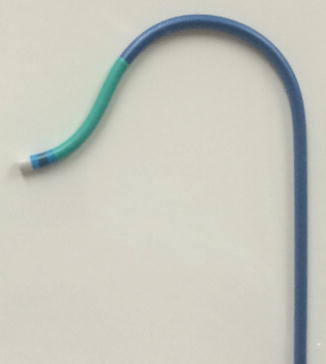
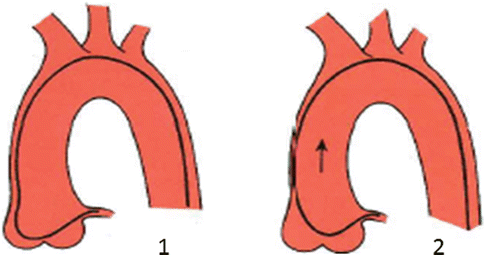

Fig. 4.4
Amplatz left catheter

Fig. 4.5
Catheterization of the left coronary artery using Amplatz technique. 1 The catheter is advanced until the secondary curve is sitting in the right or non coronary cusp with tip pointing towards the left coronary ostium. 2 The catheter is then retracted or advanced until it is engaged in the coronary ostium (From Kern [2] with permission)
Engagement of the Right Coronary Artery Using Amplatz (Femoral)
The Amplatz Right (AR) catheter is similar to the AL in that has a pre shaped half circle, but the diameter is smaller than that of the AL (Fig. 4.6) [4]. As with the Judkins technique, the AR catheter is advanced in to the right coronary cusp with its tip point at the left coronary cusp. It is then rotated clockwise 45–90° while simultaneous withdrawing the catheter to allow for the tip to point towards the right coronary artery ostium. It is then advanced and withdrawn to allow for engagement into the coronary ostium (Fig. 4.7) [2].
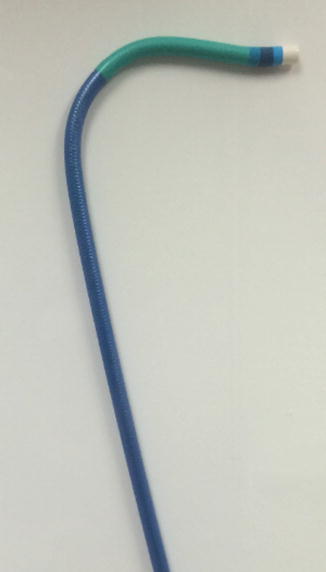
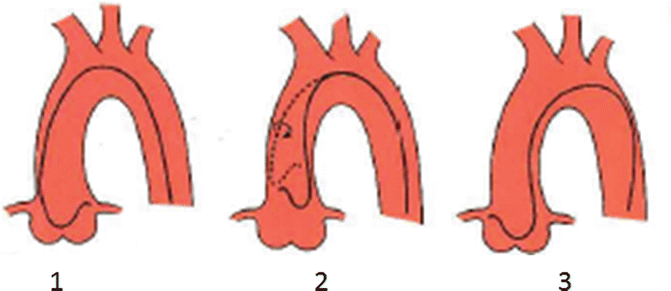

Fig. 4.6
Amplatz right catheter

Fig. 4.7
Catheterization of the right coronary artery using Amplatz technique. 1 Catheter is advanced until secondary curve is sitting in right coronary cusp. 2 45–90 clockwise rotation so that tip of catheter is point toward right coronary ostium and secondary curve is resting in left aortic cusp. 3 Catheter is advanced and withdrawn until it is engaging the ostium (From Kern [2] with permission)
Multipurpose Catheter
The multipurpose catheter (MP) has a gentler curve with an end hole and two side holes placed close to the tapered tip (Fig. 4.1). As the name suggests, it can be used for cannulation of both the right and left coronary ostiums, and also can be used for left ventriculography but the pigtail catheter is preferred. It is also useful in engaging the saphenous vein graft to the RCA. Less commonly, it may be used to obtain pulmonary pressures when the pulmonary catheter fails to advance. It is the catheter initially used to guide a wire across a patent foramen ovale during percutaneous closure.
Radial Catheters
The radial artery technique also utlilizes the Judkins catheters however there are also additional preformed catheters that have been developed. The Tiger and Jacky catheters are two of the most commonly used radial catheters (Fig. 4.8) [4]. They are designed to cannulate both the left and right coronary arteries. Judkins left and right coronary catheters are commonly used and can be utilized from either arm, however, when compared with the femoral approach, a left Judkins catheter of smaller curve typically 0.5 cm less may be necessary with the left radial technique. An Amplatz catheter can also be used effectively from either arm in a similar technique to that of the femoral approach. Another approach is to engage the left coronary ostium with a guide catheter such as the XB or EBU. Other catheters include the Kimney and the multipurpose catheters.
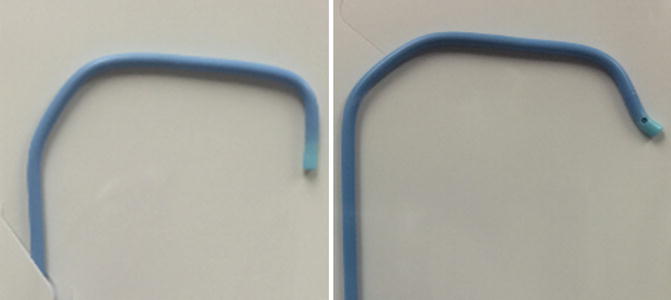

Fig. 4.8
Tiger and Jacky radial catheters from left to right
Special Considerations
Typically, the RCA is engaged in its normal position with a JR4, if extra backup is required, an AL1-2 or AR1-2 may e required. In Shepard’s crook origins of the RCA, an IMA catheter, a Hockey catheter, and an AL1-2 may be required. With low origin and horizontal course, a JR4 or an AR1-2 may be required. Finally, in patients with anterior take off of the RCA, an AL1-2, non-torque, and RDC catheters may be required. Standard left main catheters include the XB, EBU, or AL1, while short left main trunks may require JL4 and JL4 or short tip SL4 catheters (Fig. 4.9).
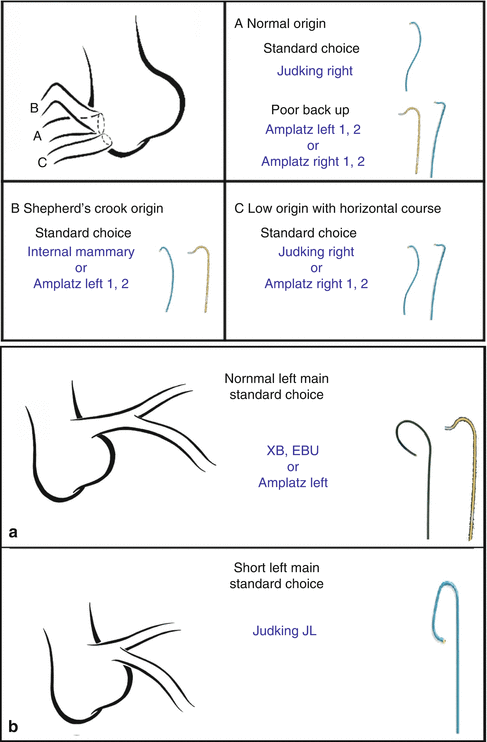

Fig. 4.9
Special considerations regarding guiding catheters for PCI on the RCA with normal (A), shepherd’s crook (B), and low horizontal © origins. Similarly, PCI on the LAD or LCX in patients with a normal (a) and short (b) left main arteries. As a general rule PCI of the LCX may require a 1/2 size greater catheter compared to the LAD (From Giubilato et al. [14] with permission)
Cineangiographic Imaging, Radiation Dose Measurement, and Contrast Types
Cineangiographic Imaging
In order to perform heart catheterizations, high resolution X-ray imaging is necessary (Fig. 4.10). Cinefluorographic systems operate on two modes which are fluoroscopy and acquisition. Fluoroscopy mode provides real time imaging of sufficient quality to guide manipulation of various catheters and wires [5]. Once the desired image is obtained on fluoroscopy, cine can be used to acquire the image. Cine (acquisition) are of high enough quality for viewing and require higher X-ray input doses in order to provide an image with less noise. The per-frame dose of cine is approximately 15 times that of fluoroscopy.
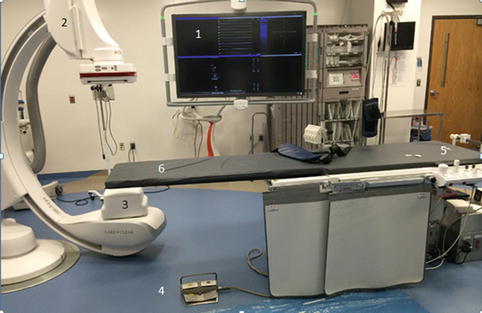

Fig. 4.10
Cardiac catheterization lab. 1 Monitor; 2 Image intensifier; 3 Xray Tube; 4 Foot pedal; 5 Touch panel control; 6 Table. The fluoroscopic image comes from a C-arm noted on the left. It is a semicircular structure with the bottom part serving as the x-ray tube (#3) and the image intensifier at the other end (#2). By rotating the C-arm, you are able to obtain different fluoroscopic image over a range of different angles. When the foot pedal (#4) is pushed, images are obtained and shown on the monitor (#1). The patient is placed on the table (#6) with their head at the center of C-arm which can then be manipulated 180° to create the desired angle with images being displayed on the monitor. The tables have bearings and brakes that can be controlled by the positioning control (#5)
Radiation Dose Measurement
There are many different ways of measuring radiation dosage and exposure but few are more pertinent in the catheterization lab. In order to understand radiation dose measurement, it is important to understand key definitions. When the X-ray beam interacts with the atoms of different tissue, most commonly the skin in the cath lab, there is a concentration of energy absorbed from that interaction and this is called the dose. The unit of measurement for dose in the lab is called the Gray, which is defined as the absorption of one joule of radiation energy divided by 1 kg of that specific substance. Another important term to understand is Kerma, which is an acronym for kinetic energy released per unit mass, which is measured in gray. Air Kerma is term that describes exposure, and this is a measure of strength of the radiation field at some point in air. The fluoroscopic output during a case is determined by this exposure.
The point at which the radiation enters the skin of the patient is important at determining the total amount of radiation exposure to the patient. The fluoroscopic machine uses software to calculate this dose to the patient, which is called the dose – area product (DAP, gy-cm^2) which is currently named the Kerma air product (KAP). KAP represents the product of air dose at the center of a certain plane of the X-ray beam multiplied by the cross sectional area of the beam at the same distance from X-ray tube. The KAP is a good surrogate for the actual dose of radiation the patient is exposed to as the majority of the X-ray beam is absorbed by the patient. Another important point at which measurements are taken is the amount of radiation reaching the image intensifier. These measurements are important for image creation and determining image noise.
Contrast Types
All contrast agents contain iodine which absorbs X-rays allowing the region containing the contrast to show up on the angiographic projection. The two main types of contrast agents are high-osmolar contrast media and low osmolar contrast agents (Tables 4.2 and 4.3). The high osmolar contrast agents are salts, which in the aqueous phase become osmotically active. They have an osmolality five to eight times greater than that of plasma. The low osmolar agents have osmolality that are two to three times that of plasma. Within the low osmolar contrast agents you have contrast agents that are either ionic or nonionic which do not ionize when in solution.
Table 4.2
High-osmolar agents
Compound | Brand name | Osmolality (MOSM/KG H20) | Viscosity at 37 °C | Iodine (MG/ML) | Sodium (MEQ/L) | Additives |
|---|---|---|---|---|---|---|
Sodium diatrizoate | Hypaque | 1690 | 9.0 | 37.0 | 160 | Calcium disodium EDTA |
Sodium meglumine diatrizoate | Renografin | 1940 | 8.4 | 370 | 160 | Sodium citrate, disodium EDTA |
Table 4.3
Nonionic or low-osmolar agents
Compound | Brand name | Osmolality (MOSM/KG H20) | Viscosity at 37 °C | Iodine (MG/ML) | Sodium (MEQ/L) | Additives |
|---|---|---|---|---|---|---|
Ioxaglate | Hexabrix | 600 | 7.5 | 320 | 150 | Calcium disodium EDTA |
Iohexol | Omnipaque | 844 | 10.4 | 350 | 5 | Tromethamine calcium disodium EDTA |
Iopamidol | Isovue | 790 | 9.4 | 370 | 2 | Tromethamine calcium disodium EDTA |
Ioversol | Optiray | 702 | 5.8 | 320 | 2 | Tromethamine calcium disodium EDTA |
Iodixanol | Visipaque | 290 | 11.8 | 320 | 19 | Tromethamine calcium disodium EDTA + 0.15 mEq/l calcium |
Angiographic Projections, Recommended Views for Specific Coronary Segments
Angiographic Projections
Accurate diagnosis of coronary abnormalities requires visualization of the different arteries from multiple angles. Manipulating the image intensifier allows you to create different views of the same coronary segments and improves diagnostic accuracy by minimizing foreshortening and vessel overlap. The first description, of the relationship of the image-intensifier to the patient, is in relation to the transverse plane. The three main views obtained in the transverse plane are left anterior oblique (LAO), right anterior oblique, and anterior-posterior (AP) (Fig. 4.11). For example, right anterior oblique is a position in which the image-intensifier is over the right anterior chest wall of the patient. The same description applies to left anterior oblique in which the image intensifier is over the left anterior chest wall. In the AP position, the image-intensifier is directly over the patient and the X-ray beam is traveling from posterior to anterior. The second description of the relationship of the image-intensifier to the patient is in relation to the sagittal plane (Fig. 4.12). Cranial describes a position in which the image intensifier is angled toward the patients head. Caudal described a position in which the image-intensifier is angled towards the patient’s feet. For example, the notation RAO 25 Caudal 25, indicates the image intensifier is positioned 25° from the midline in the transverse plane on the patients right side, and 25° from the midline in the sagittal plane towards the patients feet.
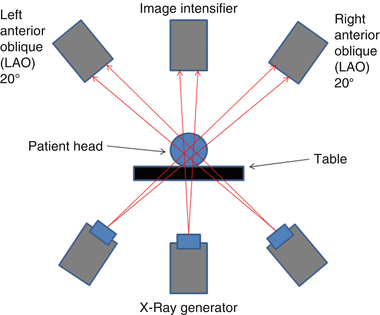
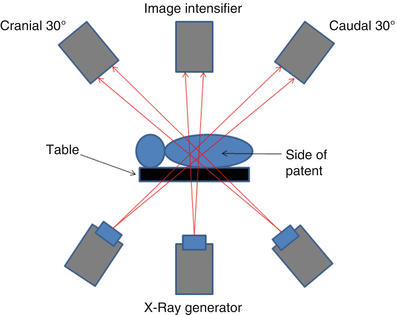

Fig. 4.11
Transverse view demonstrating the position of the image-intensifier relative to the patient. I-I to the left of the patient is deemed the left anterior oblique projection. I-I to the right of the patient is deemed the right anterior oblique projection

Fig. 4.12
In the sagittal cross section, the I-I is deemed to be cranial when angled towards the patient’s head. It is deemed caudal when angled towards the patient’s feet
Specific Coronary Segments
The main coronary arteries may be considered to be located in two planes: the plane of the atrioventricular groove and the plane of the interventricular septum as shown below (Fig. 4.13). Various segments of the coronary arteries are noted below (Fig. 4.14).
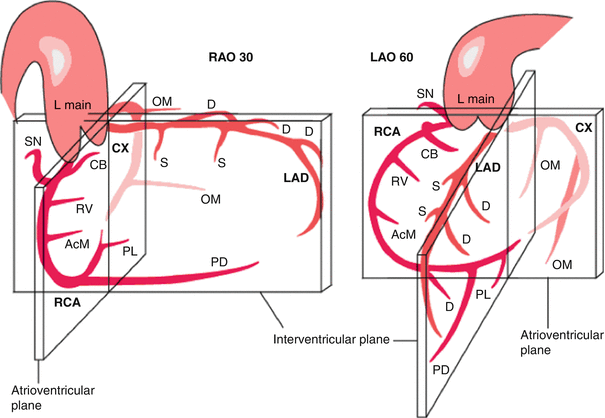
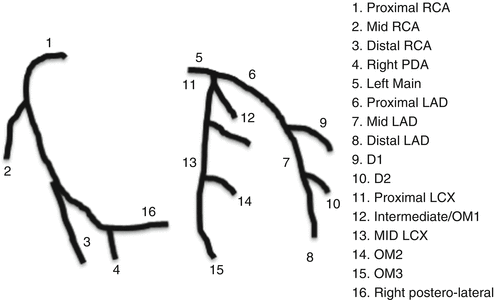

Fig. 4.13
Planes of the coronary artery (From http://www.pcipedia.org/wiki/File:Coronary_anatomy1.png with permission)

Fig. 4.14
Coronary artery segments
Recommended Views for Specific Coronary Segments
Left Coronary Artery
Obtaining fluoroscopic images of the left coronary artery and its different branches requires a multitude of different angiographic views.
Left Main
The left main is best visualized in straight AP or 5–10° RAO with caudal (Fig. 4.15). This projection demonstrates the entire perpendicular length of the left main, in addition the proximal LAD and circumflex can be seen as well.
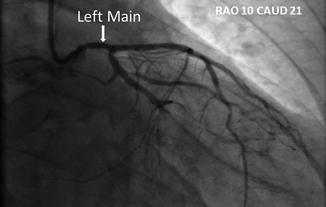

Fig. 4.15
Left main demonstrated in the RAO caudal view
Left Anterior Descending (LAD)-Circumflex Bifurcation
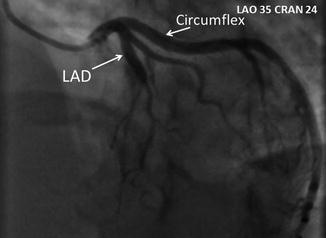
Angling the I-I at 30–45° LAO and 20–30° best shows the LAD-circumflex bifurcation. You will still be able to visualize the left main but it is foreshortened as compared to the RAO caudal projection as seen in the previous image (Fig. 4.16).

