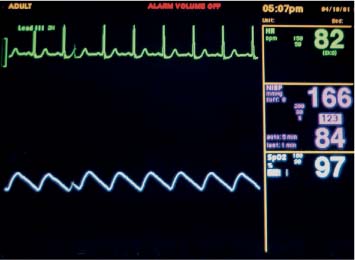
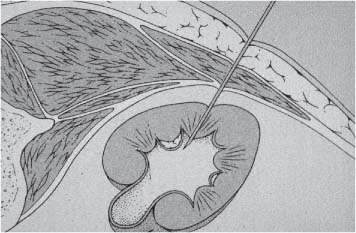
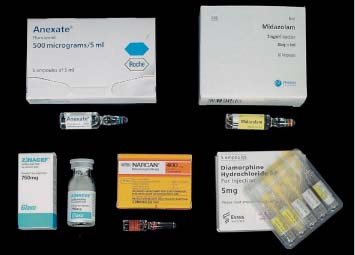
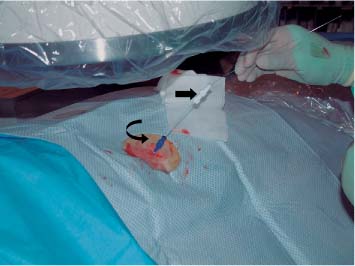
6 Radiological Intervention in the Urogenital Tract (Including Trauma and Emergencies) Generally a 3–5 MHz curvilinear or sector probe will be used in renal intervention. Higher frequencies of 5–7.5 MHz are normally reserved for superficial structures such as the transplant kidney. The sector probe provides some advantages: The probe has a smaller footprint and thus allows slightly more flexibility in initial needle positioning on the skin surface. The probe should be cleaned and then placed in one of the proprietary sterile probe covers with some gel. The gel within the cover need not be sterile. Care should be taken to achieve good apposition of probe cover to probe head. Any bubbles within the jelly under the cover should be “smoothed” off the probe head, as they degrade image quality. Sterile jelly is used between patient and sterile probe cover. The skin is cleaned and draped. A bleb of local anaesthetic is raised at the preferred point of needle entry, which is chosen after initial scanning. It is important to eliminate any bubbles in the anaesthetic, as injecting these in the soft tissues may completely obscure subsequent attempts to guide the needle. Fig. 6.1 Ultrasound-guided internal jugular vein puncture. The machine is placed opposite the operator in the direct line of sight, allowing the operator to see the machine without turning his or her head. This is an important general principle in ultrasound-guided procedures If possible, the ultrasound machine should be placed with the screen directly opposite the operator; often this means on the opposite side of the table. Constant straining of the neck to see an incorrectly positioned monitor makes the procedure much more difficult (Fig. 6.1). The first principle in ultrasonic needle guidance is the need to be able to visualize the target clearly. If this is not possible, alternative image-guidance will be necessary. Generally the operator will obtain a good gray-scale image of the target with the dominant hand initially. The transducer can then be transferred to the other hand and the needle then guided with the dominant hand. Only once the target is well-visualized can needle introduction commence. Usually the local anaesthetic needle will be guided initially. The most crucial aspect of the technique relates to orienting the needle in precisely the same plane as the long axis of the ultrasound probe. Any deviation will result in loss of visualization of the needle (Fig. 6.2). If the needle is “lost” after initial advancement, some specific maneuvers can occasionally help. Very gentle “fore and aft” movement of the transducer in the plane of the needle can sometimes bring it back into view. Occasionally very gentle angulation can also help. The target must, however, remain in view after these probe adjustments. A gentle vibration of the needle hub up and down can help by agitating tissue just around the needle, allowing minute adjustments of the probe to bring the needle fully into plane. Often the echogenic bright tip of the needle is the best-seen section. When these adjustments fail to bring a needle back into view it is best to recommence with a fresh “lineup” rather than risk inadvertent malpositioning. Finally, echogenic needles are available. These are coated with a variety of substrates, which allow increased visualization, usually polymer coatings, that cause adherence of air bubbles thus increasing needle conspicuity. Summary points: • A 3–5 MHz curvilinear or sector probe is most frequently used • Preparation is vital: ideally place the machine screen opposite you • Good visualization of the target and pathway is essential • The needle must be “in-plane” with the ultrasound probe • If you are struggling, despite adjustment, stop. Remove the needle and try again Informed consent prior to the procedure is vital. Every effort should be made to obtain consent away from the procedure room when there is time for a proper explanation of the procedure and its attendant risks. The majority of interventional radiologists use broad-spectrum prophylactic antibiotics prior to urogenital intervention.1 In nephrostomy there is certainly evidence that patients benefit from prophylaxis, with high-risk patients (urinary stones, positive urine culture, or urinary stoma) benefiting the most.2 Use of prophylaxis is also warranted in the drainage of infected abdominal collections, although generally these patients will already be receiving intravenous antibiotics. In radiofrequency ablation antibiotics have not been routinely used.3–5 Fig. 6.2 Several important points regarding ultrasound needle guidance. Firstly, the area has been cleaned, covered with sterile drapes, and the skin infiltrated with local anaesthetic. Importantly, the needle is aligned such that it bisects the long axis of the probe. This is crucial for needle visualization The choice of antibiotic is usually a broad-spectrum cephalosporin, although culture of drainage fluid will supply more specific information. In those patients with a penicillin allergy, discussion with the local bacteriology service may be helpful in choosing an alternative antibiotic to cover the procedure. A routine full blood count and coagulation screen is not required. However, it should be carried out in some groups, specifically in patients with renal or hepatic impairment, those on anticoagulants, and those with a known coagulopathy. Acceptable limits are considered to be a prothrombin time of < 1.5 times the laboratory control (also known as the international normalized ratio [INR]) and an activated partial thromboplastin time (APTT) of < 1.5 times the control. Finally, the platelet count should be > 50 × 109 per liter. Fresh frozen plasma (FFP) can be used to correct a raised prothrombin time if the INR is > 1.5. Usually four units are given intravenously if the INR is between 1.5 and 3.0, with the last unit running during the procedure. Alternatively, intravenous vitamin K can be used in less urgent cases. If the patient is on intravenous heparin, this should be withheld for three hours and the APTT measured. Heparin has a half-life of 60 minutes. Platelets should be administered again during the procedure for low counts of < 50 × 109 per liter. Fig. 6.3 Commonly-used pharmacotherapy in urogenital intervention. In the top row the short-acting benzodiazepine midazolam is seen on the right, with its reversal agent flumazenil. In the lower row, diamorphine, on the right, lies next to the opiod antagonist naloxone. Finally, the most commonly used third-generation cephalosporin antibiotic, cefuroxime, is shown bottom left Fig. 6.4 Patients should receive careful monitoring. This is particularly important when any form of conscious sedation is used. Minimum acceptable monitoring should include ECG (upper trace in image), pulse oximetry (lower trace), and regular blood pressure measurements A blood pressure above that acceptable for angiography (180 mmHg) should be avoided. In practice these are often controlled simply by using analgesia and sedation. Most practitioners use a combination of short-acting opiod analgesia and benzodiazepine. Common candidates include fentanyl or diamorphine and midazolam. Commonly combinations of 50–100 μg of fentanyl or 1–5 mg diamorphine and 1–10 mg of midazolam are used. These drugs act synergistically and can produce hypoxemia and apnoea.6 Their action is also potentiated in renal failure, so cautious use with small incremental boluses is advisable (Fig. 6.3). In addition, the patient must be adequately monitored with pulse oximetry, electrocardiography (ECG), and regular blood-pressure measurements. A nurse or operating department assistant must be available for this dedicated purpose.7 In addition, the reversal agents for opiod (naloxone) and the reversal agent for benzodiazepines (flumazenil) should be available (Fig. 6.4). Finally, the area should be cleaned with povodine iodine solution and sterile drapes applied. The skin should be anaesthetized and anaesthetic infiltrated into the intended subcutaneous track. Usually 10–15 mL of 1% lignocaine is sufficient. The maximum recommended dose is 3 mg/kg, up to a maximum of 200 mg.8 Percutaneous nephrostomy (PCN) is now a long-established and often-performed procedure, having been first described in 1955 by Goodwin et al.9 The following section will describe current indications for nephrostomy, relevant anatomy, a description of the standard technique with variations, follow-up care of patients, and a brief review of complications and their management. There are three main categories of indication for nephrostomy: • Ureteric obstruction • Urinary leak • To allow percutaneous nephrolithotomy (PCNL) Nephrostomy is rarely required as an emergency procedure. The single definite indication for an urgent nephrostomy is the presence of infection within an obstructed kidney. In this scenario, irreversible renal damage can occur within six hours. Hyperkalemia (> 6.0 mmlo/L) is also an indication for a relatively urgent nephrostomy. However, there are medical maneuvers which can reduce the level of hyperkalemia temporarily. Indeed, it is desirable to have the serum potassium level normalized before proceeding, as hyperkalemia during the procedure can produce cardiac dysrhythmias. Nephrostomy is an invasive procedure. In a survey of 303 patients undergoing nephrostomy, Farrell et al.10 described a 30-day mortality rate of 3.1% and overall complication rate of 6.5%. Given these potential complications, most practitioners would agree that percutaneous drainage should only be attempted for obstruction if retrograde stent placement is not feasible.11 Malignant obstruction is a common indication for nephrostomy, comprising up to 61% of patients in the series of Farrell et al.10 Average survival following nephrostomy with or without stenting in this cohort was found to be five months.12 With these difficulties in mind it is important that referrals for percutaneous drainage due to malignant obstruction are appropriate. These facts should also have been discussed with the patient and patient’s relatives. In general it is better to avoid placement in the first instance for unsuitable candidates. Specifically placement of a nephrostomy in those with end-stage malignancy may be inappropriate and should not be performed without consultation with the senior referring clinician first.13 The main renal arteries divide at the renal hilum into ventral and dorsal branches. The territory subtended between these main divisions is sometimes referred to as the Brödel bloodless line and lies at the junction of anterior two thirds with the posterior third of the kidney.14 The posterior calyces are oriented in the same plane as this relatively avascular region and are therefore the preferred point of entry into the renal collecting system. Given the orientation of the kidney, this means that in a patient lying prone the posterior calyces lie roughly at an angle of 20–25° dorsal to the coronal plane (Fig. 6.5). In general a puncture of a lower pole calyx, below the 12th rib, is the safest. This subcostal approach avoids the risk of transgression of the pleural space. If simple nephrostomy or stenting is the intended endpoint of the procedure, this approach is ideal.14 PCNL access will sometimes require access from above the 12th rib and this is associated with an increased risk of transgression of the pleural space. Fig. 6.5 Needle passage into the renal collecting system. As mentioned, an angle of 25° relative to horizontal (coronal plane) is ideal to allow puncture of a posterior calyx. In practice this is usually the angle which best allows visualization of the kidney during ultrasound scanning The main anatomical feature guiding PCN relates to renal blood supply. The large renal vessels lie centrally and therefore a central puncture should be avoided. Different practitioners use different techniques to gain access to the renal collecting system. Access can be gained using solely ultrasound or fluoroscopy. The vast majority of practitioners will choose to use a combination of ultrasound and fluoroscopic guidance during the procedure, and indeed the Society of Cardiovascular and Interventional Radiology (SCVIR) guidelines specify that a high-resolution fluoroscopy unit should be available.15 Computed tomography (CT) guidance is usually reserved for technically difficult procedures and is rarely required. The use of ultrasound with fluoroscopy rather than fluoroscopy alone has several advantages: • The ability to visualize overlying liver, spleen, and colon, thus avoiding inadvertent puncture • The ability to guide the needle under real-time imaging • Obviates the need to give iodinated contrast material prior to the procedure and reduces the overall ionizing radiation burden The advantages of ultrasound were confirmed in a study in 1981 in which the use of a combination approach compared to fluoroscopy reduced the number of needle passes (1.4 vs. 4.1)16 required to perform the procedure. The technique of PCN will vary according to whether the renal collecting system is dilated or not. The initial approach will vary depending on this factor. Direct calyceal puncture is extremely difficult in this group of patients. Puncture of the renal pelvis under direct ultrasound control can be performed with a 22-gauge Chiba (Neff Set, Cook, Europe) or Accustick needle (Accustick II Introducer System, Boston Scientific/Medi-Tech, France). After aspiration of a small amount of urine for culture, the system can be opacified and distended with dilute ionic contrast and carbon dioxide (CO2). Fig. 6.6 Using an 0.018” system for the definitive puncture, a transitional dilator system needs to be used to allow subsequent conversion to 0.035” diameter wires. This is achieved using a three part dilator. The 6.5 Fr outer sheath is seen at the skin surface (curved arrow), its tip lying within the renal collecting system. The inner metal stiffener and plastic dilator are seen being drawn back over the 0.018” wire (straight arrow). Once removed an 0.035” wire can be introduced The CO2 will float on top of the urine in the prone patient, preferentially filling the posterior calyces, thus allowing calyceal puncture under fluoroscopic control. Iodinated contrast mixes only slowly with urine and often poorly outlines or fails completely to show the posterior calyces. CO2 is preferred to room air, in case of inadvertent vascular injection. In this more common scenario a posterior calyx can be punctured under direct ultrasound control, urine aspirated for culture, and the system opacified, and then the procedure continued under subsequent fluoroscopic guidance. Definitive access to the posterior calyx in either scenario can be achieved using either a Kellet-type 19-gauge needle, a 22-guage Chiba or Accustick needle. Once the needle is in the calyx, the trochar is withdrawn. A 0.035” diameter wire can then be passed through the outer plastic dilator and coiled in the collecting system. Usually an intermediate stiffness wire is used, for example, a Coons (Cook, Europe) wire. At this point the track is dilated to 8 French (Fr) and a locking pigtail inserted, coiled, and locked in place. Some operators prefer to perform the definitive puncture with a 22-gauge Chiba needle. Once within the calyx, a platinum-tipped 0.018” wire can be coiled within the collecting system. A three-part coaxial “dilator” is then placed over the 0.018” wire. The inner metal stiffener and cannula are removed. The outer section in this system has a lumen wide enough to accept both the 0.018” wire and a 0.035” wire. A 0.035” wire is coiled in the collecting system along with the 0.018” wire. The outer cannula is carefully removed over both wires, to avoid dislodging the wires. The 0.018” wire is either removed or clipped to one side as a safety wire. This latter option is useful in difficult punctures in order to limit renal trauma. The nephrostomy insertion then proceeds as above with track dilatation and nephrostomy tube insertion over the 0.035” wire. The 0.035” wire is the last item removed (Fig. 6.6). There is no clear evidence to suggest one technique is better than the other. One study comparing the two showed a reduction in the number of needle passes in the 22-gauge (1.7 vs. 2.4) group but no difference in hematuria rates or success rates.17 Locking the drainage catheter, once inserted, provides improved security. The clinical team must know how to unlock it and not to use force if the drain will not withdraw on gentle traction when the time comes for removal. Further fixation with proprietary drain fixation devices such as the Drain-Fix device (Maersk Medical, UK) or Molner disk is essential. Finally, the drainage catheter is best placed within a proprietary stoma-type drainage system (Convatec, UK), rather than directly attached to a bag. This avoids the scenario of inadvertent tube dislodgment due to a heavy drainage bag providing traction at one end allied to natural patient movement overnight (Fig. 6.7). Ureteric stenting is often performed as a two-stage procedure. This may allow the edema following nephrostomy in an obstructed ureter to subside, making subsequent stenting easier. With modern catheter and guidewire technology, many patients can be successfully stented at the time of nephrostomy. This approach was successful in 80% of ureteric obstructions in a recent study.18 Emergency patients were not included in this study. Insertion of an antegrade ureteric stent requires manipulation of a wire down the ureter into the bladder. Often a hydrophilic wire of sufficient stiffness will be required. Generally a stiff-angled hydrophilic wire (Radiofocus, Guidewire M, Terumo Corporation, Tokyo) is manipulated together with a Biliary Manipulation Catheter (Torcon Blue Catheter, Cook, Europe) The angled tips of both wire and catheter allow steerage. Generally, even tight stenoses can be crossed by “helicoptering” the wire and gently advancing the tip until it passes through any stenoses. The use of a torque device to grip the wire is often necessary to gain enough purchase on the slippery hydrophilic wire. Opacification of the ureter can be helpful.
Principles of Ultrasound-Guided Procedures
Probe Selection and Preparation

Machine Placement
Needle Guidance
Troubleshooting
Patient Preparation: General Principles
Consent
Antibiotic Prophylaxis

Coagulopathy
Elevated Blood Pressure
Sedation and Analgesia
Skin Preparation
Nephrostomy
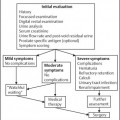
Indications
Technique
Anatomy
Guidance
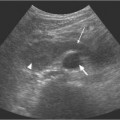
The Nondilated System
The Dilated System
Using an 19-Gauge Needle (Kellett-Type Needle)
Using a 22-Gauge Needle
Primary Antegrade Ureteric Stenting
Related posts:

Stay updated, free articles. Join our Telegram channel

Full access? Get Clinical Tree


