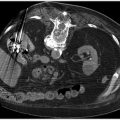
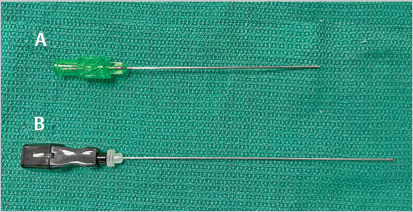
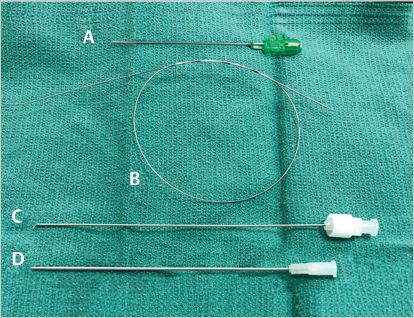
2 Tools of the Trade Pioneered by Dr. Sven-Ivar Seldinger, the Seldinger technique is the most common method used for obtaining vascular access. The technique allows the introduction of instruments into the vessel, starting with a needle and sequentially upsizing to catheters and other tools large enough to perform procedures. It can be used to gain access nearly anywhere in the body with the same basic steps. Comfort with the Seldinger technique and the tools utilized is a must for every IR trainee. A variety of different needles are used in IR. The size of a needle is denoted by gauge, which is a measure of its outer diameter. The larger the gauge, the smaller the outer diameter. The inner diameter of a needle is dependent on both the gauge and the thickness of the needle. Hypodermic needles are narrow in diameter and used to administer local anesthesia. They are generally 25-gauge or 27-gauge. Drawing up medication is slow when using these higher gauge needles. For convenience, an 18-gauge needle can be used first when drawing local anesthesia into a syringe, and then exchanged for one of the smaller-diameter (larger gauge) needles prior to injecting. The Seldinger technique begins with the introduction of an access needle into the target vessel. Access needles come in two types. One is a single hollow piece with a beveled tip, and the other is two-pieced, with a sharp central stylet inside of a hollow blunted tip (▸Fig. 2.1). The most common sizes of vascular access needles are 18-gauge and 21-gauge. After an access needle has been placed into the vessel lumen, a guidewire is inserted through the hollow portion, into the vessel (▸Fig. 2.2). Guidewires commonly range in diameter from 0.010 to 0.038 inch (you may hear them referred to as “oh-one-eight wire, oh-three-eight,” etc.). Guidewires come in different lengths, thickness, and stiffness. They are used to access target vessels and provide a scaffold over which other interventional tools can be inserted. The guidewire outer diameter should match the inner diameter of the needle or catheter through which it will pass. Fig. 2.1 Example of two access needles. The (A) 21 gauge micropuncture access needle is a one-piece needle and is most commonly used to access blood vessels. The (B) longer Chiba needle is a two-piece needle with an inner stylet; Chiba needles are used for many nonvascular procedures. Once the guidewire is in the vessel, the soft tissues and hole in the vessel through which the guidewire passes need to be dilated to allow room for various catheters and other tools. Dilators are stiff, hollow tubes with tapered tips. Their purpose is to spread overlying subcutaneous tissue and the vessel wall itself. Dilators of increasing diameter can be sequentially inserted to facilitate gradual tissue spread. They allow even the smallest vessel access to be increased to the appropriate size. By convention, outer dilator diameter is measured in units of French (Fr). Fr size is equivalent to three times the outside diameter in millimeters. For example, a 6 Fr dilator has an outside diameter of 2 mm. Said another way, 1 Fr = 1/3 mm. Sheaths are tubes inserted into the access site to facilitate insertion and exchange of instruments into the vessel of interest without repeatedly traumatizing the wall (▸Fig. 2.3). Catheters are hollow tubes that vary greatly in size, tip shape, and length. Catheters, along with guidewires, are used to navigate and select target vessels. As with dilators, catheters are sized by Fr, which reflects the outer diameter of the catheter, and also by the size of guidewire that passes through. In contrast, the Fr size of sheaths is a reference to their inner diameter. This makes it easier to pair appropriately sized catheters and sheaths. For example, a 5 Fr catheter can securely fit through the lumen of a 5-Fr sheath. The outer diameter of a sheath is typically 1.5 to 2 Fr larger than the inner diameter (▸Table 2.1). Often, a dilator and sheath come attached together in a combined device (▸Fig. 2.2). The dilator fits securely in the lumen of the sheath, with the tapered dilator tip projecting beyond the end of the sheath. A dilator-sheath can be passed over the guidewire during insertion. The central dilator is removed along with the guidewire, leaving the sheath behind in the vessel lumen. The sequence of needle, guidewire, dilator, and sheath is the basis for vascular access using the Seldinger technique. For initial access, the micro-access kit (often referred to by the brand name Micropuncture, Cook Medical) is very popular (▸Fig. 2.2). First, a 21-gauge needle is used to puncture the vessel. An 0.018-inch guidewire called a microwire is passed through the needle and into the vessel lumen. The microwire is a short guidewire that is used only during access. The needle is pulled out and removed over the wire. A dilator-sheath combination, called an introducer-sheath, is advanced over the microwire into the vessel. The introducer-sheath is composed of a dilator within a 4 or 5 Fr sheath. Since most tools in IR are used over a 0.035 wire system, the microwire needs to be exchanged for the larger guidewire. When the microwire and inner dilator are removed, a 0.035-inch guidewire can then be passed through the microaccess sheath. With the larger guidewire in place, the sheath can be exchanged for a larger one over the 0.035 wire. With an appropriately sized sheath secured in place, the operator can proceed with the case. Do not be surprised if you see some attendings use an 18- or 19-gauge access needle and jump straight to 0.035- or a 0.038-inch wire for initial access. The end goal is to get a 0.035 system in place. Fig. 2.2 The access kit that is commonly used to access blood vessels includes the (A) 21 gauge micropuncture needle; (B) 0.018 inch Cope Mandril guidewire; (C) 3 Fr inner transitional dilator separate from its (D) 4 Fr outer sheath. The sheath and inner dilator come as a single unit (sometimes called the introducer-sheath). Once the dilator-sheath unit is inserted over the wire into the blood vessel, the inner dilator is removed, leaving the 4 Fr sheath in place within the lumen. Fig. 2.3 Example of a sheath; a sheath is parked within the blood vessel and allows for convenient, frequent insertions and exchanges of instruments. A side-port allows for flushing of the sheath. Table 2.1 Sizing nomenclature of common IR tools
2.1 Vascular Procedures
Accessing the Vessel
Tool | What the size refers to |
Access/hypodermic needles | Outer diameter (in gauge) |
Guidewires | Outer diameter (“Oh-one-eight wire” = 0.018 inch) |
Dilators | Outer diameter (in French) |
Catheters | Outer diameter (in French) |
Sheaths | Inner diameter (in French) |
Navigating the Vasculature
Surgeries, including complex ones like a Whipple, often have a predetermined set of steps that surgeons try not to deviate from. IR procedures are different in that they begin with the end-goal in mind, but the intervening steps and tools used can vary from case to case. An excellent interventionalist has a strong knowledge of the tools at their disposal, and uses those tools creatively to troubleshoot the problems that invariably arise. Equally important is to know when not to use a particular tool, particularly when the circumstances make it unsafe to do so.
Guidewires and catheters are the main tools used to navigate through the vasculature, making it possible to access nearly any vessel in the body. A general rule when using catheters is that they should only be advanced in the vessel over a wire. Advancing a catheter without a wire can cause a perforation or dissection as the open tip traumatizes the vessel. The guidewire is used to traverse blood vessels, penetrate deeper into smaller vessels, and course around bends and turns. Once the guidewire has been carefully navigated into the target vessel, the catheter is advanced over the wire into a secure position within the branch. There are many different types of guidewires and catheters, each with their own characteristics. With a specific goal in mind, the right guidewire-catheter combination can be selected based on their individual characteristics.
Stiff wires, also known as “working wires,” provide the structural support over which catheters and other tools are advanced. They are also used to maintain access. Most guidewires have a central core that is tightly wrapped by a coiled wire. A guidewire’s stiffness is a function of the central core’s composition and thickness (▸Table 2.2 and ▸Table 2.3). The central core and coil wrapping are welded together at the back end of the wire, referred to as the stiff end. The central core tapers at the front-end of the wire. The guidewire tip’s floppiness is a function of how quickly the central core at the front-end tapers. Most guidewires have floppy tips that allow it to navigate around bends, curves, and plaque within a vessel, without causing trauma to the tunica intima. The shape of the tip may be straight, curved, or J-shaped. J-shaped wires vary in the radius of curvature. Selection of the appropriate guidewire requires consideration of the tip location, the tortuosity of the wire course from the access point to the tip, and the stiffness and trackability of the tools the operator plans to advance over the wire.
Table 2.2 Guidewire properties
Guidewire property | Importance |
Length | Typical guidewires → 145–180 cm long |
Stiffness (determined by the inner core’s properties) | “Working wires” → stiff |
Outer coating | Hydrophilic wires |
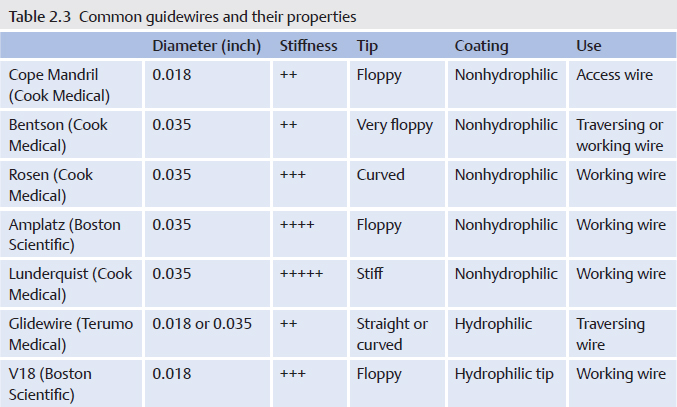
Guidewires are typically around 145 cm in length. Length is important in that when a catheter is being slid off for an exchange, the guidewire needs to be long enough to maintain position within the target vessel but also have enough length outside the body to be able to slide a catheter on or off. A longer guidewire in the range of 180 to 300 cm is considered “exchange length,” and is used when longer catheters are used.
Like guidewires, there are a variety of catheters at our disposal, which are characterized by their tip, size, and material. Early in the procedure, a catheter is used for angiography to delineate vascular anatomy, either for diagnostic purposes or to assist in navigation. Larger vessels like the aorta necessitate a higher flow rate in order to fully opacify the large lumen. As such, the ideal catheter needs to provide a high flow rate and be able to inject contrast in the center of the lumen. This is accomplished with flush catheters, which have curled or recurved tips and robust construction, allowing high-volume contrast injections (i.e., aortography). The tips have multiple sideholes, which allow contrast material to be dispersed diffusely.
Procedures that involve navigation into branch vessels require curved-tip, selective catheters (▸Fig. 2.4). Selective catheters are useful when targeting branches of main vessels. Selective catheters may vary considerably with respect to shape and function. The catheters can have slightly angled, curved, J-shaped, or reverse curved tips. The target vessel’s angle of origin off the parent vessel dictates the most appropriate tip shape. For example, subtly angled tips may be appropriate when navigating through the carotid and subclavian arteries. Curved, J-shaped, or reverse curved catheter tips may be more useful when attempting to cross the aortic bifurcation, or when selectively catheterizing a visceral or renal artery origin. Other tip configurations can be used based on the anatomy of the branch vessel of interest. A plethora of tip shapes are available, usually named after their shape or the individual who created it.
Sometimes, a catheter can be used to select a vessel of interest without a wire already into the branch. This is typically accomplished by slowly retracting the catheter until the tip pops into the ostium. At this point, a soft tipped guidewire can be advanced into the branch while keeping the catheter in place. Use of a soft tip reduces the risk of arterial spasm or dissection.
If distal branches need to be selected, a microcatheter system is typically used. A microwire/microcatheter combination is advanced through the catheter (parked at the branch vessel origin) and into the branch vessel (▸Fig. 2.5). Microcatheters may be straight or shaped, and are typically between 2 and 3 Fr. They are able to access narrow vessels without causing vessel spasm.
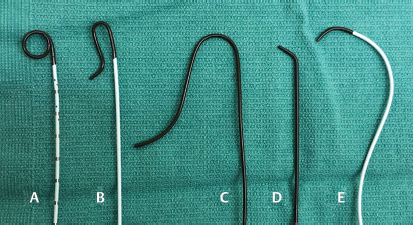
Fig. 2.4 Choosing the right catheter is important when selecting vessels and navigating the vasculature. Some common catheters you may encounter include (A) pigtail flush catheter, (B) Sos catheter, (C) Simmons catheter, (D) Berenstein catheter, and (E) Cobra catheter.
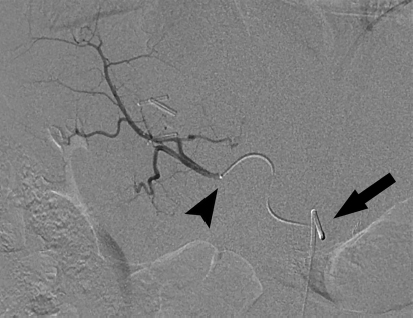
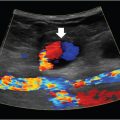
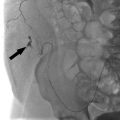
Fig. 2.5 The microcatheter-microwire system is used to navigate smaller caliber vessels. In this digital subtraction angiography image, the selective catheter is parked in the celiac axis (arrow), with the microcatheter advanced into the right hepatic artery (arrowhead).
Balloon Angioplasty
Vessel stenosis or occlusion can occur secondary to a number of pathologic conditions including atherosclerosis, fibromuscular dysplasia, or external compression. Reopening a stenotic blood vessel is usually accomplished with balloon angioplasty and also stent placement in some cases.
Balloon angioplasty involves treating a vessel by expanding a balloon within the lesion and exerting outward radial pressure to fracture the lesion. For atherosclerosis, the mechanism of an effective angioplasty is controlled intimal injury, with the repair response leading to increased luminal cross-sectional area.
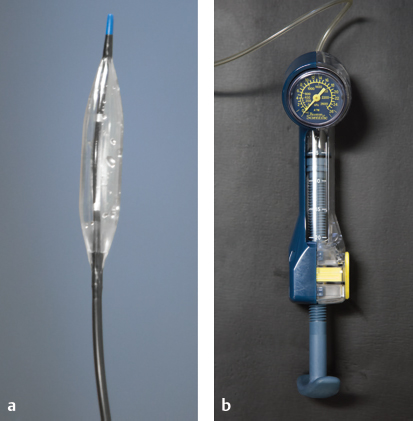
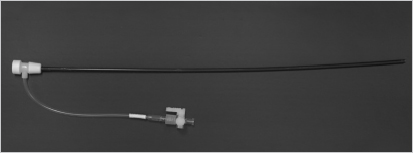
Balloons are integrated into the tip of a catheter, allowing them to be advanced across the lesion over a wire before being inflated. They come in different sizes and lengths, and vary by the amount of radial pressure they exert (▸Fig. 2.6). The insufflator is a handheld pump that fills the balloon with dilute contrast.
At each end of the balloon, there are two radio-opaque markers which indicate the balloon length. The balloon between these markers is referred to as the “working length,” which is the part of the balloon that delivers maximal radial pressure to lesion being treated. These radio-opaque markers are essential in positioning the balloon’s working length within the target lesion. The balloon inflates from outside in, with the central portion of the balloon inflating last. A “waist” in the middle of the balloon represents a portion of the lesion that is resistant to the radial force (▸Fig. 2.7). A successfully treated lesion should have no waist.