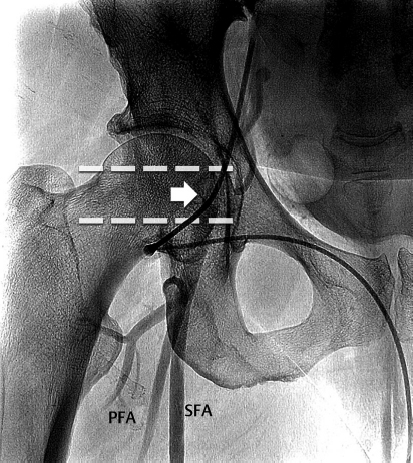
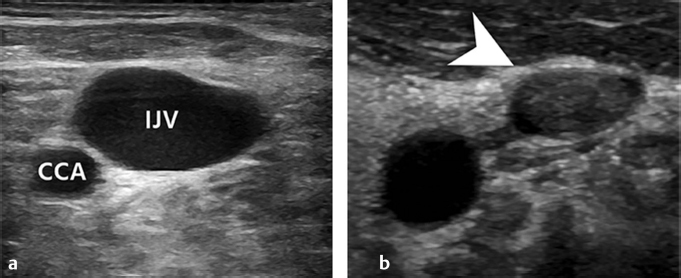
3 Vascular Access Gaining access to a vessel is the first step for the majority of IR procedures, and is often a starting point for students or residents to get early hands on experience. Those who have been in practice for some time can gain access effortlessly in the vast majority of cases, however there is still a step by step process that should be followed in every case. Most procedures will have a preferred site of vascular access, which is usually at the neck, groin, or the extremity. Before starting, the proposed access site should be inspected to make sure there are no contraindications to needle puncture. Areas with ongoing skin infection, recent surgical incision, or dense scarring should be avoided if possible. Although the target vessel can be found by palpation and use of landmarks, the standard of care is ultrasound guidance, which allows you to maintain visualization of your needle as it enters the target vessel. Use of image guidance substantially reduces the risk of complications related to access. Ultrasound can be used to ensure the target vessel is patent before the patient is prepped and draped. The IR technologist will often do this for you, but it’s a good idea to practice doing it yourself. If the vessel of choice is inaccessible due to chronic occlusion or the presence of thrombus, check the contralateral side (▸Fig. 3.1). Prior to puncturing the skin, the access site must be sanitized with an antiseptic solution and the surrounding area draped. From this point on you’ll need to have a sterile gown and gloves on. With this done, you can now give lidocaine using a hypodermic needle near the anticipated area of needle puncture. Fig. 3.1 (a) Normal relationship between right internal jugular vein (IJV) and the more medial right common carotid artery (CCA). (b) Preprocedure ultrasound evaluation of the right IJV revealed an occlusive thrombus within the vein (arrow). Obtaining vascular access properly requires two-handed coordination. You’ll take the ultrasound probe in one hand, and your needle in the other. Some choose to have a syringe attached to the needle for the initial puncture, but it is a matter of personal preference. In either case, the probe is held perpendicular to the skin and the needle near parallel to it, with the bevel facing up. The goal is to advance the needle in the same plane as the probe, watching the needle tip the whole time. If you are uncertain of whether what you are seeing is the needle tip, a gentle rocking motion of the probe will show the tip come in and out of the field of view. The tendency will be to want to look down at the needle but try to keep your eyes on the ultrasound screen. It will become more natural as you get the feel for this maneuver with practice. Ideally, you will watch your needle tip enter the vessel as you advance it. Other clues to help guide you include the appearance of a vessel wall “tenting” before the needle pokes through, as well as the tactile feedback of the puncture (▸Fig. 3.2). There should be blood return through the needle once inside the vessel lumen. In an artery the blood return will be pulsatile, while in a vein it will trickle out of the needle. If you have a syringe on the needle, you can try aspirating; with the needle in a vein you will draw back purple-colored venous blood but will meet resistance if the needle is extraluminal. Once the needle is inside the vessel, the remaining steps of vascular access follow the Seldinger technique, as described in Chapter 2. When advancing a guidewire through the needle, there should not be significant resistance. This can indicate attempted passage of the guidewire into the subintimal space or outside of the vessel lumen completely. Once the guidewire is in a #11 blade scalpel may be used to create a small nick in skin where the guidewire enters. The point of this is to ensure that the subsequent tools can be passed without getting caught on skin, which would require extra force. Care should be taken to not cut the vessel or guidewire with the blade when making a skin nick. Alternatively, some people prefer to make this skin nick as the first step, just before needle puncture. With the guidewire in place and skin nick made, a dilator sheath can be slid over the wire and into the vessel. After the dilator sheath is hubbed at the skin, the inner dilator and guidewire are both removed, leaving just the sheath in place. Vascular access to the vessel is now secure and further tools (specialty catheters, guidewires, etc.) can be inserted. Most IR procedures involving the venous system start with internal jugular or femoral venous access. Both the access site and the laterality are important to consider. For example, the right internal jugular vein (IJV) has a straighter course to the heart and minimizes bends in the catheter, which is desirable for certain procedures. When attempting IJV access, ultrasound should be used to first identify the common carotid artery. The IJV should be lateral and anterior to the artery; however, this is variable (▸Fig. 3.1). It should also be compressible and increase in diameter with the Valsalva maneuver. Fig. 3.2 Example of ultrasound-guided internal jugular vein (IJV) access. (a) Advancement of the needle tip into the exterior wall of the vein “tents” the vessel inward. (b) Additional advancement of the needle or sometimes a quick, short jab with the needle will allow the needle tip to enter the IJ lumen. Visualizing the needle tip in the IJ can help confirm proper positioning before moving forward with the procedure. (These images are provided courtesy of Avinash Medsinge, MD and Pattana Wangaryattawanich, MD, University of Pittsburgh Medical Center.) The risk of complications with venous access is less significant due to lower intraluminal pressure and thinner vessel walls. Nevertheless, occasional complications do occur and may include symptomatic thrombosis at the puncture site, venous perforation, and injury to adjacent structures. Complications specific to IJV access include pneumothorax and hemothorax, however these are rare. Hematomas can occur with venous access, usually in coagulopathic patients. Ultrasound guidance and preferential use of the IJV have almost completely eliminated the risk of pneumothorax. Though pneumothoraces are a greater concern during subclavian vein access, it is important to be conscientious of your needle trajectory with IJ access, keeping the needle about 1 cm above the clavicle and in constant view by ultrasound if possible. Arterial access sites are limited, with most procedures performed via the femoral artery, radial artery, or brachial artery. Pedal or antegrade arterial access in the lower leg can also be obtained for certain peripheral vascular procedures. Prior to attempting arterial access, the distal pulse strength and capillary refill should be checked as a precaution in case an occlusive or embolic complication occurs as a result of the procedure. Blood pressure measurement and perfusion of the digits are particularly important to check prior to upper extremity arterial access. Common femoral artery (CFA) access is the most common for arterial interventions. However, arterial patency may preclude CFA access. For example, if a patient has severe aortoiliac disease and requires mesenteric artery interrogation, brachial or radial artery access may be necessary. For lower extremity arterial intervention such as recanalization of tibial or femoropopliteal occlusion, antegrade femoral access with or without pedal access can be used. The dorsalis pedis and posterior tibial artery are both options for the latter. The target for a femoral artery stick is the arterial segment overlying the femoral head (▸Fig. 3.3). The bony landmark offers rigid support to compress and tamponade the femoral artery when needed. Just inferior to the inguinal ligament, a radiopaque object such as a hemostat should be placed with the tip at the approximate location of the midfemoral head, and an anteroposterior (AP) fluoroscopic spot image taken to confirm placement. The femoral artery should be accessed in this approximate location after successfully palpating the artery just proximal and distal to the desired access site. The femoral bifurcation also needs to be lower than this point, verified using ultrasound. The brachial artery is readily visible with ultrasound, however its depth and a lack of underlying support diminishes the potential effectiveness of manual compression. For the past 20 years, support in the interventional cardiology community has steadily shifted toward transradial access (TRA) as the preferred approach for coronary interventions. Recently, the use of TRA in IR has also gained traction, though widespread implementation has been limited by operator familiarity and training, as well as equipment availability, such as appropriate catheter length and shape. Radial access has some notable benefits compared to femoral access. The advantages of radial access include more effective postprocedure hemostasis, immediate ambulation postprocedure, and increased patient comfort. It is also helpful when intervening on obese patients, for whom femoral access is a challenge. Vasospasm is of particular concern for transradial access, and several strategies are employed to reduce this risk. This includes the use of special hydrophilic sheaths and injection of an antispasmodic solution consisting of heparin, nitroglycerin, and verapamil. After completion of the procedure, a radial compression device is wrapped around the wrist to achieve nonocclusive “patent” hemostasis, which minimizes risk of radial artery occlusion (▸Fig. 3.4). The band can be removed 75 to 90 minutes after application.
3.1 Venous Access

3.2 Arterial Access
Radiology Key
Fastest Radiology Insight Engine