Higher taxon
Species
References
Scanning condition
Demospongiae
Haplosclerida
Lubomirskia baicalensis
(5)a
Ex vivo
Crustacea
Decapoda
Callinectes sapidus
(6)a
In vivo
Cancer pagurus
(7)
In vivo
Maja squinado
(7)
In vivo
M. squinado
(8)
In vivo
Procambarus clarkii
(9)
In vivo
Cherax destructor
(10)a
In vivo
Arachnida
Araneae
Eurypelma californicum
(11)
In vivo
Insecta
Multiple taxa
Review article on all studies published prior to 2003
(12)
In vivo/ex vivo
Lepidoptera
Manduca sexta
(13)a
In vivo
M. sexta
(14)
In vivo
Hymenoptera
Apis mellifera carnica
(15)a
Ex vivo
Diptera
Drosophila melanogaster
(16)a
In vivo
Coleoptera
Ascioplaga mimeta
(17)a
Ex vivo
Mollusca
Bivalvia
Crassostrea gigas
(18)
In vivo
C. gigas
(19)a
In vivo
Elliptio complanata
(20)a
In vivo
Cephalopoda
Sepia officinalis
(21)a
Ex vivo
Lolliguncula brevis
(22)
Ex vivo
Echinodermata
Echinoidea
Psammechinus miliaris
(23)a
In vivo/ex vivo
P. miliaris
(24)a
Ex vivo
Multiple echinoid species
Ex vivo
Since comparative studies can be complicated not only by technical but also by logistical aspects, we focus on the large-scale use of museum specimens for such comparative purposes. The so-called wet collections of natural history institutions around the world house millions of invertebrate specimens that constitute an enormous resource that also includes endangered and recently extinct species.
Here, we give an account of MRI protocols that permit gathering data on invertebrate anatomy in a non-invasive manner, using freshly fixed or even century-old museum specimens. Since phylogenetic or ecological studies usually require the analysis of multiple organisms, we have optimized the protocols to allow for high-throughput scanning of large numbers of specimens. The resulting datasets permit interactive viewing as well as advanced automated or manual three-dimensional (3D) visualization of internal and external structures.
The primary focus of our work was the study of sea urchins (Echinodermata: Echinoidea). Therefore, this taxon of marine invertebrates serves here in an exemplary fashion. However, we have extended MRI studies to various other invertebrate groups in order to demonstrate that non-invasive MRI datasets can principally also be obtained from further taxa.
2 Materials
2.1 Invertebrate Specimens
1.
Fresh specimens can be obtained from the field or through biological supply companies (e.g. Carolina Biological Supply Company, USA) (see Note 1).
2.
Museum specimens are available from the so-called wet collections of natural history institutions worldwide (see Note 2).
2.2 Specimen Containers and Specimen Fixation Material
The choice of the specimen container depends on the inner diameter of the resonator as well as the general set-up of the MRI scanning system (e.g. horizontal or vertical bore magnet). Make sure that the caps of the specimen containers are tight as they might have to be placed horizontally.
1.
2.
3.
Cap-sealed glassware NMR tubes (e.g. Sigma-Aldrich, USA). Conventional sizes have 3 mm, 5 mm, or 10 mm diameter, although NMR tubes with up to 30 mm diameter can be obtained.
4.
A set of fine glass and/or plastic tubes of varying diameters such as one-way polyethylene Pasteur pipettes or glass stirrers (e.g. Carl Roth, Germany) for mechanical specimen fixation.
5.
Rack for specimen preparation and transport of plastic tubes (e.g. Falcon tube rack, Formulatrix, USA).
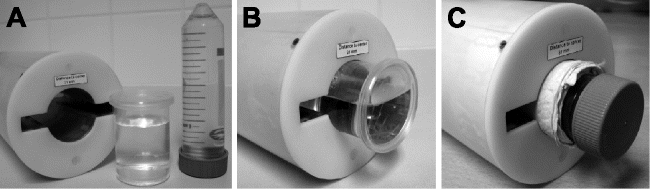
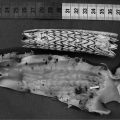
Fig. 1.
Specimen containers for invertebrates. (a) Linear 1H-radiofrequency birdcage resonator (left) with custom-made specimen container of acrylic glass (centre) and 50 mL Falcon tube (right). (b) Custom-made specimen container inside resonator, only partly filled with distilled water to allow for better tuning. (c) 50 mL Falcon tube inside resonator. Conventional paper towels wrapped around the tube and fixed with adhesive tape can be used to fill the gap between specimen container and resonator.
2.3 Imaging Solutions
During our studies, distilled water was the predominant scanning solution. However, other solutions can be used for MRI as well.
1.
Distilled or de-ionized water – use of distilled water reduces the risk of specimen contamination (see Note 4).
2.
Formalin (aqueous solution of formaldehyde) – use a maximum concentration of 5% (v/v) for scanning. Available from chemical supply companies (e.g. Sigma-Aldrich, USA). Be aware of its toxicity!
3.
Fomblin (a perfluoropolyether fluorocarbon) – proton-free oil (Solvay Solexis, Italy). Non-toxic (see Note 5).
4.
Fluorinert (a fluorocarbon-based fluid) – proton-free liquid (e.g. FC-77 or FC-84 by 3 M, USA). Its properties are similar to those of water, although its density is higher (1.6–1.9 g/cm3) than that of water. Non-toxic (see Note 5).
2.4 Contrast Agents (Optional)
1.
Nonspecific MRI contrast agents based on the element gadolinium. Commonly used products are Magnevist (Bayer HealthCare, Germany) (Fig. 2), Gadovist (Bayer Schering, Germany), or Magnegita (Insights Agents, Germany) (see Note 6).
2.
Specific MRI contrast agent based on manganese. This paramagnetic metal is supplied, e.g. as MnCl2 by chemical supply companies (e.g. Sigma-Aldrich, USA). (see Note 7).
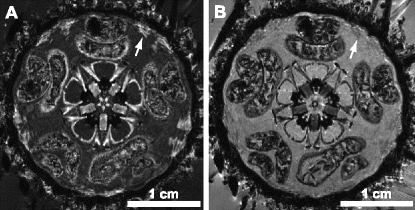
Fig. 2.
Use of Magnevist as a contrast agent in invertebrate MRI. (a) Museum specimen of Strongylocentrotus purpuratus (CASIZ 5724) scanned with a 3D protocol (FLASH) at 81 μm isotropic resolution in distilled water. (b) Same specimen scanned with the same protocol after contrasting with 2 mM Magnevist. Differentiation of internal organs is improved, although some structures (e.g. tube feet ampullae (arrows in (a) and (b))) have become less visible.
2.5 Vacuum Pump
1.
Conventional laboratory vacuum pump with tubing (e.g. Laboport, KNF, Germany).
2.
Exsiccator with vacuum valve. The device needs to be large enough to fit the whole specimen container (e.g. Rotilabo, Carl Roth, Germany).
2.6 MRI Scanner Including Gradient System and Resonator
The imaging system described here has been used primarily for our high-throughput analyses in 2D and 3D. The choice of the imaging system and its subcomponents dictates parameters such as specimen size, maximum resolution, and scanning time.
1.
7 T PharmaScan 70/16 small animal imaging system (Bruker Biospin GmbH, Germany) with a 1H-resonance frequency of 300 MHz. The system is equipped with a shielded gradient set with an inner diameter of 90 mm and a maximum gradient strength of 300 mT/m (see Note 8).
2.
Linear 1H-radiofrequency birdcage resonator (Bruker Biospin GmbH, Germany) with an outer diameter of 89 mm and an inner diameter of 38 mm.
3.
Workstation operating the MRI scanner with pre-installed software (we used ParaVision 3.0.2 and ParaVision 4.0, Bruker Biospin GmbH, Germany).
2.7 Graphics Workstation for Image Processing
1.
Desktop PC with CPU (e.g. 2 GHz), sufficient RAM (e.g. 2 GB), graphics card with OpenGL and texture mapping capabilities (e.g. GeForce series, NVIDIA, USA), sufficient hard drive capacity (e.g. 1 TB), and operating system (e.g. Mac OS or Windows). Additional components include two monitors, a mouse, a keyboard, a DVD burner, and a pen tablet for manual segmentation (e.g. Wacom, USA). The set-up has to be able to smoothly handle image datasets of 100–500 MB size.
2.
Image processing software with DICOM viewing capabilities (e.g. ImageJ, NIH, USA).
3.
3D visualization and modelling software (e.g. Amira, Visage Imaging GmbH, Germany).
3 Methods
The 2D and 3D MRI protocols described here will lead to initial results in most specimens. However, every invertebrate taxon will require its specific scanning parameters and the proposed protocols may have to be modified and optimized according to the needs of the study (see Note 9). Such adaptations should be done in close collaboration with the technical staff operating the MRI system. 3D model generation (Fig. 3) of internal and external structures usually requires the use of isotropic datasets (i.e. datasets which are composed of cubic voxels) that can be obtained using the 3D MRI protocols described below. The 2D MRI protocols provided here were used for high-throughput scanning, but resulted in non-isotropic virtual sections only partly suitable for 3D visualization.
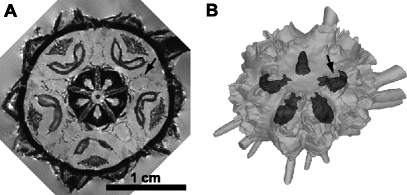
Fig. 3.
Example of a surface-rendered 3D model based on a 3D MRI dataset. (a) Virtual horizontal section through a museum specimen of Eucidaris metularia (NHM 1969.5.1.15-40). (b) Surface-rendered 3D model based on the 3D MRI dataset of (a). Stewart’s organs (arrows in (a) and (b)) can be seen through the semi-transparent endoskeleton. See Ref. (2) for colour figures as well as an interactive 3D PDF model.
3.1 Specimen Preparation
Note that the differences inherent in distinct fixation protocols and their effect on MRI scanning of invertebrates have not yet been established systematically.
1.
Bring the specimen to room temperature if kept in a refrigerator.
2. (a)
Specimens fixed and stored in formalin: this material can be scanned directly if the final formalin concentration is below 5% (v/v).
(b)
Formalin- or ethanol-fixed specimens that later were transferred into ethanol for long-term storage (i.e. most museum specimens): this material needs to be brought into distilled water in a gradual ethanol series (e.g. 75%, 40%, 20% (v/v) – each step for at least 2 h, and longer, if the specimen possesses a strong, encapsulating exoskeleton).
(c)
Specimens fixed in Bouin’s solution that later were transferred into ethanol for long-term storage: proceed as in the previous step. (see Note 10).
3.
Place the specimen inside the scanning container – if the previous step had not already been performed within the scanning container. The position of the specimen depends on the type of container used. In our set-up, the specimens were placed in the lower third to middle of a 50 mL Falcon tube. Use plastic or glass rods and tubing to carefully attach the specimen to one side or to the centre of the container (see Note 11). Make sure that hollow rods and tubes are completely immersed in and filled with the scanning solution in order to decrease the likelihood of boundary artefacts between air, scanning solution, and the specimen.
3.2 Contrasting of Specimens (Optional)
1.
Manganese needs to be applied in vivo (see Note 7).
2.
Inject the gadolinium-based contrast agent into the scanning solution with a final concentration of 2 mM. Let the sample rest for at least 2 h in order to achieve complete perfusion of the specimen – note that this parameter largely depends on the composition of the specimen and may therefore require more extensive trials.
3.3 Degassing of Specimens
1.
Gently agitate the specimen container to remove air from the sample.
2.
Evacuate for 30 min to 1 h in order to remove further air and to help fluid exchange.
3.4 Specimen Scanning
1.


Place the specimen container inside the resonator (Fig. 1b, c) and place the resonator in the centre of the magnet.
Related posts:
Stay updated, free articles. Join our Telegram channel
Full access? Get Clinical Tree
