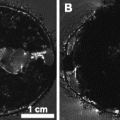
Fig. 1.
Materials for reactive hyperemia surgery. (a) Occlusion tube. (b) Bisected end of occlusion tube through which the 6-lb test fishing line is threaded and which is placed into the intraperitoneal (IP) cavity of the animal (arrow: thin strips of electrical tape; arrow head: circumferentially wrapped electrical tape covered in epoxy; see Note 14). (c) Soldering stand helper with alligator clips.
2.4 BOLD MRI
The additional materials listed here are required to induce reactive hyperemia in the lower leg of the mouse while it remains in the magnet and acquire and process imaging data.
1.
Physiological monitoring and control (rectal temperature probe at minimum; ideally respiration pad too but may be difficult due to placement of occlusion tube; see Note 6).
2.
Eye ointment not required because of non-survival procedure.
3.
Lubricating jelly.
4.
3-cm Inner diameter transmit–receive volume radio-frequency (RF) coil for proton imaging (see Note 7).
7.
Scope trigger or some other means to provide a signal to personnel who will be lowering and raising occlusion weight.
8.
Fast spin echo (FSE) sequence providing adequate temporal resolution, ≤10 s per image (see Notes 8 and 9)
9.
Image analysis software (MATLAB, including the Image Processing Toolbox; The Mathworks, Natick, MA; or MRVision, Winchester, MA)
Fig. 2.
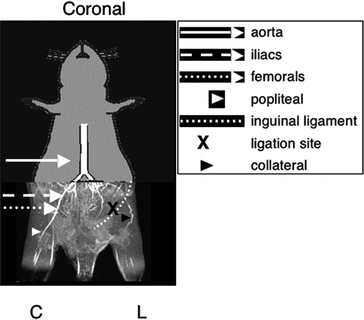
Murine anatomy following femoral artery ligation as visualized by an MR angiogram. Various levels of the vascular tree are highlighted along with the femoral artery ligation site: aorta;
 iliacs;
 femorals;
 popliteal;
 inguinal ligament; X ligation site;
 collateral. (Adapted and reproduced from (20) with permission from John Wiley & Sons, Inc.)
aorta; iliacs; femorals; popliteal; inguinal ligament; X ligation site; collateral. (Adapted and reproduced from (20) with permission from John Wiley & Sons, Inc.)Fig. 3.
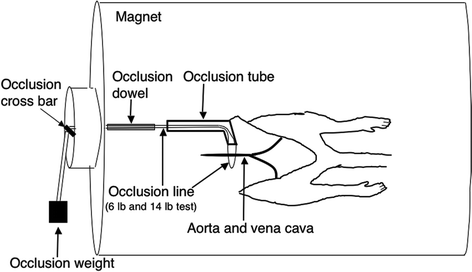
Diagram of animal and reactive hyperemia setup inside the bore of the magnet. The design allowed transient occlusion and reflow of the aorta and vena cava while acquiring data continuously. (Adapted and reproduced from (21) with permission from John Wiley & Sons, Inc.)
3 Methods
All animal work should be carried out only upon review and approval of the methods by your institution’s Institutional Animal Care and Use Committee (IACUC). For those new to small animal surgery and/or these procedures, instruction should be sought from experts in the field prior to initiating any studies (22).
3.1 Femoral Artery Ligation Surgery
Aseptic technique is required for this procedure (lab coat, mask, hair cover; sterile instruments, sterile gloves, and a sterile field). If not already proficient, obtain training in aseptic technique from experienced personnel.
The following can be done with non-sterile gloves and preferably in an area separate from where the surgery will take place. If the latter is not possible, then be careful to remove fur thoroughly from the surgical area prior to starting the surgery and maintain sterility of instruments and field.
1.
Anesthesia should be induced at ∼3% isoflurane in a carrier gas flowing at 1 L/min (medical grade air, or 70/30 mixture of N2O/O2 will work but are listed here in order of preference).
2.
Upon induction, place animal on the heating pad ventral surface up with its nose in a nose cone to continue to deliver isoflurane at ∼1.5–2% in 1 L/min of the carrier gas. The animal’s head should be pointing away from you.
3.
Before proceeding, check for the appropriate plane of anesthesia (e.g., by pinching one of the hindpaws of the animal).
4.
Opthalmic ointment should be placed on each eye.
5.
The fur over the left femoral artery at the level of the inguinal ligament should be removed by using clippers or depilatory (see Note 10)—externally the landmark is where the hindlimb attaches to the intraperitoneal (IP) cavity (Fig. 2).
6.
Prepare the skin over the femoral artery by scrubbing it with three separate povidone–iodine swabsticks followed by one to two alcohol pads. Let the skin dry.
At this point, transfer the animal to the surgery area and put on sterile gloves. Place the sterile drape over the animal so that the surgical aperture is over the furless skin.
7.
Using the large, delicate serration forceps and small surgical scissors, make a small incision (∼1 cm in length) through the skin, only, over the femoral artery at the level of the inguinal ligament. The incision should be parallel to the inguinal ligament (see Fig. 2).
8.
You will need to move aside a small portion of subcutaneous fat before visualizing the femoral artery, which will reside between the femoral vein on the left and the femoral nerve on the right.
9.
Have a small syringe (1–3 mL) filled with sterile saline available to moisten the surgical site as you are separating the femoral artery from surrounding tissue.
10.
Isolate the femoral artery from the vein using the small, angled, smooth platform forceps (see Note 11).
11.
When the femoral artery has been isolated, run a 5-0 silk suture beneath it and tie off the artery. A drop or two of saline can provide lubrication. Cut the ends of the ligature to appropriate lengths (∼2 mm) (see Note 12).
12.
Close the skin using the needle holders, 5-0 silk suture, and a wound clip. The wound clip should be removed after 7 days if it is still in place.
13.
Administer appropriate post-operative analgesic, e.g., buprenorphine (0.05–0.1 mg/kg subcutaneously).
14.
Recover the animal in a cage, with no bedding, that is placed half-on/half-off a warm heating pad until ambulatory.
3.2 Inhibition of VEGF
Administration of such injections can be done with non-sterile gloves and without anesthesia. If not already proficient, obtain training in administering injections via the intraperitoneal (IP) cavity from experienced personnel.
1.
Gently restrain animal by holding the skin at the nape of the neck between thumb and forefinger with one hand and tail with the other hand.
2.
Turn animal so its abdominal surface is facing toward the ceiling.
3.
Place the animal’s tail between the fourth and fifth fingers (ring and pinky) of the hand that is also holding the skin at the nape of the neck between thumb and forefinger.
4.
Inject animal just proximal to the inguinal ligament with needle entering at an approximately 45° angle relative to abdominal surface. The needle should be pointed superiorly (see Note 13).
3.3 Reactive Hyperemia Surgery
You will need to construct the occlusion tube (see Note 14) at least 24 h in advance of performing this surgery to allow for the epoxy to dry. This surgery is performed just prior to performing the BOLD MRI. The surgical area needs to be close to the preparation area for imaging as the animal will need to be quickly moved from the surgical bench to imaging preparation area without its regaining consciousness.
Non-sterile technique is allowed because this is a non-survival procedure. However, best practice suggests care should be taken to avoid contaminating the surgical site, for example, with fur.
1.
Repeat Steps 1–3 of the femoral artery ligation surgery.
2.
The fur on the midline of the abdomen, from approximately the sternum to the level of the inguinal ligament, should be removed using clippers or depilatory.
3.
Using the large, delicate serration forceps and small surgical scissors, a small incision (∼2–3 cm in length) through the skin only, should be made parallel to the aorta.
4.
You will now see the ventral musculature of the intraperitoneal (IP) cavity. Again, make a small incision (∼2–3 cm in length) through the muscle wall (see Note 15).
5.
Your field of view will now largely be encompassed by the intestinal tract. You will need to move aside the intestinal tract before visualizing the aorta and vena cava.
6.
Have a small syringe (1–3 mL) filled with sterile saline available to moisten the surgical site as you are separating the aorta and vena cava from surrounding tissue.
7.
Do not separate the aorta and vena cava from each other. Instead, using the small, angled, smooth platform forceps and/or the triangular surgical spears, separate the pair from the surrounding tissue (see Note 16).
8.
A drop or two of saline should be used to provide lubrication during this procedure. When there is a clear tunnel beneath both the aorta and vena cava, take a length of 6-lb test fishing line (approximately double the length of your occlusion tube) and run it beneath the vessels until half is protruding from each side.
9.
Thread both ends of the 6-lb test line through the occlusion tube and tie it off.
10.
11.
Gently manipulate the soldering stand arm such that the surface of the occlusion tube is ∼5 mm above the aorta and vena cava. Make sure not to put pressure on the vessels thereby blocking flow.
12.
Using the 5-0 suture, suture the muscle and skin layer closed around the occlusion tube.
13.
When the surgery is complete, elevate the anesthetic to 2–3% for ∼3 min in anticipation of transferring the animal to the imaging preparation area where a nose cone should be located with anesthetic already flowing via a carrier gas.
14.
Transfer the animal to the imaging preparation area.
3.4 BOLD MRI
Once the animal has been transferred to the imaging preparation area, check once again that the correct plane of anesthesia has been maintained. Once that has been confirmed, you will likely want to return the isoflurane to ∼1.5–2%.
1.
The rectal temperature probe should be inserted using lubricating jelly and taped in place.
2.
Both the animal’s hindlimbs should be gently straightened and taped in this position (see Note 17).
3.
The end of the occlusion tube outside of the RF coil should be supported so that it remains parallel to the body of the mouse thereby minimizing the possibility of the occlusion line becoming taut beneath the aorta and vena cava.
4.
Tie the 14-lb test line (long enough to reach through the extent of the bore of the magnet) to the 6-lb test line running through the occlusion tube.
5.
Place the animal inside the RF coil. If you have an RF coil with its active extent toward one end of the coil, only the animal’s hindlimbs up to the occlusion tube will be inside the RF coil (see Note 7).
6.
Tape the 14-lb test line to a plastic dowel long enough so that it can be easily reached from the other end of the magnet. There should be a small extent of occlusion line between the end of the dowel and the end of the occlusion tube. You will need to make sure that this dowel is supported at both ends to keep it in line, i.e., at the same height, with the occlusion tube. This will minimize the possibility of tension being put on the 6-lb test occlusion line that is running beneath the aorta and vena cava (Fig. 3).
7.
Get Clinical Tree app for offline access

a.
 Spin Echo BOLD fMRI on Songbirds
 Interventional MRI in the Cardiovascular System
 Analysis of Freshly Fixed and Museum Invertebrate Specimens Using High-Resolution, High-Throughput MRI
 MRI Using Intermolecular Multiple-Quantum Coherences
 MRI of CEST-Based Reporter Gene
 Hyperpolarized Molecules in Solution


When you place the setup (RF coil, animal, fishing line, and dowel) into the magnet, the fishing line should be long enough to be draped over the occlusion cross bar and the occlusion dowel should be long enough to be easily reached inside the bore of the magnet in order to actively push the line back through the occlusion tube and reflow the aorta and vena cava, see Fig. 3. The occlusion dowel does not need to slide into the occlusion tube to reflow the vessels.
Related posts:
Spin Echo BOLD fMRI on Songbirds
Interventional MRI in the Cardiovascular System
Analysis of Freshly Fixed and Museum Invertebrate Specimens Using High-Resolution, High-Throughput MRI
Hyperpolarized Molecules in Solution
Stay updated, free articles. Join our Telegram channel
Full access? Get Clinical Tree