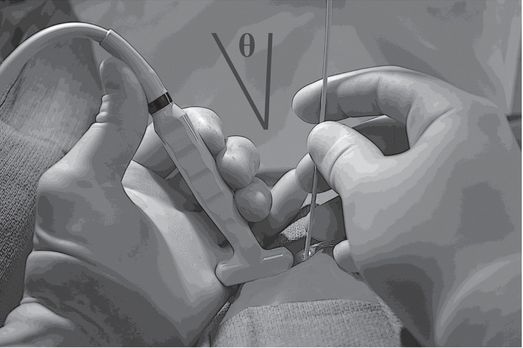
Resting some part of each hand against the body surface reduces fatigue and unwanted motion during ultrasound-guided needle access. Obtaining a wide angle (Θ) between the ultrasound transducer and the needle, by entering the skin some distance apart from the transducer, will significantly improve conspicuity of the needle.

The wide angle between the needle and the transducer and eccentric location of the lesion within the imaging field allows earlier and more conspicuous visualization of the needle shaft and tip in plane with the target lesion, increasing the opportunity for a successful outcome.
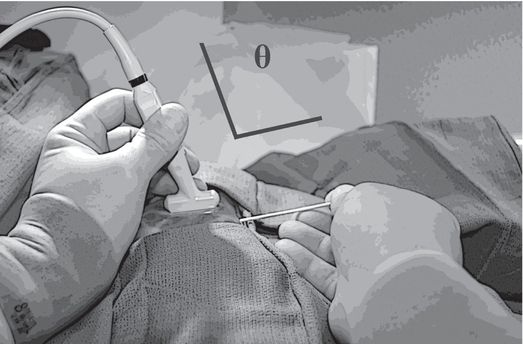
A narrow angle (Θ) between the needle and transducer, often created by moving the needle too close to the transducer, may severely impair visualization.

With an acute angle between the needle and the transducer, and with the target centered in the imaging field, the needle is visualized poorly and over only a short part of its path. Partial visualization of the needle shaft, motion artifact, and less careful management of the tip location contribute to a higher likelihood of adverse outcomes.
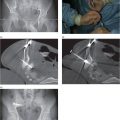
When operating at a curved body surface, a needle entry point well away from the transducer allows an optimal (parallel) relationship between the needle and the transducer face.

Achieving the ideal parallel relationship between the transducer face and the needle shaft optimizes conspicuity of the needle, including the tip (due to “comet-tail” or “ring-down” artifact) and the entire length of the shaft (with “reverberation artifact”). Again, locating the target eccentrically in the imaging field allows visualization of the greatest possible length of the needle, including tip and shaft, in plane with the target lesion.
Ideally, when scanning in long axis, the entire course of the needle, including its tip, and the target lesion should be seen in the imaging field throughout the procedure. A common source of difficulty in accomplishing this objective arises when the needle is located too close to the transducer, and at too acute an angle. Desirable specular reflections from the needle are maximized when the needle is parallel to the face of the transducer and perpendicular to the sound beam. This optimal geometry is difficult to accomplish in practice. Deviation of only 10 degrees from parallel with respect to the transducer face may be enough to impair visualization of the needle. This may require that the needle enter the skin 1–3 cm or more away from the edge of the transducer. Locate the target eccentrically or peripherally in the scanning field, so that the needle can be tracked throughout its entire course.
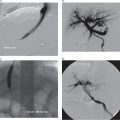
Although one may wish to scan periodically with color Doppler to identify and avoid vessels, it is best to turn color off or to narrow the color box to just show the relevant vascular structure at risk while advancing the needle in order to keep the screen refresh rate high enough to detect needle tip motion in a timely fashion (Figure 3.23f). Raise the focal zone toward the surface to visualize the needle entering the field. Advance slowly until the tip enters the target, moving the focal zone as necessary.
As much as possible, one should be able to visualize the needle shaft and tip in plane with the target. If at any time this is not what you see, stop. Look at your hands! (Unlike diagnostic US, the key to interventional US is relating physical space with the imaging space. Staring at the monitor while moving both the needle and the transducer is unlikely to accomplish this goal, while holding the transducer on target and looking at the relationship of the needle to the transducer may be the most efficient way to bring the needle tip and the target into simultaneous view.) With the transducer properly positioned adjust the angle of the needle until it is in plane with the sound beam (parallel to the long axis of the transducer face at its midpoint). If uncertainty persists after repeatedly trying to locate the needle tip, it may be better to withdraw and begin again.
If a lesion is located near a curved body surface (e.g., a focal renal lesion), it can be helpful to scan in long axis and position the long axis of the transducer and the needle entry site perpendicular to each other, ideally arranging the needle path as perpendicular to the sound beam as possible, even if this means that the needle enters the skin several centimeters from the transducer (Figure 1.1e,f). Such an arrangement can increase the conspicuity of the needle significantly.
Clinical practice development
Approach
There is no single right way to approach practice development. However, in over 30 years of being a pediatric interventionalist, my colleagues and I have found that certain approaches work better than others. Here are some of the lessons we have learned. There are three main keys to success: focusing on customer service, being willing to help without reservation, and being an expert.
If we look at critical aspects of the patient/family encounter we find it is important to develop a trusting relationship at the initial meeting. This is made easier when the practitioner presents a professional and positive attitude. Simple gestures that recognize the patient as a person are easy to overlook but have a profound effect on rapport. For example, we try to always introduce ourselves to the patient and the family. If the patient is old enough to understand what is going on, it is often good to talk first with the patient and address their concerns and questions and then talk with the parents. In all cases we give a sufficiently detailed outline of the procedure with a reasonable account of the alternatives, benefits, and risks so the patient and family can understand the implications and choices involved, and give an estimate of how long it will take so they can have realistic expectations about the scope and nature of the encounter. We let the patient and parents know what to expect after the procedure in terms of pain and any limitations that might be imposed, and when the patient will be able to eat again and return to baseline activities.
If there are delays before the procedure (for example, if prior cases are running longer than expected), our staff give a face-to-face explanation and update to help dissipate the heightened stress and frustration that can be magnified by uncertainty and a feeling of being “neglected.” During the procedure, especially if it is taking longer than predicted, it is very helpful to give the family updates. Finally, when the procedure is over it is important to give the family an overview of how the procedure went and to discuss any issues or problems. It is vital to developing an effective trust relationship that the patient and family are given ample time and encouragement to express concerns and to ask questions, from the initial consultation and consent discussion through to the recovery period and any follow-up visits. The referral service also needs to be informed, ideally personally via a phone call, of the outcome of the procedure and any issues or complications that may have arisen. The clinical team also needs to know what postprocedural needs the patient may have and what the plan for future follow-up or intervention may be.
The impact and importance of providing quality customer service is probably obvious to all of us, but somehow it is often difficult to accomplish. You certainly know good service when you see it! The essence of good customer service is to treat everyone – clinicians, patients, and families – as you would like to be treated. However, something crazy often happens when people become the service provider – they become less flexible, need to follow both real and imaginary rules, and come up with lots of excuses for not doing something. As one might guess, this approach does not usually get the customer response and positive feeling that is desired. Yet this is the “black hole” into which a service will inevitably be drawn without positive effort and energy. Avoiding this unfortunate state and making customer service a strong point of a practice are complex issues about which many books have been written.
In our experience, a simple and successful solution to this complex problem begins with the most effective, but at times painful, answer to the question, “Will you/can you do.…?”. Say: “Yes.” When the conversation begins with “No” it is very difficult to walk away with a satisfied customer. Ironically, we have all had these experiences on call when prolonged contentious discussions ultimately result in the requested case being performed anyway, but with both parties feeling very stressed and dissatisfied. As someone who has been in that situation more than once (or even one thousand times), “No” is seldom the right answer even when it seems to be the correct answer.
Saying “Yes” instantly changes the tenor of the discussion and makes you an ally of the person seeking your help. Saying “Yes” does not mean that you will do anything and everything asked of you but it does indicate your willingness to meet the other party halfway and to enter into an open discussion that hopefully ends with a mutually satisfying plan to care for the patient, which obviously is the real priority. When a requester hears “No” they tend to feel polarized and threatened with an inability to find a solution to their problem; they may escalate rhetoric and tension in a bid to avoid being abandoned. When the requester hears “Yes” they can relax and better hear recommendations about alternative solutions. Thus, saying “Yes” even to a request for help with a hopeless problem or a clearly contraindicated procedure can provide the support and shared responsibility the requester may need to accept and act appropriately on a difficult or challenging reality.
The medical expert engenders confidence in others and is able to solve a wide range of problems. Other professionals will seek out the expert to get their opinions on subjects within the expert’s scope of practice and will be open to the expert’s advice. In order to gain expert status it is essential for the interventional radiologist to be current in the field, attend and, if possible, participate in local, regional, and national meetings, maintain high professional standards, and expect and strive for excellent outcomes.
Seek out mentors and advisors. Very few who perform pediatric interventional procedures have the luxury of multiple colleagues within the same practice, and every pediatric interventionalist, from the most experienced to the most recently trained, benefits from sharing ideas, concerns, and outcomes with others who have overlapping interest, experience, and scope of practice. Early in your career this is essential in order to form foundational technical skills and problem-solving approaches to a variety of cases. It is also important to maintain relationships with mentors and colleagues with whom you can discuss challenging cases and problems throughout your career because all of us are continually learning. When we exchange ideas we challenge what we think we know. The excellent practitioner can learn from everyone, including practitioners outside of our field.
The interventional radiology team
One of the major keys to developing a successful pediatric interventional practice is building a strong interventional team. A typical pediatric interventional team consists of interventionalists, interventional radiology technologists, and pediatric radiology nurses. Each member brings a skill set that is additive and helps provide the highest level of care. Substitution for or omission of any one of these individuals can significantly impair the team’s effectiveness. The number of persons in each subgroup depends on many factors including the number of interventional suites that are in use per day, the number and type of cases performed, and the availability of adjunctive staff such as schedulers, aides, or others to answer phones and assist with other functions. With increasing volume, efficiencies improve significantly with at least two full-time equivalent pediatric interventionalists, nurses, and technologists.
The leader of the team is an interventional radiologist who is committed to the concept and ideal of pediatric interventional radiology. The team leader must have knowledge of pediatric conditions, diseases, and special needs, the technical training to deal with this diverse patient population, and the commitment to focus on the care of children. The pediatric interventional radiologist must also be able to develop a rapport with the pediatricians, pediatric surgeons, and pediatric subspecialists who will be referring patients to the interventional service. They must demonstrate a willingness to participate in a child’s care regardless of the type of procedure or level of difficulty that is required. A willingness to live in the pediatric world, to be responsive to pediatric problems and an investment in the “art of the possible” characterizes the practice leader likely to achieve success. The practitioner who works at the end of an “umbilical cord” from another practice environment, who is willing to do only what must be done, and who conceives of pediatric interventions as an imposition on other priority commitments, is not likely to inspire the interventional team or potential referring clinicians.
The interventional technologist also has a complex and challenging job. Their skills and enthusiasm make them an indispensable member of the team. In many practices, the lead technologist is responsible for workflow management, as well as purchasing and inventory control. The technologists are responsible for setting up instrument and supply trays, anticipating the technical needs of the case, and safely and effectively setting up the equipment. On many occasions, a technologist will be the first assistant during a procedure. We always have a technologist, together with a nurse, circulate in the room to supply equipment and technical support as needed. Compared to technologists in the adult interventional environment, the pediatric interventional technologist is often significantly more integrally involved in the performance of the procedure, rather than simply managing the related imaging and documentation. At the completion of the procedure the technologist will complete paperwork and label and submit images to the picture archiving and communication system (PACS) for review and interpretation.
Pediatric interventional nurses are the third vital part of an effective IR team. The interventional nurse must have advanced skills in pediatric patient care, usually with critical care experience such as in the intensive care unit, transport team, or emergency department, with skills and experience in the evaluation, assessment, and care of children with a wide variety of illnesses, acuities, and developmental levels. Unfortunately, in some places this type of pediatric nurse is left off the team or substituted for with a nurse trained in other areas of pediatrics, which can leave a significant deficit in team composition.
When familiar with the procedures, the IR nurse adds to the breadth and complexity of procedures that may be performed on a sedated or anesthetized child. The nurse working in the IR suites will meet the family, ready the child for the procedure, and discuss nursing issues relating to the forthcoming procedure to be performed. If a procedure is performed with the patient under sedation the nurse is responsible for administering the medication and monitoring the child’s vital signs. At the completion of the procedure, the nurse is responsible for coordinating the patient’s recovery, either until discharge to home or until transfer to a recovery facility (i.e., pediatric anesthesia care unit or intensive care unit) or to an acute care unit. If the child is to be discharged home, written instructions are given to the family and questions are answered by the nurse. The day after the procedure nurses make follow-up phone calls to check on the patient and make sure all questions are answered. In addition to these duties, the interventional nurse is often involved with the team making hospital rounds and seeing children in IR clinic. And finally, in our practice, in addition to nursing duties during cases, the nurse is responsible for same-day patient scheduling and daily case management. On its best day and in all but the quietest practices, interventional radiology is a study in controlled chaos. With all these responsibilities it is important that the interventional nurse be well trained, flexible, friendly, and fast.
Some practices also incorporate mid-level providers (i.e., nurse practitioners or physician assistants) who act as physician extenders and work within the scope of practice of the supervising physician to perform procedures, provide patient histories and physical examinations, participate in clinic visits, consultations, ward rounds, and patient and provider education. They can become the face of the practice to the patient and provider community, tying loose ends, improving communication and accessibility, and freeing the interventional radiologist to focus on “big picture” elements essential to the long-term success of the practice.
Facilities, equipment, and supplies
Another key to having an effective pediatric IR service is having the correct equipment and supplies to do a wide variety of cases. In pediatric IR this means making sure that you have wires, catheters, drains, etc., to use on patients of all sizes. Especially in infants and small children you just cannot “make do” with adult-sized materials. This section is included for someone interested in building a pediatric IR lab from the ground up. It is not intended to be a fully comprehensive list of every single item or piece of equipment you will ultimately use, but rather it is a basic list of materials and equipment that will allow you to start a program and be able to perform a wide variety of basic cases as well as a few of the more complex cases you will be asked to perform.
Angiography suite
Because the conventional access point for many angiographically guided interventions is the adult groin, the location of central and auxiliary components of these angiographic units is oriented to serving the needs of the operator at this location. Pediatric interventions tend to differ in a major way – they are far more often conducted at a location closer to the X-ray generator and detector, the more so the smaller the patient. The head of an adult patient may be under the detector during a neurologic intervention while the operator stands comfortably at the groin, 2 to 3 feet (0.6 to 0.9 meters) away from the detector, looking directly at the monitor, hands easily at the controls. The whole body of a pediatric patient may be under the detector while the operator stands as close to the patient as the pedestal and foot controls will allow, struggling to see the patient in the dark shadows under the detector while craning around the C-arm to see monitors that may not orient easily for viewing from this position, and out of immediate reach of controls. The images generated under such conditions may not reflect these challenges, but the ease and speed of the procedure, the safety of the patient and staff, and the fatigue of the operator may well reflect them. These are all items that should be considered when evaluating potential equipment (and when preparing for a given procedure).
There are different philosophies regarding what the minimal needs of an IR section are. In our view, in order to be able to do the broadest menu of cases it is best to begin with a biplane angiography suite. On the other hand, having only a high-quality single plane suite takes very few procedures off the table. The equipment should have all the modern technology to be able to perform digital subtraction angiography at low dose and do suitable postprocessing of images. A small focal spot (≤0.4 mm) and pediatric-specific presets are central to achieving optimal image quality while conserving total delivered dose of radiation (see “Radiation dose management” below). Rotational angiography is great if affordable and the service is substantial enough in size and complexity to justify the expense. If a second room is needed single plane suites will usually suffice.
Ultrasound
The majority of cases will involve a combination of US for guidance of needle placement followed by fluoroscopic monitoring of the remainder of the procedure. We have found it preferable to have a dedicated diagnostic quality US machine equipped with a full range of transducer sizes, types, and frequencies. An absolute must is a linear high-frequency transducer with a small footprint, which in our practice is our workhorse probe, especially for venous access. More portable notebooks and limited, miniature US machines may have a limited role and can be adequate for less demanding applications but do not have the penetrating power that high-quality machines possess. Although the features of a high-end machine are only intermittently required, it is impossible to predict which cases will not require them, so the lower quality machines have not proved adequate for a full service IR department in our experience.
Miscellaneous equipment
The suite must have a high-quality power injector that can accurately inject small volumes of contrast. Ideally the injector is linked digitally to filming.
Safety devices such as Velcro® straps (or “seat belts” in pediatric parlance) that can be cut to desired lengths are a must in order to secure the patient on the table. Also, we often use an Octostop® cradle to secure small infants (<10 kg) and facilitate positioning. This can sometimes reduce the need for sedation and can shorten procedure time, especially for feeding tube insertion and other minor procedures. Other safety devices for positioning patients include arm boards, sponges, gel rolls, and bolsters all in a variety of shapes and sizes.
Warming devices are a must to keep small children warm and dry in order to maintain their body temperature. These can include warming lights, warming blankets, and chemical warming pads. We prefer warm blown air. We use a Bair Hugger® that comes with a variety of sizes and shapes of air blankets, which can be placed under or over the patient depending on the needs of the case. We also find having a blanket warmer in the suite indispensible for patient comfort at both the beginning and end of cases.
Pulse Doppler is a sensor that we place over the dorsalis pedis or posterior tibialis pulse so that we can monitor the distal pulse while compressing the arterial puncture site after catheter/sheath removal.
Catheters, wires, and things
A basic, limited set of catheters will accommodate the vast majority of intravascular procedures (Table 1.1). To the extent possible all catheters should be in 3, 4, and 5 French sizes. Specialty catheters may be in selected sizes for specific uses. The core guide wires are 0.018-inch and 0.035-inch although 0.038-inch can be substituted. The length of the wire is also relevant. The 0.018-inch wires are maintained in 65, 100, and 150 cm when available. Table 1.1 reflects a core stock that we have found covers most situations. Additional equipment and supplies will depend upon the local mix of cases and operator preferences. Procedure-specific equipment and supplies accompany each procedure set throughout the text.
Catheters: Pigtail, JB-1, Harwood Nash or Weinberger (WNBG), C-1, Cobra, microcatheters (depending upon case types, from 3 French to 1.2 French tips)
Guide wires: Bentson, mandril, angled Glidewire®, Roadrunner®, Amplatz Stiff® and Superstiff®, Rosen, Newton
Specialty guide wires are not stocked in all sizes and lengths. These wires are primarily for microcatheters and are usually 0.014-inch although smaller gauge wires are stocked to match the microcatheters
Vascular (single-wall) puncture needles, micropuncture needles, angiocatheters from 24 to 18 gauge, Seldinger
Abscess drainage and large collection needle: Yueh 5 French sheathed needle
Drainage catheters: Towbin Duan 5 French pigtail, 6.3 French to 24 French locking pigtails
Biopsy needles:
Fine needle aspiration (FNA): 22-gauge or 18-gauge Chiba needles
Soft tissue core biopsy needles (18 gauge, 16 gauge): end-cutting automated, side-cutting semi-automated; with coaxial sets
Transjugular liver biopsy kit
Bone biopsy needles: Ackerman, Craig (can be used with a power drill), T-Lok, Jamshidi
Embolic materials:
Liquid agents: dehydrated alcohol, sodium tetradecyl sulfate, doxycycline, bleomycin, thrombin
Temporary particulate agents including Gelfoam® and Avitene®
Permanent agents: tissue adhesives and liquid embolics, e.g., Histoacryl® and Onyx®
Embospheres or PVA particles: 100 to 300, 300 to 500, 500 to 700, 700 to 900, and 900 to 1,200 micron particles
Coils:
– 0.018-inch: Hilal 0.5 cm, 1.0 cm straight plus complex shapes with 1 to 2 cm diameters
– A wide range of 0.035-inch coils in diameters from 3 mm to 12 mm and lengths to 15 cm
Vascular plugs
Feeding catheters:
Frederick–Miller nasogastric tube (8 French)
Primary gastrostomy tube for antegrade insertion
Button (low profile) gastrostomy and button gastrojejunostomy (balloon-tipped)
Balloon-tipped replacement gastrostomy (14 to 24 French) that can be converted to a gastrojejunostomy with the coaxial addition of a Frederick–Miller tube
Venous access:
PICC: 3 French single lumen, 4, 5 French single and double lumen, standard and antibiotic-impregnated
Cuffed central lines: 3 French single lumen, 4, 5 French single and double lumen, standard and antibiotic-impregnated
Temporary and apheresis catheters: 6 to 12 French
Hemodialysis catheters: 8 to 14.5 French; 15 to 27 cm
Patient preparation and safety
General principles
Most cases are performed with US guidance with confirmatory fluoroscopy and less frequently with CT guidance. Ultrasound generally allows for shorter and safer procedures. The ability to have continuous needle visualization almost certainly results in greater accuracy in needle tip positioning and a lower incidence of untoward effects. Computed tomography guidance, because of its large radiation dose, is reserved for only those cases in which US guidance is not possible. The result of the improvement in techniques, image guidance for procedures and new and improved materials is an increasing total number of minimally invasive procedures, many of which are being performed safely and effectively on an outpatient basis, e.g., feeding procedures, biopsy, vascular access, angiography, sclerotherapy, arthrography, and lumbar punctures.
It is important that the IR suite is treated like an operating room and strict sterile technique and adherence to universal precautions is maintained. In our practice IR suite entry is restricted. All personnel entering the IR suite must wear hospital scrubs, surgical hats, and masks. Those performing the procedure, including the interventionalist and any assistants, must wear sterile gowns and gloves.
Patient preparation
Informed consent
For interventional procedures, informed consent is necessary prior to elective and urgent cases, and where possible for emergency cases as well. Policies regarding emergency procedures when consent cannot be obtained vary from hospital to hospital, and usually involve attestation in the medical record from clinicians not performing the procedure that the procedure is critical to the welfare of the patient and that delay to obtain consent would pose an unacceptable risk.
The basic elements of informed consent include a description of the planned procedure, expected benefits, known significant risks, and available alternatives, ideally presented in a language and form that the consenter can adequately understand. It is useful to record these elements in the medical record. Consent is obtained from the patient when they are 18 years of age (or of majority) or are an emancipated minor. However, for the majority of pediatric patients informed consent is obtained from the parent or legal guardian, who must be present or at least available by phone. When appropriate, assent is obtained from the minor patient. If the child is a ward of the state consent issues should be addressed early since it can take hours to days to get consent from the appropriate state-appointed official.
NPO status
Patients scheduled for an interventional procedure are fasted according to hospital policies regarding sedation and anesthesia. In our practice, patients are kept NPO for six to eight hours for formula or solids, four hours for breast milk, and two hours for clear liquids. Emergency cases may require deviations from these guidelines, which must be considered on a case-by-case basis. If proper fasting cannot be assured, procedural sedation may not be appropriate. All patients that require sedation or anesthesia should have adequate intravenous access. In order that patients fasting for a procedure do not become dehydrated, especially neonates, infants, and young children, orders for maintenance intravenous fluids should be part of routine preprocedure orders. This is especially important for patients who will be receiving intravascular contrast during the procedure. Good communication with the referring service will help identify those patients with specific fluid restrictions or requirements.
Preprocedure medications
Children who are on anticoagulation have these medications held. Typically we withhold enoxaparin (Lovenox®) for 24 hours, which usually amounts to the doses the night before and the morning of the procedure. Heparin needs to be withheld for two to four hours. Warfarin may need to be withheld for one to several days depending upon the specific regimen. If non-steroidal anti-inflammatory agents are to be withheld (usually only for high-risk elective procedures), at least a week is required to replace affected platelets. There are certain patients in whom cessation of anticoagulation may not be safe, and in those cases a decision about whether to move forward with the procedure is made after consultation with the referring service. Non-steroidal anti-inflammatory agents, reversible platelet inhibitors, may need to be withheld for only 24 hours.
All necessary medications (usually anti-seizure medications) that cannot be given intravenously (IV) should be taken the morning of the procedure with small sips of water, at least two hours before the procedure. The insulin dose in diabetic patients may be cut in half on the morning of a procedure for the fasting patient, although appropriate endocrinologic consultation will provide more specific guidance.
Laboratory studies
Routine laboratory tests are seldom required prior to most procedures unless there is a known or suspected bleeding diathesis, a significant possibility of postprocedural bleeding related to the type of procedure being performed (e.g., pancreatic biopsy), or there is a pertinent medical condition. In such cases, a CBC, platelet count, PT, PTT, and INR are the baseline studies usually obtained. There is generally a poor correlation between abnormalities in the coagulation profile or platelet counts and procedure-related bleeding complications. Not all laboratory abnormalities of coagulation are associated with increased risk of a significant bleeding complication. However, there have been no prospective studies on the predictive value of coagulation parameters in pediatric patients undergoing image-guided procedures. Medical history appears to be the most important factor in predicting the risk of bleeding complications in patients undergoing percutaneous procedures. For example, patients with a history of malignancy or bone marrow transplantation are at a five-fold greater risk of hemorrhagic complications following liver biopsy, regardless of preprocedure coagulation parameters, number of passes, needle size, or operator experience. No matter what the numbers, a sick child or one with a history of bleeding problems should be treated with great caution.
Platelet dysfunction can be congenital or acquired, qualitative or quantitative. Acquired conditions such as liver disease, renal failure (uremia), and aspirin administration cause a qualitative defect whereas a consumptive coagulopathy results in a quantitative defect. For qualitative platelet dysfunction, alternatives include desmopressin (DDAVP), platelet transfusion, or cryoprecipitate administration. Extrinsic pathway abnormalities, signaled by a prolonged PT or an elevated INR, are seen most often with warfarin administration, nutritional (vitamin K) deficiency, and disseminated intravascular coagulopathy. In the face of an elevated INR, in addition to holding warfarin (or replacing with heparin), vitamin K or fresh frozen plasma may be indicated. Intrinsic pathway abnormalities, with prolonged PTT, most often result from treatment with heparin or enoxaparin. In addition to holding heparin, fresh frozen plasma may be helpful. Specific circumstances may require factor replacement or other specialized interventions to correct the abnormal value. In all cases, agents such as platelets and fresh frozen plasma that achieve peak blood levels at the time they are infused should be administered as close to the time of the procedure as possible for maximum effect. Close consultation with the referring clinical service and with a hematologist in such situations is essential.
Policies regarding pregnancy testing before imaging and interventional procedures vary from hospital to hospital. In general, every female patient capable of conception should have affirmative evaluation (β-HCG testing) before exposure to ionizing radiation or to an invasive procedure.
Related posts:
Stay updated, free articles. Join our Telegram channel

Full access? Get Clinical Tree


