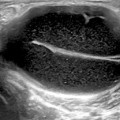
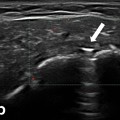
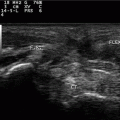
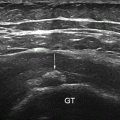
Fig. 14.1
After ultrasound lesion depiction, the skin is marked at the probe ends and center. The needle is penetrating perpendicular to the skin in the center of the target lesion skin projection
The direct MSUS-guided technique is a superior approach as it offers a real time and continuous visual monitoring of the needle penetration and advancement, through every tissue layer, till the targeted area. Needle-guiding devices attached to the probe may help in achieving a maximum precision for hitting the target structure, but the predefined direction of the needle must be kept throughout the entire procedure. In contrast to this, “free-hand” technique, direct MSUS-guided technique is highly flexible, giving the facility of various needle insertion positions. Table 14.1 shows the main advantages and disadvantages of the two techniques .
Table 14.1
MSUS needle-guiding methods. Advantages and disadvantages of direct “free-hand” and “device-guided” needle techniques
Method | Advantages | Disadvantages |
|---|---|---|
Free hand | Very good needle visualization | Difficulties in keeping the needle and lesion in the same plane |
Needle penetrates skin at distance from the probe (not necessary to sterilize the probe) | ||
Flexibility in probe/ needle movements (allows needle reorientation) | Needs more training and longer learning curve | |
Reduced cost | ||
Guiding device | Different types, reasonable cost | Difficulties in needle manipulation |
Needle direction preselection is possible | Needle penetrates close to the probe; needs sterile probe cover and sterile gel | |
High precision in hitting the target | Higher costs (probe, guiding device, sterile equipment, more personnel) | |
Needs less training |
Similar to any other conventional therapeutic procedure, MSUS-guided approach has its pros and cons (Table 14.2). Possible untoward side effects linked to local drug deposition or postinterventional complications are summarized in Table 14.3 [24, 25].
Table 14.2
Indications and contraindications in MSUS-guided interventional maneuvers
Indications |
For diagnosis: Arthrocentesis (extended to tendon sheaths, bursae) and biopsy |
For therapy: Decompression (effusion under pressure, hematoma, abscess) Medication (corticosteroids, viscosupplementation, radioactive substance, etc.), lavage |
Contraindications |
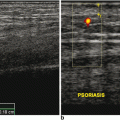
Relative, temporary: Infection, wounds, psoriasis, skin vasculitis (large areas)!! advantage in using nonconventional puncture areas under MSUS guidance Anticoagulant drugs: INR > 3.5 in the last 72 h; attention to combination with NSAIDs Hemophilia: when factor VIII, IX is < 20 % Diabetes mellitus, high blood pressure, glaucoma |
Allergy to medication or drug composition |
Table 14.3
Potential side effects, postinterventional course recommendations
Side effects/complications |
Increase of local pain: secondary to traumatic act (needle insertion), microcrystalline synovitis induced by CS, irritation produced by viscosupplementation drugs |
Facial, chest rash |
Local skin depigmentation |
Local skin atrophy |
Severe infections: iatrogenic (antiseptic rules), sepsis in the layers the needle penetration takes place |
Tendon rupture, necrotizing fasciitis (intra-tendon/ fascia injection) |
High blood pressure, high glycemia |
Postinterventional course |
No need for bed rest |
Current treatment with anticoagulant drugs—reduction of walking effort some days |
General rules must be constantly applied when any of these intervention techniques is considered. Agreed protocols should be adopted. Table 14.4 entails some of the basic steps.
Table 14.4
General conditions for performing MSUS-guided invasive interventions
1. | Re-examination of the region is mandatory for decision reconfirmation, optimizing patient and doctor position |
2. | The patient must be informed regarding the necessity of the chosen invasive method; the informed consent must be signed |
3. | The performing physician must collect information regarding coagulopathies, hemorrhagic accidents in the past, INR value, number of thrombocytes, allergies, intolerance to some drugs |
4. | Easy access to emergency equipment; intravenous branula for selected cases |
5. | Disinfection of anatomic area/ probe—simple/ complex |
6. | Protection measures for the doctor—sterile/nonsterile gloves, mask/more complex equipment |
7. | Local anesthetic—lidocaine 1 %, bupivacaine, etc. are used in biopsies, percutaneous drainage, sedation |
8. | Avoid vagal reactions—manipulate needles outside the patients visual field |
9. | Needle type selection—length, caliber |
10. | Postinterventional—in outpatient clinic—patient must report the occurrence of fever/persistence > 48–72 h; hospital surveillance for those with complex interventional maneuvers, drainage catheter |
Free-Hand Direct MSUS-Guided Interventional Maneuvers
Apart from its flexibility in choosing the site of needle penetration, distance in relation to the probe varies from minimum 0.5 cm for small areas up to 2–3 cm for bigger areas). Needle angulation to the ultrasound (US) beam (90–45°) can be adapted according to the anatomic region and targeted structure. If necessary, needle re-direction can be considered at any moment and depth, subject to local factors.
The needle visualization inside a body tissue or fluid is possible due to its physical characteristics (metal, hyper-reflectogen, glittering hyperechogen structure); however, this is also subject to its positioning inside the US beam. Higher caliber needles are better visualized in comparison to thin ones. The use of needle-guiding systems attached to the probe allows a perfect needle penetration, perpendicular to the US beam and parallel to the transducers margins, with optimal needle visualization. Though “free-hand” technique needle visualization may be less accurate, it is good enough for identifying the needle tip and the penetration of soft tissue layers (Figs. 14.2 and 14.3).
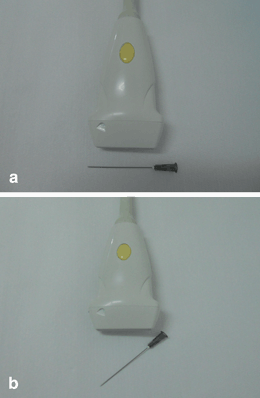
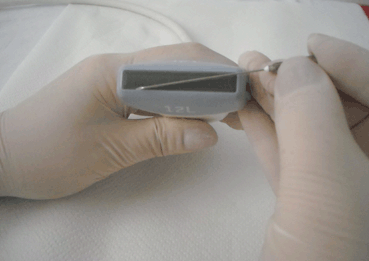

Fig. 14.2
When needle is placed at angulation of 90° and perpendicular to the ultrasound (US) beam, optimal visualization is achieved (hyperechoic, continuous line). When needle is placed at angulation between 45° and 90°, visualization is possible (hyperechoic, discontinuous line)

Fig. 14.3
When needle is placed at angulation of 90° and oblique to the ultrasound (US) beam, visualization is possible (hyperechoic, discontinuous line)
Skin and Probe Disinfection
Skin and probe preparation protocols may vary from simple protocols set according to local rheumatology settings regulations and/or personal experience up to complex rules (use of sterile probe envelope, sterile gel, sterile cleaning solutions, alcoholic solutions, surgical drapes, etc.) [9, 26, 27] .
In our experience, there is no need for using sterile probe envelope or sterile gel. Rigorous, dry cleaning of the probe prior to each interventional maneuvers accompanied by rigorous skin disinfection (similar to conventional blind injections) with bethadine should be enough if the security distance between the probe and puncture site is respected. This simplifies the entire technique and reduces substantially the costs. A recent study showed that adopting these simple rules ensured a very good safety profile and satisfactory outcomes [14].
Alcoholic cleaning solutions, if used for probe cleaning, must be applied strictly to the plastic cover and not on the footprint, in order to avoid its damage [28]. The use of bethadine solution for skin disinfection has some further advantages. In addition to the fact that bethadine is less irritating to the skin in comparison to alcoholic disinfection swaps, its brown color will highlight the disinfected area, hence it will be easier to trace the probe position.
Puncture Preparation
For puncture preparation, a small quantity of nonsterile gel will be applied on the footprint in order to avoid the overflow of excessive gel to the puncture site and compromise the sterile maneuvers status (Fig. 14.4).
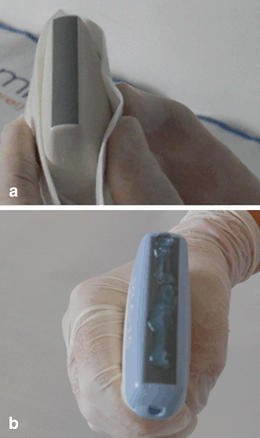

Fig. 14.4
a Dry cleaning of the transducer. b A small amount of gel is placed strictly on the footprint
Multiplanar scanning technique allows the optimal identification of the targeted lesion. Afterwards, the best scanning position for a lesion exposure will be memorized. For beginners, it is helpful to mark the transducer’s footprint position by using a permanent marker. After final probe positioning, the needle will be inserted. There are two modalities for insertion: “in plane”—the needle will enter the tissues parallel to the long transducer axes and the whole needle length will be visualized or “out of plane”—the needle will enter perpendicular or oblique to the short axes and it will be visualized as a hyperechoic dot or it will be partially detected (only the portion inside the US beam will be identified; Figs. 14.5 and 14.6). Once the needle insertion is finalized, minimal sliding or tilting maneuvers to adjust the probe position is allowed for optimal image acquisition.
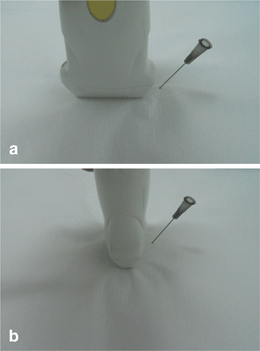
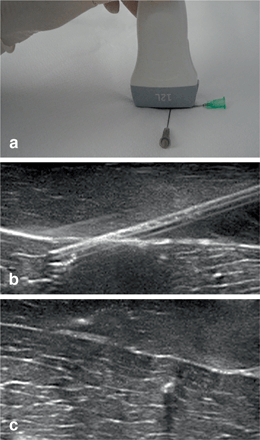

Fig. 14.5
a “In-plane” needle insertion. b “Out-of-plane” needle insertion

Fig. 14.6
a “In-plane” and “out-of-plane” needle insertion. b “In-plane” technique—detection of the needle as a hyperechoic line generating reverberation artifact. c “Out-of-plane” technique—detection of the needle as hyperechoic dot generating acoustic shadow
Though in MSUS, there are usually good ultrasonographic windows for almost all anatomic regions, there are still some limitations, in particular for accurate deep structures imaging, caused by artifacts such as osteophytes, bony fragments, calcifications, or due to the presence of air.
Basic Rules for Joint, Tendon Sheath, Cysts, and Bursa Puncture
In standard rheumatology practice, MSUS-guided procedures usually include joints, tendon sheaths, cysts, or bursae aspiration/injections. In general, for optimal needle and target visualization, “in-plane” insertion is usually the recommended approach, if possible.
The joint is a triangular cavity delineated by two bones and capsule. The needle penetration in a joint cavity can be made in a longitudinal or transversal approach (Fig. 14.7). On the other hand, the tendon sheath injection approach varies subject to the anatomical region as well as the operator preferences. The puncture can be carried out by using a transversal/longitudinal scanning view, with “in-plane” needle insertion (Fig. 14.8). For cysts and bursae, it is left open for the performing physician to choose the most convenient scanning view, preferably adopting the “in-plane” needle insertion. Optimal needle angulation in relation to the US beam should be 90° for superficial structures and can vary between 90° and 45° for more profound structures. Beyond this angulation limit, there would be difficulty in detecting the needle. When using a 4–5-cm-long probe footprint for visualizing small structures, we recommend the target lesion to be displayed on the right side of the monitor for right-handed operators and on the left side of the screen for left-handed operators. In this way, we shorten the distance from the skin penetration area to the target lesion, offering the possibility for using shorter, thinner, and less traumatic needles (Fig. 14.9).
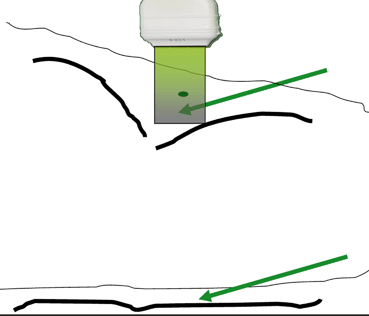
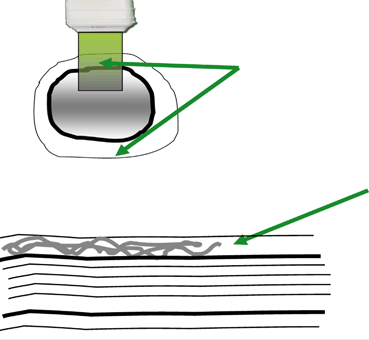
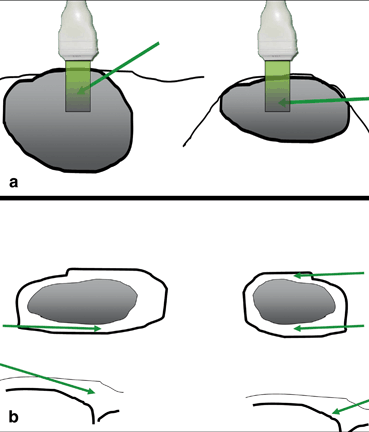

Fig. 14.7
Schematic joint representation (longitudinal, upper part of the figure)—triangular space delineated by two bones (black thick lines) and capsule (thin black line). Arrow—needle penetration “in-plane” approach, dot—needle visualization—“out-of-plane” approach. Joint representation (transversal, lower part of the figure)—the joint space is delineated by one of the bones cortex (thick black line) and capsule (thin black line). Arrow—needle penetration “in-plane” approach

Fig. 14.8
Schematic tendon representation (transversal view, upper part of the figure)—“in-plane” needle (arrow) penetration inside the tendon sheath. Tendon representation (longitudinal view, lower part of the figure)—“In-plane” needle (arrow) penetration inside the tendon sheath and drug deposition (gray lines)

Fig. 14.9
a Schematic cyst representation. “In-plane” needle approach—right side— a superficial structure and needle can penetrate with angulation of 90°, left side— a deeper structure and needle is penetrating with angulation < 90°. b Schematic representation of the target structure on the monitor for right-handed (structure is displaced at the right side of the screen) and left-handed (structure is displaced at the left side of the screen) performing physicians
Needles caliber must be adapted to the desired procedure. It is recommended to use 16–21 gauge needles for aspiration and viscoelastic drug injection and thinner needles (22–24 gauge) for other medications like CS, anesthetic drug, etc. For profound areas like hip or glenohumeral joint, we recommend the spinal puncture needles.
Applications for Anatomic Regions
This section focuses on different types of interventional approaches, in different anatomic areas, using the most suitable and simple technique, designed for one performing doctor, and considering the most important pathologies encountered in clinical practice.
Shoulder Region
Several target areas are identified in the shoulder region: the glenohumeral and acromioclavicular joints, the subacromial–subdeltoid bursa, the long head of the biceps brachialis (BB) tendon, intratendinous calcifications.
Glenohumeral Joint
MSUS-guided interventional maneuvers for the glenohumeral joint are a treatment option in case of synovitis (RA, SpA, septic arthritis, microcrystalline arthritis, trauma), OA (viscous lubricating drugs), adhesive capsulitis (repeated capsule distension procedures) and a method for contrast agent injection (magnetic resonance imaging (MRI) arthrography). With visual assistance, contrast agent and other drug deposition reaches an accuracy of 94–100 % in comparison to classic anatomic landmark injections where accuracy is estimated at about 50 % [14, 29–32].
There are three different joint approaches: posterior, anterior, and axillary. As far as the axillary recess, despite being a sensitive location for joint pathology detection, it is less commonly used, as the reduction of the joint range of motion is considered a serious impediment for achieving a comfortable examination position for the patient. Similarly, and despite its high accuracy, a major limitation for the anterior joint approach is the multiple neurovascular structures located in the joint proximity [24, 33]. Therefore, the posterior joint approach is considered the preferred option for several reasons including: sensitivity of pathology detection, comfortable patient’s and performing physician’s position, and preparations away from the patient’s visual field.
Pathologically, glenohumeral synovitis is best detectable with MSUS at the posterior and axillary recess level. Also, the migration of intra-articular effusion can be identified around the long head of the BB tendon. During the shoulder external rotation maneuvers, exposure of a small quantity of effusion/synovial hypertrophy (not visible in neutral arm position) can be seen inside the posterior joint recess [33].
Injection Technique and Positioning
It is recommended to start the procedure by positioning the patient seated on a chair or supine on the contralateral side. The performing physician will approach the joint from the posterior aspect placing the probe parallel to the infraspinatus muscle fibers at the tendeno-muscular junction. The posterior recess is identified profound to infraspinatus muscle, in the labrum proximity. The needle will penetrate the skin at an approximately 2-cm distance, in plane, with an angulation of 45°, aiming at the superior margin of the labrum. In this way, the interaction with neurovascular structures (suprascapular nerve, circumflex artery) can be avoided and undesirable accidents eliminated. The penetration of the joint capsule is noticed as an obstacle and the puncture may be realized in particular in chronic inflammatory processes associated with higher capsule thickness and fibrotic changes. When final needle position is reached, arthrocentesis and/ or drug injection can be made. No resistance should be encountered while injecting, when the needle is properly positioned in the joint (Fig. 14.10).
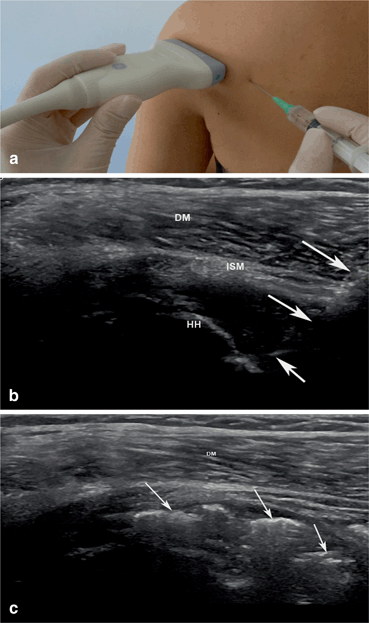

Fig. 14.10
a Patient and probe positioning for glenohumeral joint injection, “free-hand technique.” b Needle (arrows) is penetrating with angulation of 45° inside the distended posterior glenohumeral recess. DM deltoid muscle, HH humeral head, ISM infraspinatus muscle. c Corticosteroid deposition (arrows, hyperechoic mass moving antigravitational generating acoustic shadow) inside the posterior glenohumeral recess
Acromioclavicular Joint
The posterio-superior, “out-of-plane” approach is usually the preferred approach when injecting the acromioclavicular joint. The patient is sitting on a chair with the performing physician standing behind the patient (Fig. 14.11). After proper skin and transducer disinfection, the probe will be positioned with one end on the clavicle and with the other on the acromion. The needle penetrates the skin approximately at a 1–2-cm distance from the probe having the angulation of 90°, entering below the acromioclavicular ligament [34].
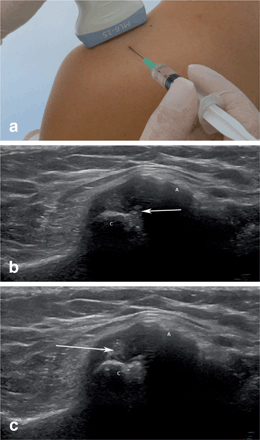

Fig. 14.11
a Patient and probe position for acromioclavicular joint injection, “free-hand technique,” longitudinal approach, “out of plane” needle penetration. b Needle is depicted as a hyperechoic dot (arrow) inside the joint space, C clavicle, A acromion. c Hyperechoic mass (corticosteroid deposition, arrow) inside the acromioclavicular joint space distending the capsule
The Subacromio-Subdeltoid Bursa
It is located deeper to the deltoid muscle and its approach can be easily made . Subacromio-subdeltoid bursitis usually occurs in association with other inflammatory, degenerative, or traumatic rotator cuff pathologies. Alone or in combination with tendon pathology, it represents a frequent cause of shoulder pain. The aspiration of the bursal content represents an important emergency maneuvers leading to rapid therapeutic decompression as well as a diagnostic procedure (inflammatory, septic, hemorrhagic content, laboratory analysis—cytology, crystals, etc.) and can be done immediately after clinical examination and MSUS evaluation. The bursal content can be effusion, synovial hypertrophy or both, blood, etc. The MSUS-guided puncture accuracy is superior to the blind method in case of mixed or parenchymatous bursal content. Furthermore, the precise bursal CS injection can be carried safely avoiding rotator cuff tendon penetration or systemic intradeltoid CS administration [35–37] and subsequent better outcome is expected [38, 39]. In the last years, several attempts injecting intra-articular viscoelastic drug therapy showed some promising results [40].
Injection Technique and Positioning
Skin and probe disinfection is made according to previous described technique. If possible, needle penetration will be “in plane” with angulation of 90°. In some cases of obese or very muscular subjects, it is necessary to angulate the needle more (60°–45°). After skin, subcutaneous tissue and deltoid muscle penetration, the needle tip reaches the bursa ( Fig. 14.12). Real-time aspiration and/ or drug injection can be rapidly carried out and drug deposition and dispersion can be checked immediately after finalizing the invasive maneuver .
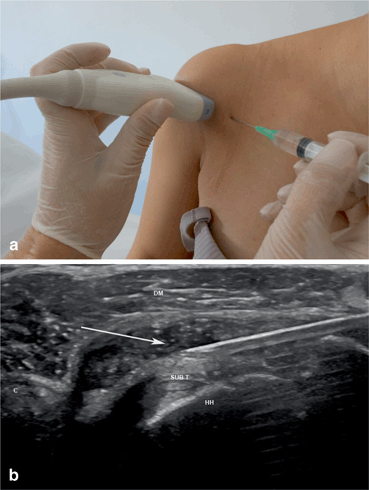

Fig. 14.12
a Patient and probe position for subacromio-subdeltoid bursitis, anterior approach. b Corticosteroid drug deposition (arrow) inside the subacromio-subdeltoid bursa, C coracoid bone, HH humeral head, SUB T subscapularis muscle tendon, DM deltoid muscle. The needle is depicted as a hyperechoic line creating reverberation artifact
BB Tenosynovitis
In case of true BB tenosynovitis or glenohumeral arthritis with BB tendon sheath effusion, anterior “in-plane” approach using a transversal scanning view is recommended (Fig. 14.13).
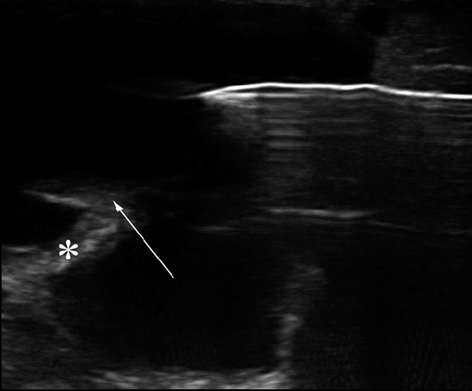

Fig. 14.13
Biceps brachial tenosynovitis. “In-plane,” transversal scanning approach. Arrow biceps tendon, * mesotendon
The Elbow
Elbow Joint
Elbow synovitis (humero-radial and humero-ulnar joints) may occur in several pathologies like RA, SpA, gout, septic, or traumatic circumstances. These joints can be approached either from the anterior or posterior aspect. In case of anterior approach, the patient can be seated or laid down on the bed with the elbow in maximal extension position. Preinterventional anterior joint aspect scanning will identify the neurovascular structures (median nerve and brachial artery, radial nerve and radial artery) and the distal BB tendon, structures that must be avoided while injecting.
Injection Technique and Positioning
After skin and probe disinfection, the transducer will be placed in transversal scanning position and the needle will be inserted “in plane” at a 1–2.5-cm distance from the probe margin, with an angulation of 45°. The needle will penetrate the skin, subcutaneous tissue, the brachioradial muscle (located lateral and superficial to the brachial muscle) or the pronator muscle (located medial and superficial to the brachial muscle), depending on the puncture side, the brachial muscle, and lastly the joint capsule. The capsule penetration will generate a degree of resistance depending on its thickness and fibrotic changes. The needle tip will be visualized afterwards inside the articular space and aspiration and/or drug administration can be carried out under continuous visual control. The drug will be identified as a hyperechoic mass with antigravitational movement accompanied by capsule distension (Fig. 14.14). There are some limitations of the technique in cases of the reduction of the elbow extension due to chronic inflammatory pathology.
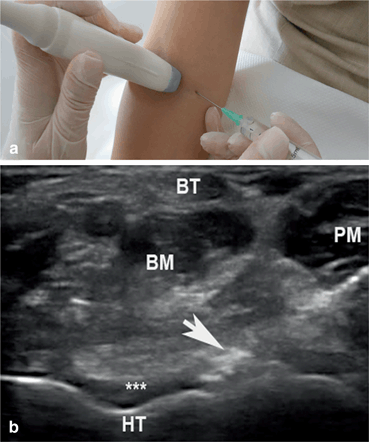

Fig. 14.14
a Patient and probe position for elbow joint puncture, “in-plane,” transversal scanning, anterior approach. b Transversal scanning of the elbow joint—the needle tip is depicted inside the joint. HT humeral trochlea, BM brachial muscle, PM pronator muscle, BT biceps tendon, ** joint space, arrow needle
The posterior approach is the preferred due to a more comfortable position for both patient and physician and because of the lack of important neurovascular structures in the proximity, except the ulnar nerve. Its position in the proximal cubital channel must be checked before invasive maneuver commencement. The patient is seated, positioned for posterior elbow compartment scanning (Fig. 14.15). After olecranon recess visualization (transversal view), needle insertion is made profound to the triceps muscle tendon, angulation of 90°.
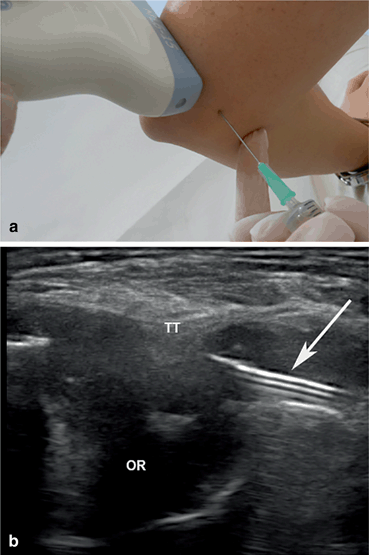

Fig. 14.15
a Patient and probe position for elbow joint punction, “in-plane,” transversal scanning, posterior approach. b Transversal scanning of the elbow joint, posterior recess—the needle is depicted inside the joint (arrow) below the triceps muscle tendon (TT), OR olecranon recess
Olecranon Bursa
Pathological inflammatory/hemorrhagic affection of the olecranon bursa is a relatively common finding in patients with gout, RA, spondylarthritis or septic/traumatic conditions . The bursal puncture is easy to be performed because of its superficial location. The blind puncture is highly successful but in cases with synovial hypertrophy or blood clots, guided puncture is much more precise (Fig. 14.16). There is total freedom in needle insertion position “in and out of plane” which, in this case, depends more on the physician’s comfortable position. After bursal content aspiration, in selected cases, CS deposition can be immediately made through the same needle [36, 41] .
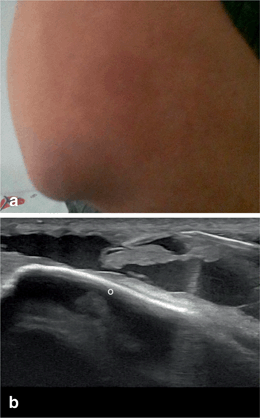

Fig. 14.16
a Olecranon bursitis in a patient with gout. b Posterior aspect of the elbow, O olecranon. The needle is identified inside the distended olecranon bursa
Lateral and Medial Enthesopathy
Lateral and medial enthesopathy is a common pathology, frequently seen in clinical practice. Several invasive techniques have been described tailored to the underlying pathology. The first treatment option is to deposit the CS outside the enthesis, at the level of the interface with the subcutaneous tissue. In this approach, enthesis needle injury and intratendinous drug injection are avoided (Fig. 14.17). The second option is the intralesional drug deposition. This technique is more specific for sport medicine injuries and uses viscoelastic drugs. A third option refers to the dry needling technique with repetitive intralesional needle insertion which helps in stimulation of neovascularization and acceleration of the reparative process [42–44].
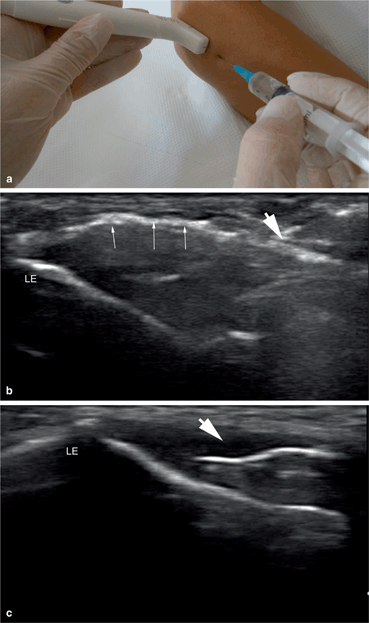

Fig. 14.17
a Patient and transducer position—longitudinal scanning of the common extensor tendons at the level of the lateral epicondyle. b Longitudinal scanning of the common extensor tendons; LE lateral epicondyle, needle penetrating with angulation of 45° (arrow head), corticosteroid drug deposition at the interface between the common enthesis and subcutaneous tissue (small arrows). c Hyaluronic acid drug deposition inside the enthesis lesion (arrow head), LE lateral epicondyle
Injection Technique and Positioning
The patient is sitting with the forearms placed on a table or pillow, in pronation (for lateral common extensor tendons enthesis) or supination position (for medial common flexor tendons enthesis). The enthesis is identified in a longitudinal or transversal approach and a short needle is inserted at a 0.5–1-cm distance with an angulation of 45° close to the interface with the subcutaneous tissue or at intralesional level as previously described (when hockey stick probe is used, needle angulation can be kept at 90°). Drug injection is made under continuous real-time visual control.
Wrist and Hand Region
Wrist and hand joints as well as periarticular structures may sustain inflammatory and/or degenerative lesions in several pathologic conditions as RA, SpA, microcrystalline arthropathies, OA or secondary to mechanical/ traumatic strain, etc.
Injection Technique and Positioning
Interventional maneuvers in the wrist region require the following position: the patient sitting on a chair, facing the performing physician, with the hands on a table, in neutral position.
Radiocarpal, Intercarpal Joints
For radio-carpal joint interventions, the most convenient approach is in transversal dorsal scanning position, distal to Lister’s tubercle. After region and probe disinfection, the needle penetrates at a distance of 0.5–1 cm from the probe margin, with an angulation of 60–45°. After capsule puncture, aspiration and/or drug deposition can be safely made under continuous visual control. The accuracy rate in injecting this area is high (93.5 %). The intra-articular drug is further seen as a hyperechoic cloudy mass moving antigravitational in the capsule proximity (Fig. 14.18). For the intercarpal joints, we recommend the scafo-lunate approach. The technique is similar with that described earlier, with the position of the probe more distally [44–47].
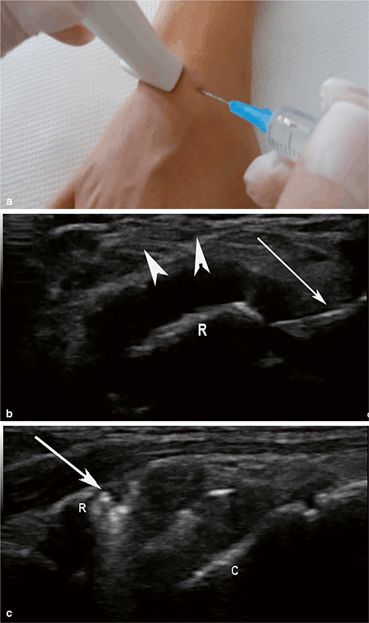

Fig. 14.18
a Patient and transducer position—transversal scanning of the radio-carpal joint. b Transversal scanning of the radio-carpal joint; R radius, capsular distension (arrow heads), needle (arrow). c Postprocedural longitudinal scanning of the radio-carpal joint; R radius, C carpal bone, corticosteroid drug deposition is identified intra-articular (arrow)
MCP, PIP, and DIP Joints
Metacarpophalangeal (MCP), proximal interphalangeal (PIP), and distal interphalangeal (DIP) joints are injected more easily in a longitudinal approach. In order to avoid tendon perforation, an “out-of-plane” needle insertion is recommended (Fig. 14.19).
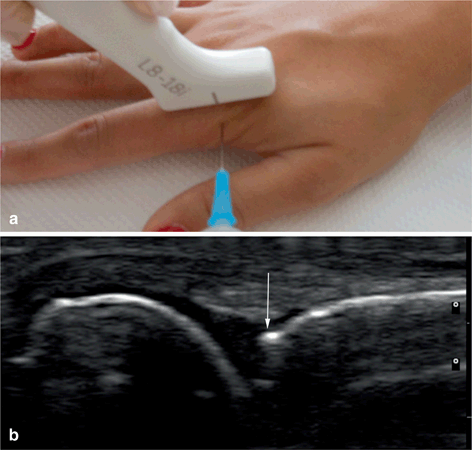

Fig. 14.19
a Patient and transducer position for MCP joint injection—longitudinal joint scanning and “out-of-plane” needle penetration. b Longitudinal scanning of the second MCP joint; the needle is visualized as a hyperechoic dot inside the joint (arrow). MCP metacarpophalangeal
Wrist and Hand Tendons
Tenosynovitis is another good example for MSUS-guided injections with high accuracy of drug deposition in comparison to the blind technique [48–50]. Wrist and hand tendons are superficial structures and therefore can be approached easily. Medication deposition inside the tendons sheath follows the same technique. The tendons’ scanning and injecting position depends strictly on the performing physician’s choice and can be done in transversal or longitudinal view. The “in-plane” approach is usually advised as it offers continuous real-time visualization of the needle tip penetration. At wrist level, pathology can be encountered on either dorsal (extensor compartments I–VI) or volar aspects (carpal tunnel tendons—digit flexors I–V, flexor carpi radialis, flexor carpi ulnaris). At the digits level, the inflammatory changes presents usually on the volar side (superficial and profound flexor tendons) [51]. For digits, needles are preferred to be shorter and thinner.
Injection Technique and Positioning
The hands will be placed in a comfortable, neutral position, on a table according to the area of interest (Figs. 14.20 and 14.21). Immediately after drug deposition, it is possible to scan again the target region and check if the procedure was properly done. At carpal tunnel level, CS deposition will be made in the proximity of the median nerve or, in case of flexor tendons tenosynovitis, anywhere inside the carpal tunnel. The needle will penetrate the disinfected skin at a 0.5–1-cm distance, angulation of 60–45°, avoiding neurovascular or tendon structures, reaching the target area (Fig. 14.22), [52, 53].
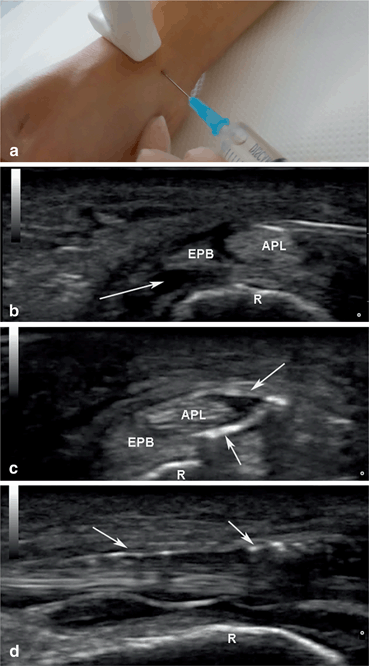


Fig. 14.20
a Patient and transducer position for extensors compartment I injection at the wrist level. b Transversal scanning at the level of the first extensors compartment (APL abductor pollicis longus, EPB extensor pollicis brevis), hypoechoic material distending the tendons sheath (arrow), R radius; the needle is identified as a hyperechoic line inside the tendons sheath. c Postprocedural corticosteroid drug deposition inside the tendons sheath (transversal scanning, arrows). d Postprocedural corticosteroid drug deposition inside the tendons sheath (longitudinal scanning, arrows)
Stay updated, free articles. Join our Telegram channel

Full access? Get Clinical Tree


